Pressure Cooker Mongolian Beef

Another recipe for my Instant Pot.

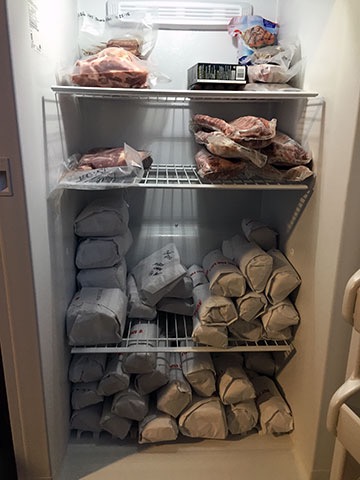
Back in December I took delivery of 1/4 cow: about 100 pounds of local grass-fed beef. The meat was butchered and packaged and frozen and most of it is still in the freezer I bought primarily to store it.

Mongolian Beef
Here’s what my first try looked like. I cut the green onions too long. (Not sure what I was thinking there.) And yes, I know I can benefit from a course on food photography.

Among the cuts of meat I got in my package was a lot of stew meat. I’ve been using it to make a variety of things, including beef barley soup, in my Instant Pot pressure cooker. The other day, while looking for something different to make with an Asian flair, I found this recipe for Mongolian Beef.

I made it today, tweaked to the beef I had on hand. I wasn’t thrilled with the results. In general, it was too sweet and not flavorful enough. I made some minor changes to the recipe that I think make it better — at least for me. Here’s my version.

Ingredients

  • 2 pounds beef stew meat, cut into 1-1/2-inch cubes. The original recipe called for sliced flank steak.
  • 1/2 teaspoon salt
  • 1/4 teaspoon pepper
  • 1/2 teaspoon Chinese five spice. This was not in the original recipe, but I think it adds flavor.
  • 1 tablespoon sesame oil. Vegetable oil may be substituted.
  • 6 cloves garlic, minced or pressed
  • 1/2 cup soy sauce. Low sodium would probably be best, since this recipe can be quite salty. I might even consider cutting the soy sauce in half the next time I make it.
  • 1/2 cup water
  • 1/3 cup brown sugar. The original recipe called for 2/3 cup dark brown sugar, but I think it comes out way too sweet so I cut it in half. I use light brown sugar.
  • 1 teaspoon minced fresh ginger. The original recipe called for 1/2 teaspoon.
  • 2 tablespoons cornstarch
  • 3 tablespoons cold water
  • 4 green onions, sliced into 1-inch pieces. The original recipe called for only 3 green onions.

Instructions

These instructions assume you’re using an Instant Pot or a similar electric pressure cooker.

  1. Mix salt, pepper, and five spice in a medium bowl. Add beef and toss to coat as evenly as possible.
  2. Add oil to the pot and press Saute.
  3. When oil begins to sizzle, add meat and brown on all sides. You may have to do this in multiple batches so as not to crowd the meat. When browned, transfer meat back to the bowl.
  4. Add the garlic to the pot and sauté for one minute.
  5. Add the soy sauce, 1/2 cup water, brown sugar, and ginger. Stir to combine.
  6. Add browned beef and any accumulated juices.
  7. Press Keep Warm and then press Manual. Set the timer for 20 minutes. Make sure High pressure is selected.
  8. When pressure cooking cycle is done and beep sounds, press Keep Warm. Then release the pressure (carefully) by turning the release knob. When all the pressure has been released, carefully remove the lid.
  9. Combine the cornstarch and 3 tablespoons water, stirring until smooth.
  10. Stir the cornstarch mixture into the beef mixture in the pot.
  11. Press Saute and bring to a boil, stirring constantly until sauce thickens.
  12. Stir in the green onions.

Serve with rice and steamed vegetables or a salad with a ginger dressing.

This is not spicy at all, although I think it could use some heat. If anyone has any suggestions on what kind of chili or pepper I should add, please leave your suggestion in the comments for this post.

Maria’s Most Excellent Eggnog Coffee

If you love eggnog and coffee, try this.

Eggnog Nutrition
Nutritional information, courtesy of Google.

I love eggnog. But due to the crazy calorie count — 223 calories for just 8 ounces — not to mention the fat and cholesterol content, I try to minimize how much I drink. (Seriously, eggnog is just not really good for you.)

Eggnog latte from Dutch Brothers or one of the other drive-thru coffee shops around here help. I ask them to thin out their eggnog lattes with some non-fat milk. This reduces the richness while maintaining the flavor.

But I also make a similar drink at home when eggnog is available. Here’s my recipe, should you care to try it:

Ingredients:

  • 2 parts eggnog
  • 1 part low- or non-fat milk. (I typically use 2%.)
  • 3 parts strong, hot coffee

Instructions:

  1. Combine the milk and eggnog in a microwave safe cup.
  2. Microwave on high for 1-1/2 to 2 minutes, until very hot but not boiling.
  3. Add coffee. I normally brew my coffee right into the cup of eggnog and milk using a Brew and Go.
  4. Stir and enjoy!

If you’re interested in a spiked version of this, be sure to check out this review of eggnog spiking options. I tend to enjoy this in the morning, so I haven’t tested any alcohol additives for myself. Yet.

Beef Barley Soup

Skip the mushrooms!

Freezer full of meat
Here’s what 100 pounds of beef looks like in a mid-sized upright freezer. The other meat I’ve been storing is on upper shelves. The doors are filled with plastic containers of homemade heat-and-eat meals.

Yesterday, I took delivery of 100 pounds of grass fed, locally raised beef. This “1/4 cow” came butchered, wrapped, and frozen solid. Although I already had a chest freezer I’d brought with me from my Arizona home, I bought another freezer primarily to store this meat. It just about filled the bottom two shelves.

(I should mention here that our local supermarkets often put “expiring” meat on sale for 30% to 50% off. I can’t tell you how many amazing deals I’ve gotten on normally very pricey meats just because their last date of sale is that day or the next. One day I scooped up four racks of lamb for about $7 each and a large boneless leg of lamb — which was great in a Moroccan lamb dish — for about $10. Last week, Safeway had a sale on baby back ribs that were still frozen: $2.99/pound instead of the normal $4.99. I bought four racks for smoking on my Traeger. Having a big freezer makes it possible to take advantage of these deals as they come up. And when you consider how much I’ve been using my new Instant Pot lately, I don’t expect to have any trouble keeping that freezer full of meat or homemade heat-and-eat meals.)

I had some control over what I’d get in my beef package — basically a menu where I could choose a certain number of cuts in certain categories. In addition to a bunch of steaks cut from all over the place and a lot of ground beef, I also got short ribs, roasts, a very large brisket, and stew meat.

With a winter storm coming, I figured that some comfort food was in order. So when I went down into town to run errands and pick up the beef, I stopped at the supermarket for the few ingredients I needed to make beef barley soup.

I found the recipe on MyRecipes.com. I chose it over other recipes I found online primarily because it looked so hearty in the photo and wasn’t tomato-based. Although I made the recipe pretty much as it was written, I wasn’t satisfied with the results. The reason: mushrooms. In my opinion, mushrooms ruin the flavor of this soup.

So here’s my new take on this recipe.

Ingredients:

  • 1 tablespoon olive oil. The original recipe called for cooking spray. But why not use a little olive oil instead?
  • 1 to 1-1/2 pounds stew meat, trimmed and cut into 1/2- to 1-inch pieces. You can make it with less meat, but if you have more, use it. It’ll make a heartier soup. The beef I got was amazingly lean and didn’t need a bit of trimming.
  • 3-4 large carrots, sliced. Carrots are a must-have in any meat-based soup.
  • 2-3 stalks of celery, sliced. The original recipe called for 1-1/2 cups of celery. Seriously? That’s way too much.
  • 1 large onion, chopped. The third member of the aromatic trilogy, I put onions in most soups and stews. The original recipe called for 2/3 cup, but more is better.
  • 1 large parsnip, sliced. If you can’t find parsnips, add another carrot or two.
  • 1 medium turnip, cut into 1/2-inch cubes. This will really round out the root vegetable flavor.
  • 4 cups fat-free, low-sodium beef broth. I could not find real beef broth (vs. “beef flavored” broth) in my supermarket that was both fat free and low sodium. So I bought what I found.
  • 1 bay leaf.
  • 2/3 cup uncooked pearl barley. This was the first time I’d ever bought or cooked barley, despite the fact that I really like beef barley soup. Go figure, huh?
  • 1/2 teaspoon salt. You can probably omit the salt if you don’t use low-sodium beef broth. I did, but then again, I’m trying to keep my salt intake down. Remember you can always add salt; you can’t remove it.
  • 1/2 teaspoon black pepper. Pepper is always good with beef.

Instructions:

These instructions assume you’re making this on the stovetop. I’ll update this blog post when I have pressure cooker instructions. I need to experiment.

  1. Heat oil in a heavy-bottomed pot over medium-high heat.
  2. Add beef to pot; cook 4-6 minutes or until browned, stirring frequently.
  3. Remove beef from pot with a slotted spoon and set aside.
  4. Add vegetables to pot; cook 6-8 minutes or until liquid almost evaporates.
  5. Return beef to pot with beef broth and bay leaf; bring to a simmer over medium-high heat.
  6. Cover, reduce heat, and simmer 1 1/2 hours or until beef is tender, stirring occasionally.
  7. Stir in pearl barley; cover and simmer 45 minutes or until pearl barley is tender.
  8. Stir in salt and pepper.
  9. Discard bay leaf before serving.

Keep in mind that the longer you cook the pearl barley or let it sit in the hot soup, the more liquid it will absorb. The net result could be more of a stew than a soup. If you want a soupier soup, either reduce the amount of barley or increase the amount of broth.

This yields about six-eight servings, depending on serving size. I think it would be excellent with some crusty bread on a cold winter day.

Want a printable version of this recipe? Download it as a PDF.

Low-Fat, Low-Calorie Raisin Bran Muffins

A variation of a Martha Stewart recipe.

This summer, after cleaning out my RV for the last time, I found myself with an unopened box of raisin bran cereal. I like raisin bran, but there are other cereals I like better. So I searched for a way to use up the cereal and remembered how I used to occasionally make raisin bran muffins. So I went in search of a good recipe that called for the ingredients I had on hand. I found this one on MarthaStewart.com.

I made them with just one substitution: I didn’t have whole wheat flour so I used just unbleached flour. They came out amazing: moist and tender. I stored the leftover muffins in the fridge and reheated them one at a time with a 30-second zap in my microwave.

Of course, the big drawback to the recipe is also what makes it moist: it contains oil, which is high in fat (duh) and also high in calories. Although the folks at MarthaStewart.com seem to think this is a “low-fat” recipe, it could be better. I decided to try again with a substitution that could make it better: using unsweetened applesauce instead of oil.

This isn’t something I dreamed up. I’d read it in other places and figured this recipe would give me a good opportunity to try it. Here’s my version of the recipe — not only did it come out great, but it’s about 80 calories less per muffin than the Martha version. Like the other version, this makes 6 largish muffins.

Ingredients:

  • Nutritional Info
    Nutritional information with the ingredients here. As you might expect, it’s pretty high in fiber.

    1 1/2 cups raisin bran. I used Kellogs, but you can use any brand. If you can get it without sugar-coated raisins (ick), go for it.

  • 3/4 cup 2% milk. You could probably substitute fat-free milk for even less fat and a lower calorie count.
  • 1 cup unbleached all-purpose flour. If I had whole wheat flour — it’s on my shopping list now — I’d do 1/2 cup of each.
  • 2 teaspoons baking powder
  • 1/2 tbsp cinnamon
  • 1/4 tsp salt
  • 1 large egg
  • 1/4 cup packed brown sugar. You could probably reduce the amount of sugar if you wanted to since the unsweetened applesauce is still sweeter than oil. That would further reduce the calorie count.
  • 1/4 cup sauce unsweetened applesauce. If you use sweetened applesauce, you might be able to completely omit the brown sugar. I don’t know; I haven’t tried it. I don’t buy sweetened applesauce.

Directions:

  1. Preheat oven to 400°F. Lightly grease a 6-cup muffin tin.
  2. In medium bowl, combine cereal and milk. Let stand until softened, about 5 minutes.
  3. Stir applesauce, egg, and sugar into cereal mixture and mix well.
  4. In a small bowl, thoroughly combine remaining ingredients. Fold into cereal mixture.
  5. Raisin Bran Muffin
    One of the drawbacks of substituting applesauce for oil is that the muffin sticks to the paper liner. The next time I make this, I’ll put the batter in the individual lightly oiled tin cups.

    Divide batter into prepared muffin cups. Bake 20-25 minutes, until toothpick inserted in the center of a muffin comes out clean.

  6. Cool in pan 5 minutes, then move to a wire rack. Store in a sealed container in refrigerator.

If you do make this, let me know what you think. I’m also interested in any substitution ideas you might have.

Pressure Cooker Carnitas

Another pressure cooker recipe.

I’m hooked on this damn pressure cooker. I still can’t believe how tender and juicy meat comes out after cooking for less than an hour.

After Tweeting about the first time I used it, one of my Twitter friends, Laura suggested carnitas. When I asked for a recipe — fully expecting a link — she gave me basic instructions. Very basic. Too basic for me.

So I Googled it and found a recipe on Allrecipes.com. I modified it for my own tastes and pressure cooker. Here’s how I made it. And yes, it came out amazingly good.

Ingredients:

  • 2-1/2 pounds boneless pork shoulder, cut into 1-1/2-inch cubes. I used the country style spareribs and trimmed much of the fat off.
  • 3 tablespoons canola oil. I used olive oil because that’s what I have in the pantry.
  • 2 poblano peppers, roughly chopped. I used 3.
  • 3 jalapeño peppers, roughly chopped. I used 1.
  • 1 serrano pepper, roughly chopped
  • 1 large onion, roughly chopped
  • 4 cloves garlic, roughly chopped. I used garlic from my garden, which was a real pain in the butt to peel.
  • 2 teaspoons ground coriander
  • 1 tablespoon ground cumin
  • 1 1/2 cups beef broth. I used about a cup, which I made with water and powered bouillion. Next time, I’ll use 1/2 cup.

Instructions:

  1. Heat oil and brown pork cubes on all sides.
  2. Stir in remaining ingredients.
  3. Lock down the pressure cooker and cook for 45 minutes. (The recipe stated 60 minutes on medium pressure, but my pressure cooker does low or high — not medium. So I took a wild guess and reduced the time. It worked fine.)
  4. At the end of the cooking period, vent the steam, open the cooker, and serve.

While it cooked, I made guacamole with onions and tomatoes from my garden. I served it with corn tortillas I happened to buy yesterday. It needed salt and pepper to taste. The finished product wasn’t very spicy; I probably could have used more jalapeño peppers. But the meat was, once again, fork tender. And so juicy!