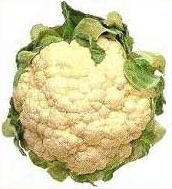
Cauliflower Mashed “Potatoes”

A lower calorie, lower carb, healthy alternative.

Here’s a recipe for folks trying to cut calories or just eat healthier. It’s basically a mashed potato substitute — made with cauliflower.

Ingredients:

  • Cauliflower1 head of cauliflower. Make sure it’s not green. (Image from Wikipedia.)
  • 1/4 cup milk or cream. Obviously skim milk will make it lower fat and calories, but cream will make it more like real mashed potatoes. Use either or anything in between.
  • 3 tablespoons butter or butter substitute. Butter is better, but go with the substitute if you’re trying to keep calories or fat content down.
  • salt to taste

Instructions:

  1. Trim off cauliflower stem and greens and cut into flowerettes. (My spelling checker says I spelled that wrong, but how else would you spell it?)
  2. Place in a microwaveable bowl with a lid, add about 1/2 cup water, and cover.
  3. Microwave on high for about 10-12 minutes. (Times may vary.) You want it completely cooked through. (If you have a fear of microwaves, you can steam it on a stovetop.)
  4. Drain.
  5. Combine milk or cream and butter or substitute in a microwave safe cup or bowl.
  6. Microwave milk/cream/butter/substitute mixture on high for 30 seconds or until hot and butter is melting. (Fear of microwaves? Use a pan on the stove.)
  7. Using a potato masher or electric handheld pureeing tool (my tool of choice for this job), puree the cauliflower. (You might also be able to use a blender or food processor, but I think that’s taking things too far.)
  8. Add the milk/cream/butter/substitute mixture and stir well.
  9. Add salt to taste.
  10. Serve.

This should make 4 normal sized servings.

I made this the other night with some heavy cream left over from the holidays that has still (by some miracle) not gone bad. It tasted unbelievably good with the steak Mike grilled up for us.

Skeptical? Don’t knock it until you try it.

And yes, I do use my microwave extensively for cooking vegetables.

Chicken Curry

Easy dinner.

Here’s what I had for dinner tonight:

Ingredients:

  • 2 tbsp. vegetable oil
  • 2-3 lbs. of chicken. I used chicken breast fillets tonight, but I usually use thighs. I trimmed off all the excess fat before cooking and cut into large cubes.
  • 1-1/2 large onions, cut up. I slice them, but you might prefer them chopped.
  • 1 tsp. salt
  • 1 cup dairy sour cream
  • 2 tsp. curry powder
  • 1/8 tsp. ground ginger
  • 1/8 tsp. ground cumin

Instructions:

  1. Lightly brown chicken in oil. If necessary, drain off fat. (If you use lean chicken or trim it like I do, you shouldn’t have any fat to drain off. Just nice chicken juice.)
  2. Add onions and salt.
  3. Cover and cook until chicken is cooked through. This should take 10 to 20 minutes, depending on how small you cut up the chicken.
  4. Mix remaining ingredients in a bowl.
  5. If there’s a lot of liquid, drain off all but about 1/2 cup.
  6. Stir in sour cream mixture.
  7. Heat through.
  8. Serve with rice and mango chutney.

This should serve 4 or 2 with leftovers.

Microwave Chocolate Cake in a Mug

I’m blogging this recipe so I don’t lose it. Again.

I found this recipe this past summer when I was stuck in a camper for four months. I made it a few times — a few too many times, if you ask me. Today, when clearing some nonperishable foodstuffs out of the camper, I found the cake flour and remembered it. I immediately wanted to make a cake for my husband to try.

I thought I’d blogged the recipe, but when I went to find it today, it wasn’t in my blog. I probably tweeted it and set a Delicious bookmark for it instead. But I have so many damn bookmarks, a Google search was a quicker way to find it again. I also found a bunch of similar recipes. Now I’m storing the one I used this summer in my blog so I’m sure to find it the next time I want it.

The original recipe was on dizzy-dee.com, which was so overwhelmed with traffic that the recipe (or apparently the whole site) had to be moved. You can now find it, with its photos, at http://blog.vault9.net/food/chocolate-cake-in-5-minutes/. My version is a tiny bit different and I skipped the photos.

Ingredients:

  • 4 Tablespoons cake flour (Do not use any other kind of flour if you expect good results.)
  • 4 Tablespoons granulated sugar (I tried making this with less sugar and it simply wasn’t sweet enough.)
  • 2 Tablespoons unsweetened cocoa
  • 1 Egg
  • 3 Tablespoons milk
  • 3 Tablespoons oil

Instructions:

  1. Mix the flour, sugar, and cocoa in the largest microwave-safe coffee mug you have. I recommend at least 16 ounces; any smaller and you’re likely to make a mess in your microwave. In a pinch, you could certainly use a 2-cup glass measuring cup.
  2. Add the remaining ingredients and mix well. Make sure the egg is thoroughly mixed in if you don’t want bits of egg white in your cake.
  3. Microwave on high for 2-1/2 to 3 minutes, depending on the power of your microwave. This is something you’ll have to test for yourself. My home microwave, which is ancient, is only 700 watts, so 3 minutes was perfect. My camper’s microwave is 1200 watts (for reasons I’ll never understand) and 3 minutes was too long.
  4. Watch the cake rise out of the top of the cup as it cooks. If the cup is too small, this is when it will overflow and make a mess in your microwave, so you might want to put a paper towel under the cup before you start if the cup isn’t very big.
  5. When the cake is done, invert the cup onto a plate. If you got the timing right, the cake will be thoroughly cooked, but still moist throughout. If you cooked it too long, the edges will be hard and somewhat dry. Either way, it will be slightly rubbery. But the flavor should be good.

There are other variations of this recipe out on the Web, but this one seems to be the easiest and most consistent, given that all of the ingredients are “raw.” For example, one recipe calls for hot cocoa mix and water instead of the cocoa, sugar, and milk, but every mix is different, so who knows how it might come out?

You’ll find the mug a bit difficult to clean without soaking. I suspect that if you coated it with spray oil and mixed the batter in a different cup before pouring it in to bake, there wouldn’t be a clean up issue. But since I’d rather wash one cup than two when camping, I’ve never tried this.