Bees: The Riskier Hive Split

Just a quick note another long, drawn out post to document a recent hive split and the results so far.

I started my beekeeping hobby in June 2013 and have been blogging about it periodically. If you’re interested in reading the other posts in this series, follow the Adventures in Beekeeping tag. Keep in mind that the most recent posts always appear first on this blog.

Last year, I split my original hive into 2 hives. I called it “the risky hive split” because of the way I did it — kind of haphazardly with my fingers crossed. I basically pulled a few brood frames with swarm cells out of an existing hive and stuck them in a new hive box with some honey and empty frames. The split worked because at least one of the queens hatched and took over. But that new hive was never very healthy and was the second to die after winter. The original hive was the first to die.

Mites on a Sticky Board
The actual size of this square is 1 inch.

Now you could say that they died because of the split. Instead of one strong hive, I wound up with two week ones. But I did the split in mid-July and prevented a swarm. The original hive continued to thrive. I think the reality was much more sinister. Both of those hives had terrible varroa mite infestations — I documented this with sticky boards in late summer. Although I did what I could to get rid of the mites, including drone frames, screened bottom boards, and miticide, I think the damage was done and the colonies were weak going into winter. The winter was harsh with few warm days and the bees simply didn’t make it.

Springtime at My Mobile Apiary

Fast forward to this year. Of my three hives, only my swarm capture hive survived the winter. Not only did it survive, but it was going like gangbusters within a few days of setting it up in my temporary home in the Sacramento area of California. (That hive, by the way, had very few mites in late summer. Coincidence? I don’t think so.)

If you’re not a beekeeper, all this is probably meaningless to you. Let me try to explain as simply as I can.

Each hive must have a single queen and a whole bunch of worker bees. It might also have drones, but doesn’t really need them. (Strong women really don’t need men either, but I digress.) The queen’s job is to lay eggs to make more bees. The workers’ jobs are to do everything else — tend to the eggs and larvae (or brood), maintain the hive, guard the hive, gather pollen and nectar, and make honey.

If there isn’t a queen, no new bees can be added to the hive. Within a month or two, all the bees will have died and the colony will have collapsed. The workers instinctively know this. They also know if the current queen is sick and needs replacement (supercedure) or if the hive is becoming so crowded that half the bees need to move out with the queen so there’s room for a new queen to start fresh (swarming).

The workers have the ability to turn any egg into a queen when they think they’ll need one. They do this by forming a special elongated cell for the egg and feeding it a diet of royal jelly, which they make, until the cell is capped. After a longer-than-usual larval stage, a queen emerges. If there’s more than one queen in a hive, the strongest queen will kill the weaker ones.

I’ve done four pretty thorough hive inspections since arriving here and setting up the bees — including the initial setup/inspection about a month ago. The second inspection showed impressive brood development but not much in the way of honey storage. In addition, I was very surprised to see that the queen’s laying pattern covered almost an entire brood frame — not just the middle as most queens do. There were brood cells all the way to the side and bottom edges of each brood frame with just areas along the top and in the corners filled with honey.

The other surprise was how many of the frames were being used for brood. The deep body had just nine frames in it — a strategy I’d like to avoid in the future — and there was brood in six or seven of them. At that rate, I figured the queen would soon run out of space for brood and the bees would need more room for honey. So I placed a queen excluder atop the deep box, a spacer with an entrance on top of that, and a medium box with mostly drawn out — but otherwise empty — comb on top of that. The idea was to encourage the bees to move the honey upstairs, where I could pull frames for extraction and replace them with empty frames. The queen excluder would keep the queen downstairs. In theory, it should work.

It didn’t. On the next inspection, I found that the queen just kept laying eggs downstairs, making the hive ever more crowded, but the bees had not started to put honey in the medium super above them. I looked for signs of swarm preparation but found none. Just a whole lot of bees and a whole lot of brood.

That gave me the idea that they wanted to make bees. That was fine with me; I was hoping to go home with at least three active hives. Maybe I should try another hive split?

The Riskier Hive Split

Now, the last time I did a hive split, I had swarm cells — that means that the workers were already trying to make queens, likely in advance of a swarm event. What made that split risky is that I never actually found the queen. I just made sure that each hive had brood frames with swarm cells on them. I figured that the bees would continue to tend to those swarm cells until a queen emerged. If a hive wound up with more than one queen, they’d sort it out for themselves.

And that’s what they apparently did. They certainly didn’t swarm and I have no way of knowing which hive wound up with the old queen — or even if she was killed by a new queen.

But in this case, I didn’t have any swarm or supercedure cells. No future queen.

What I did, have, however, was the location of the queen. I found her on one of the three primary brood frames during my third inspection. I was prepared. I’d already assembled another deep hive box with brood and honey frames. I slid the frame with the queen on it back into her hive and then pulled out the other two primary brood frames, each of which had very young larvae in them. I can only assume there were eggs as well — the damn things are so small that I just can’t see them in cells against the yellow background. (Note to self: only buy black foundation for deep frames from now on.) I slid those frames with their bees into the new box and put empty brood frames from that box into the original hive. Then I took one of the honey frames full of bees and put that into the new box. In all, I probably put about 30% of the original hive’s bees and 20% of its brood into the new box. I closed up the new box and pointed its door 90° to the left (south)

What I was hoping, of course, was that the bees in the new hive would quickly realize that they were queenless and do something about it — namely, take a few of those cells containing eggs or newly hatched larvae and do what they needed to do to turn them into queens. That would be the best case scenario. The worst case is that they’d abandon the hive and find their way back into their old hive, which was sitting right beside them with its door pointing 90° to the right (west), leaving the brood untended so it would die.

Of course, you won’t find many bee books that tell you to do this. Most tell you that if you want to split a hive, you should buy a queen, put bees from an existing colony into a new hive box, and introduce the new queen to them. If they accept the queen — which they should if you do everything right — the queen will get right to work making more bees.

I had a few more things to do with the original hive before I closed it back up.

I had a drone frame in there and it was more than half full and capped, but I pulled it out and replaced it with a regular frame. Trouble is, it won’t fit in my RV’s freezer and I had to borrow freezer space at the airport office. Doing that once is okay, but I don’t think they’d like to see a new frame full of bee larvae every three weeks. (Yes, I did wrap it in a black plastic bag.) I’ll save the drone frames for when I get home and can access my chest freezer.

In the meantime, I’d bought a comb honey setup with shallow frames and wax foundation. Not knowing what else to do with it, I stuck it on top of the medium box on the original hive. Maybe they’d prefer that kind of foundation over the medium frames. (That would certainly make me happy, since I want to make comb honey.)

I closed the hive back up, put away my tools, wished the bees luck, and left them.

Throughout the week, I visited the hives. I saw bees coming and going from both hives, but far more at the original hive than the new one.

Progress Report

And that brings me to my most recent hive inspection, which I did earlier today. My main goal was to see what was going on in that new hive. Were there bees in there? Were they working? Most importantly, had they built queen cells?

I suited up and opened their box. I immediately saw bees inside — a good sign. I pulled out a few frames along the edges. No new brood — but I really didn’t expect any.

Queen Cell
This photo shows a queen cell and some drone cells from last year. I didn’t take any photos of the queen cells in my new hive.

Then I pulled out one of the middle brood frames — one of the ones that had been inside the old hive box. I was thrilled to see queen cells on one side. I counted two of them. The other frame had five queen cells. This was looking good. I put everything back in place and closed it up. No need to disturb the bees any more than I needed to.

Of course, now I have a new worry. If the queen hatches successfully, will she find drones to mate with when she goes out for her mating flights? Maybe freezing that drone frame was a bad idea. (Cut me some slack; I’m new at this.)

The original hive, however, was a bit of a disappointment. The bees still hadn’t put any honey in either of the upper boxes. To make matters worse, they’d begun to fill the queen excluder with wax. I had quite a time clearing it out. Not knowing what else to do, I reassembled the hive the way it had been. If the new hive produces a queen and she starts laying eggs, I’ll put one of the honey supers on that hive.

In the Meantime…

A beekeeper with a pollination business here in California is selling his hives. He has 50 left and is selling them in palettes of four. I’ll be visiting him next week. Who knows? I might come back to the airport with another four beehives.

Bees: More about Mites

My own observations prove another beekeeper’s theory true.

I started my beekeeping hobby in June 2013 and have been blogging about it periodically. If you’re interested in reading the other posts in this series, follow the Adventures in Beekeeping tag. Keep in mind that the most recent posts always appear first on this blog.

As I mentioned in a previous post, I’m concerned about varroa mites in my beehives. Mites can weaken a colony to the point that winter survival is impossible. Since I’d like all my hives to survive the winter, I’m starting a war on mites now, before it’s too late.

My Setup, as it Relates to Mites

There’s a few points I want to make here without spending a lot of time on a long narrative.

  • My three hives come from two sources:
    • My original hive was a nuc I purchased from a beekeeper in Peshastin. That hive grew and thrived very quickly, producing 2-1/2 gallons of honey in about a month. When a hive inspection showed signs of swarm cells, I split it off to form my third hive.
    • My second hive was a swarm capture. The swarm came from a colony living in the wall of a friend’s shop building. These are as close to “wild bees” as you can get.
  • My hives aren’t all set up exactly the same way. As I experiment with different hive components, I use them on different hives. For example, my first and second hives have standard wood bottoms while my third hive has a bottom with a varroa trap screen drawer. When setting up this third hive, I placed a sticky board in the drawer and left it there for about a month (which is really too long.)
  • My first and second hive have drone frames installed. As I discovered earlier this month, the drone frames work — once they’re adopted by the bees — and my first hive was confirmed to have mites.

Mite Count

On Wednesday, after a normal hive inspection, I placed sticky boards (with screens) in my first and second hives. Remember, I’d already learned that my first hive had mites; the idea behind the sticky board was to see how bad the mite problem was in each hive. Because I’d left the sticky board in the third hive so long, I couldn’t really gauge the mite problem. So I got serious for this test and left the boards in for just two days. If I had a third board, I would have tested that third hive again, too.

Mites on a Sticky Board
I’d say this hive has a mite problem, no?

When I pulled them out yesterday morning, I was surprised to find that the sticky board from Hive #1 was full of mites. Here’s a magnified image of just one square inch of the board. The dark ovals are dead mites — you can even see the legs on a few of them. The light ovals are also mites, but I don’t know if they’re some sort of shedded skin or exoskeleton or the actual mite itself after being dead for a day. The other dots on the image are mostly litter from the hive as well as some propolis that the bees laid down between the holes on the screen. Keep in mind that this sticky board has 176 square inches and although not all of them are as full of mites as this one, some are a bit worse.

All this was gathered in less than 48 hours.

But what was even more surprising to me — at first, anyway — was that the sticky board for Hive #2 had very few mites on it. In fact, because I pulled it out first, I thought that I’d pulled it out too soon. It wasn’t until I pulled out the other sticky board that I realized that the boards had done their job; I just had far more mites in one hive than the other.

Why the Difference?

Last night, I was at a BBQ gathering of helicopter pilots and mechanics who are based in the area for fire season. One crew — pilot, mechanic, and fuel truck driver — are based in a really nice house in a farm just down the road from where I’m currently living. They had a fire going in the fire pit and grilled up some steaks and brats and corn. It was a really nice night out.

I got to talking to one of the pilots, a guy who flies the Cessna Skymaster “push-pull” used for observation and direction to fire crews. He lives in the Snohomish area of Washington and keeps bees at home. We got to talking about mites and he asked me where I’d gotten my bees. When I explained their source, he told me that commercial bees always had mites.

I thought about what he said. It completely jived with what I had observed. The hive from the nuc had a bad mite problem. The hive from the swarm had very few mites at all.

He said that because so many hives were moved around for pollination, the mite problem spreads. He keeps mites out of his hives by keeping them away from commercially available bees.

Certainly something to think about.

Three Means of Attacking Mites

Because I’m serious about eliminating — or at least greatly reducing — the mite population in my hives, I’m currently using a two-prong attack:

  • The drone frames, as I discussed in another post, can help concentrate most of the mite reproduction on one frame, where they can be easily removed. Unfortunately, the queen is far less likely to lay drone eggs as the summer season comes to a close. In addition, only one hive (so far) has adopted the use of the drone frame.
  • I’ve purchased a miticide and dosed each of my hives with it. Although it can’t be used when the bees are producing honey for human consumption, using it now, before winter, should help reduce the number of mites and make a stronger hive.

The third method, which I hope to be able to institute soon, is to have sticky boards beneath screens on the bottom board of each of my hives. While it would be great to do this via a varroa trap with drawer for each hive, the $27 price tag makes that a bit more than I want to spend. So I’ll likely cook up my own solution using some “hardware fabric” I already have on hand to make the screen. I’ll talk to a beekeeper friend to see what we can rig up.

In this area, bee colonies have a 50% overwinter survival rate. I have three hives. I want to have all three colonies survive the winter. That’s going to take some work — and I’m willing to do it.

Bees: The Drone Frames Really Do Work

A component of my integrated pest management system.

I started my beekeeping hobby in June 2013 and have been blogging about it periodically. If you’re interested in reading the other posts in this series, follow the Adventures in Beekeeping tag. Keep in mind that the most recent posts always appear first on this blog.

A while back, I installed a so-called “drone frame” in two of my beehives. A drone frame is a special frame with large cells embossed on a plastic foundation. The bees supposedly see this frame, realize that the big cells will be perfect for drones (which are larger than workers), build out the cells for drones. The queen lays drone eggs in each cell and the workers feed and cap them like any other drone cell. Varroa mites, which prefer drone brood, enter the cells before capping and do their parasitic mite thing — including laying eggs — on the drone larvae. The drones hatch and carry more mites into the hive to mix with the other brood.

Varroa mites are a bad thing for beehives and supposedly every beehive in North America has them. Not only does their blood sucking weaken the bees and possibly cause deformities in newly hatched bees, but they have been tied to colony collapse disorder (CCD), which has been getting a lot of press lately because of it’s potential to do serious harm to the food chain humans rely on for survival.

I checked the drone frame each time I opened my main hive. I try to inspect my hives every 10-14 days. The first time I looked there was no activity. The bees didn’t seem interested in the frame. The second time I looked, the bees had begun to draw out comb. A good sign. The next time I looked, the frame had been partially filled with capped and uncapped honey as well as a good number of capped drone cells.

That was August 11. I was unprepared. I should have brought along a second drone frame so I could have swapped them out. The idea with the drone frames is to remove the frame once it contains capped drone cells and to put it in the freezer for a few days. This kills the drone larvae as well as the mites. (Drones don’t do anything except fertilize the queens — kind of like some men I know — and my queens were already fertilized.) After a while, you put the frame back in the hive, the workers see the dead bees and clean them out, and the queen lays new eggs.

I went back with an empty drone frame only five days later. I was late. The drones had already begun to hatch. In fact, more than half of them were gone. Others were hatching as I watched.

Drone Frame
Here’s the drone frame as it looked today after a week in the freezer. You can see the capped cells where drones were emerging. The dark empty cells are where the other drones hatched from. There’s honey along the top of the frame. The reverse side looks pretty much the same.

I have to admit that it made me sad to do what I had to do.

I brushed the workers and newly hatched drones off the drone frame and back into the hive. Then I put the drone frame aside and replaced it with a brand new one. I have four of them and three hives so if I time everything right, I’ll only have one in the freezer at any time; I’ll just keep circulating the freezer one to replace the one I pull in a hive.

I put the drone frame in the back of my truck and went on with my day. I secretly hoped the drones would all hatch and fly away. I didn’t want to kill them.

But the next day, when I inspected the frame, I found that many of the drones had half emerged and died there. I also saw the mites — they were quite easy to spot with my glasses on. There were a lot of them.
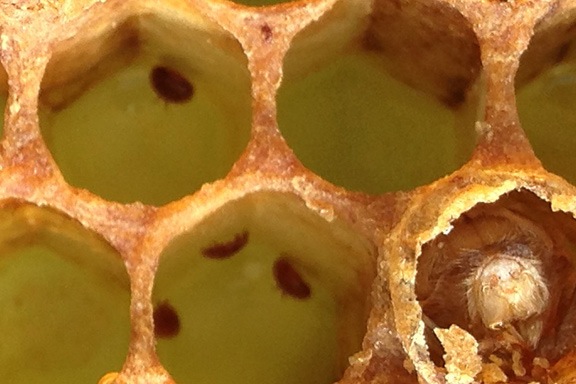
Varroa Mites on a Drone Frame
Here’s a closeup of some of the cells in the drone frame. Although my camera focused on the outer edges of the cells, you can clearly see the dead mites. The bottom-right cell has a dead drone bee that died while emerging from its cell. If I’d waited just one more day, they all would have hatched.

I put the frame in a plastic bag and stowed it in my landlord’s freezer. (I wonder if he noticed.)

I spoke to another beekeeper at a recent meeting of the North Central Washington Beekeepers Association. I admitted how I’d screwed up by pulling the drone frame late. He made me feel a little better when he admitted that he’d done the same thing.

This afternoon I pulled the drone frame out to take some photos. Tomorrow, I’ll bring it to my hives. I’ll check the second hive with a drone frame to see if there’s any capped drone cells in it. If there’s any, I’ll pull it and replace it with this one. Otherwise, I’ll put this one in the one hive that doesn’t yet have a drone frame at all.

I suspect that my mite problem is worse that it should be. I also ordered a miticide from the bee supply place. I need to get the mites under control before winter sets in. My friend Don blames the loss of his hive last winter on mites. I’d like to beat the odds of a 50% winter survival rate here in Central Washington and have all three hives make it through the winter.

Wish me luck!