Bees: The Case of the Missing Queen

You don’t have to see a queen bee to know she’s there.

I started my beekeeping hobby in June 2013 and have been blogging about it periodically. If you’re interested in reading the other posts in this series, follow the Adventures in Beekeeping tag. Keep in mind that the most recent posts always appear first on this blog.

Lately, the North Central Washington Beekeepers’ Association‘s mailing list has been flooded with a rash of panicky reports from members that claim they have a queenless hive. In nearly every case, the beekeeper has made this determination because he or she simply has not seen the queen.

Fortunately, you don’t need to see the Queen among the rest of the bees to know that there is a queen in the hive. I say “fortunately” because I rarely see the queen in my hives, yet I know that she’s in there.

At the beginning of this season, I obtained two nucs and four packages. In each case, I introduced the queen to the rest of the hive by prepping her queen cage and letting the other bees release her. (And yes, I know a “real” nuc should have an established queen — how I got these is a story in itself.) So I know I started with a live queen in each hive.

Queen Bee
Image of queen bee by Pollinator on Wikipedia. Used with permission; Creative Commons 3.0 license.

Yet on my first inspection, I found no sign of a queen in two of my four packages or either nuc. I thought I had a disaster on my hands and started researching how I could get new queens quickly, before the colony died, without driving to Seattle or spending a fortune.

In this case, my slow response paid off. I inspected the “queenless” hives again and found evidence that there was a queen present, even though I didn’t see the queen. All the hives are doing well; I didn’t have to replace any queens.

Now I don’t want to suggest that I’m an expert — I’m not. This is only my third year as a beekeeper and I never even completed the beekeeping course offered by the group. Yet it seems to me that there’s one pretty positive indicator that a queen is present, even when you don’t see her:

Are there eggs?

Pretty simple stuff. If there are unhatched eggs, you know there was a queen in the hive within the past three days. Why? Because it take three days for an egg to hatch.

Now yes, it’s true: when a hive is queenless it is possible for workers to lay infertile eggs. But how often does that really happen?

If you don’t see eggs, are you looking hard enough? I never saw a bee egg until this year. Why? Well up until this year, I had my contact lenses set up for near and far vision. Unfortunately, although I could see okay near and okay far, I didn’t see well either way. So this year I decided to use the contacts for far vision and wear readers for close vision. All of a sudden I could actually see tiny things again! Like bee eggs! So if you’re 40+ years old and your close vision isn’t perfect, don’t expect to see bee eggs without a pair of glasses to help. Put them on under your veil.

Black foundation also helps. The tiny white eggs — much smaller than a grain of rice! — show up much better against black than yellow. Mann Lake and other beekeeping supply houses sell black foundation just for this reason. See for yourself here.

If you still don’t see bee eggs, look for freshly hatched larvae. Those are only a few days old. If you see some tiny larvae today and look again a few days later and see more around the same size, there probably were eggs in there that you just didn’t see. And a queen laid them. Thus, there is a queen in the hive.

Right now, I’m caring for seven hives. I don’t do hive inspections as often as I should — I only get in there about once a month — and this year I’ve probably only done about twenty hive inspections. Yet I’ve only seen a queen four or five times. And in two of my hives, the queen is marked!

Remember, there are thousands and thousands of bees in each hive. If you’re set up with two or more supers and twenty of more frames, do you honestly think you’ll be able to spot the queen in an 30-minute inspection? I don’t. And although I keep an eye out for her as I examine each side of each frame, I don’t waste time searching for her.

It’s more important to assure that the colony is healthy with plenty of brood and food stores than to look for the boss lady that makes it all work.

That’s how I look at it anyway.

Bees and Mites

A TED talk with great bee footage and some clarification.

My friend Megg tagged me in a Facebook post that included a link to a TED talk titled “A Thrilling Look at the First 21 Days of a Bee’s Life.” If you haven’t seen this yet, you should watch it. It includes the most amazing footage of a bee hatching from an egg and developing from a larvae to an adult bee.

Watch it now. I’ll wait.

Wasn’t that amazing?

But I do need to set the record straight. During the presentation, the speaker, Anand Varma, says that beekeepers use chemicals to treat for mites. Although we can use chemicals, not all of us do. There are other non-chemical treatment methods. I use a combination of drone frames and screened bottom boards.

  • I’ve blogged about mites and drone frames:
    Bees: Installing Drone Frames
    Bees: the Drone Frames Really Do Work
    Bees: More about Mites

    Drone frames encourage the queen to lay more drone eggs, which the mites prefer because they have a longer gestation period. I then kill the developing drone larvae and the mites with them by freezing them (or feeding them to my chickens). I can reuse the drone frames.

  • Screen bottom boards replace the solid bottom of a hive with a screen that bees can walk on but mites fall through. Once they fall through, they can’t climb back into the hive. Sticky boards can also be used beneath screens to catch the mites and count them to estimate infestation levels.

A third technique I’ll try this year is using powdered sugar. You dust the bees with sugar and they clean each other off. As they clean off, the mites fall off and, if there’s a screened bottom board, they fall thought and exit the hive.

I believe that consistent and proper use of all three methods can reduce mite infestations without chemicals.

So while genetically engineered bees might be one solution that could be better, beekeepers have other cheaper and easier options available to us.

New Bees, a New Bee Yard

I reboot my beekeeping efforts with two nucs in a new location.

I started beekeeping back in the spring of 2013. I’ve had mixed results.

Some History

I started beekeeping in June 2013 and have been blogging about it periodically. If you’re interested in reading the other posts in this series, follow the Adventures in Beekeeping tag. Keep in mind that posts appear in reverse chronological order, with the most recent first.

I started with one colony in 2013, caught a swarm, and then split a hive to end the season with three colonies. That first colony yielded about 2-1/2 gallons of honey with an early harvest. I was very encouraged. Late in the season, I moved my hives from their temporary homes in Wenatchee and Wenatchee Heights to my new home in Malaga. I set up an apiary or bee yard for them not far from where I was living in my RV and would build my home.

I lost two of the three colonies over the winter of 2013/2014 but the surviving hive, which I took with me to California for two months, was strong and I split it early. When I returned home, I added four packages in April and caught a swarm, ending the season with seven hives.

Unfortunately, I neglected my beekeeping duties that summer — mostly because I was kept so busy with the construction of my new home — harvested another 2-1/2 gallons of honey very late, and failed to treat for mites. My neglect did not go unpunished: despite moving six of the hives to East Wenatchee for the winter to avoid the Shadow Time at home, all seven of my hives died.

Cleaning Up

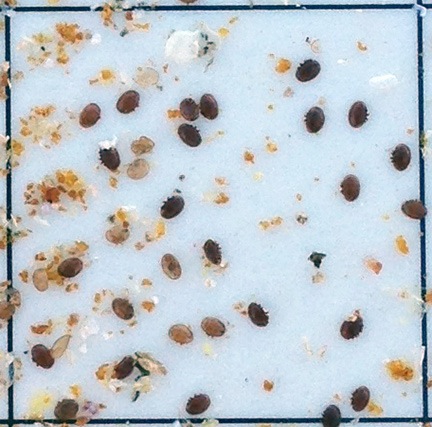
I retrieved the hives from East Wenatchee on their trailer, opened the boxes, and took a look. All of the boxes were full of dead bees and a lot of mold. (Yes, I know: I should have ventilated the tops of the boxes. I did mention my general neglect, didn’t I?) I thought it was the mold that killed them, but later decided it was probably a general weakening due to mites, which I hadn’t treated for prior to winter. (Lesson learned.)

I started pulling out frames and scraping them clean, keeping the comb to melt down wax. Some of the frames I’d bought locally at Coastal Farm and Ranch had been improperly brushed with wax, resulting in irregular comb that was a real bitch to extract honey from. I was determined to rewax all of the frames bought from Coastal before reusing them and needed the wax stores to do the job. But with so many dead bees and so much mold, most of it wasn’t worth saving.

I surfed the net to find some info on cleaning mold out of hives. Several sources said to simply reuse the moldy frames — the bees would clean it up. One source even had a video showing a moldy frame put into a hive and that same frame, a week later, cleaned up and being used by the bees.

Many sources suggested freezing frames to kill any pests that might be on them. That’s easy enough to do — I have a chest freezer that’s big enough to hold a few dozen frames at a time — but since my hives were out in freezing weather after the bees died, I don’t think it’s necessary.

Meanwhile, on warm days — and we had a few of them last week — the neighborhood bees, most of which are likely pollinators brought to the area for cherry pollination, came by and cleaned out the remaining honey. For a few days, the area around that bee trailer was buzzing with thousands of “robber” bees. It took them about a week to clean up.

Pollinators
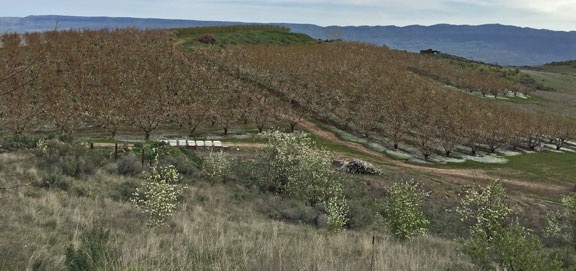
The pollinators are back! This orchard just off my street has blooming cherry trees and pollinator bees brought in just for the season.

I ordered four packages of bees from the supplier used by the beekeeping club I belong to: the North Central Washington Beekeepers Association. Unfortunately, they would not arrive until mid April.

I set up a hive box, base, and lid on the hive stand near my garden. That’ll be for my garden hive. And then I started to rethink where to put my new hives once I got them.

A New Bee Yard

I have ten acres of land here in Malaga. While about 30% of it is too hilly to accommodate bee hives and I’m using about 10% of it for my home, I still have several acres I’m not using. It seemed silly to put the bees so close to my home, in my view, when I could move them farther east on some land I wasn’t likely to use for anything else.

Lay of the Land
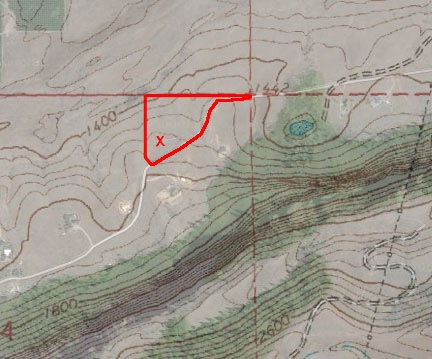
I threw together this hybrid topo/satellite map to show the lay of the land. The odd shaped red box is my 10 acre parcel; the south property line follows the road — hence the odd shape. The X is my homesite.

Understand that my lot has an odd shape. While its west and north boundaries run pretty much north/south and east/west respectively, its south boundary follows the road. Since the road winds northeast past my home, the farther you get on the east side of my property, the narrower the property is. At the very far east end, which is over a ridge and out of sight from my home, it’s only about 20 feet wide.

Before that point, however, right where the lot starts to get narrow, is a small ridge where my lot is about 100 feet wide. I know exactly where my property line is there because I had surveyors place a stake on the ridge back in 2013 before I bought the property. This is the easternmost part of my land that I can see from my home; I have to stand on that ridge to see beyond it. It’s also the part of my land that receives direct sunlight the longest.

I’d been considering that location as a site for my bee yard for a while and I drove out there a few times to take a closer look. The ground wasn’t exactly level and there were some sagebrush bushes, along with the bunch grass and wildflowers native to the area. But there were a few areas that were relatively clear and level and would be easy enough to get to with my ATV or Jeep or even the bee trailer. It would be a shame to carve in a two-track road with my tires, but it wasn’t as if the road would be long or I’d see it from my home. The ground was soft enough that I could probably even drive in a few T-posts, which I already had, and fence in the area to keep out large critters.

I let the information stew in my brain while I went on with my life.

Two Nucs from Wapato

I am not a patient person. The warm weather and abundance of wildflowers and orchard flowers were driving me nuts. If I had bees, they’d be out and about, visiting flowers, bringing home pollen and nectar, growing their hives. I could not only do a hive split in late May or early June, but I could probably even harvest some honey then — which was a good thing because I had less than a quart left.

Beekeeping 101: Nuc vs. Package

A nuc is a nucleus hive. It’s a cardboard box with an established queen and five drawn-out frames of honey and brood. It’s basically a small colony. You get it home, put the frames in a standard hive box with five empty frames, and the colony simply carries on, expanding into those frames you provided. This is the easiest way to get started.

A package is a box of bees with a queen in a cage. You dump the bees into a hive box filled with empty frames, put the queen’s cage between two frames with the cork replaced by a piece of candy or marshmallow, and cover up the box. The bees eat through the candy to release the queen and she starts laying eggs.

The main benefit of a nuc is that with capped brood already available, new bees will emerge from cells immediately; although a queen in a package should start laying eggs immediately, it’ll take three weeks for the new bees to start emerging.

So I started poking around, looking for bees. And I discovered that the Sunrise Honey Farm was selling nucs, with a pickup date down in Wapato on April 4.

To be fair, some people from my club had ordered nucs from Sunrise and they were delivered to Wenatchee the previous weekend. Somehow I thought the bees I ordered would arrive the same day so I ordered the packages, which were considerably less expensive. If I’d known that the nucs would arrive three weeks earlier, I would have gone with the nucs.

I did not want to drive to Wapato. It’s more than two hours away, south of Yakima. But I wanted an earlier start. So I called Sunrise and left a message. A few days later, they called back to say that they had a cancellation and there were two nucs available. I told them I’d take them. They told me to be in Wapato between 7 AM and 10 AM on Saturday.

I left home at 7 AM in my little Honda S2000 to make the drive. Along the way, I stopped down at Crescent Bar, where one of the cherry orchards I’m on contract to dry was in full bloom with bees on. I could not have timed it any better. When I arrived, the beekeepers were just pulling the last pallet of hives out of the orchard. I pulled over, rolled down the window, and chatted with the beekeeper, Eric, for about 10 minutes.

Wow. What an education! He told me that the cause of death in my hives was most likely nosema, although varroa, as I suspected, had probably weakened them, too. He recommended a product to apply at the end of honey harvest, before winter. He also suggested that I feed pollen late in the season when food sources were scarce. He said that doing these things should keep the bees strong enough to get through the winter.

I drove the rest of the way along a scenic route that took me along the Columbia River and then through rolling hills studded with farms and orchards. After a quick bathroom stop at a gas station five miles short of my destination, I pulled into a farmhouse driveway where I flatbed truck waited. It was just after 10 AM and there were just two nuc boxes on the truck’s bed.

I apologized for being late and they told me I was right on time. I gave them money and we loaded the two boxes into my car’s trunk. They didn’t fit, of course — my trunk needed to be about two inches deeper. So we used Penny’s dog leash to tie the trunk lid down. (Note to self: put bungee cord in Honda trunk.) We said goodbye and I headed home to Malaga; they headed back to their home in Spokane.

Hiving My Nucs

At home, I took the nucs out of the trunk and put them in the shade. One of them was buzzing loudly; the other was more subdued. I put the car away.

I was very pleased to see that the new nuc boxes were solid. In the past, I’d gotten boxes that the bees could escape from; it didn’t seem as if any were escaping from these.

It was only about 1 PM so I had plenty of time to get the bee yard set up and put the bees in their hives. Or at least I thought I did. The weather made me doubt that.

I used my ATV with its farm trailer attached to move a pallet, and several blocks of scrap wood posts, a level, and the beehive bottoms and tops out to where I planned to put the bees. As I suspected, I could drive the ATV right up to the yard area. I set up the pallet on the blocks, raising it about 8 inches off the ground. I was able to get it surprisingly level. I set up the hive bottoms and checked the level again. One rocked a bit; the pallet wasn’t perfectly flat. Some Pergo scraps under a corner would fix that. I positioned them on half the pallet, leaving room for two more hives. I’d have at least six by month-end.

On the second trip, I brought out the hive bodies with five relatively clean honey and brood frames in each.

By that time, the wind was blowing cold and hard. There was a storm moving in from the south toward Wenatchee. It might even be snowing up on Mission Ridge. Although it looked as if the storm might miss my place, who knew? I didn’t want to be out there with open beehives in a cold wind or rain. So I took a break and went inside for a while.

A friend called. He was in the area and asked if he could drop by. Of course!

We chatted, drank hard cider, assembled two of my three new bar stools, and tried them out. The storm never came. The sun came out and the wind died down. I kept thinking about my bees, eager to get them put away before nightfall. But I was enjoying my friend’s company. Still, when he said he had things to do at home, I didn’t stop him from leaving.

By that time, it was 5 and the sun was getting low. The wind had kicked up again, but not as bad. I loaded the bees, my smoker, and my hive tool into my Jeep. I suited up in my bee suit. Then I drove out to my new bee yard, backed the Jeep into the yard, and got to work.

I did one nuc box at a time. They were both filled with old, propolis-stained brood frames, with many capped brood cells. I didn’t waste time examining each frame or looking for the queen. In both cases, however, I did notice a queen cage fastened to a frame; I’ll need to make sure there’s no queen in each cage before removing them.

New Bee Yard
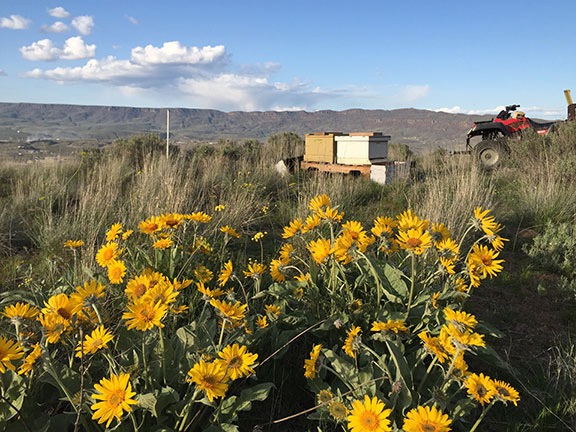
I used my ATV with its attached farm trailer to bring the hive components out to the new bee yard. There’s a lot of balsamroot in the area.

I have to admit that I’m a bit disappointed. Apparently, these nucs were created by taking brood frames with bees on them from the pollination hives and adding a caged queen. This is like a mix of a nuc and a package — the only thing that makes it better than the package is the inclusion of capped brood. The queen isn’t really “established;” she may not even be laying eggs yet. I need to examine the frames more closely on a warm day to see what’s going on.

Of course, some of the bees were left behind in the nuc boxes. That’s common. I left the boxes in front of the hives with rocks in the bottoms so they wouldn’t blow away if the wind kicked up hard again; the straggling bees might find their way into the hives. Or they might not and simply die overnight in the cold.

I realized belatedly that I should have fed them but I didn’t have any feed ready; I prepped some later when I got back in and put feeders at each hive this morning, before it warmed up. I also picked up the nuc boxes and put them away; they’ll come in handy if I have to capture any swarms over the next few months or if I want to do a hive split.

My Bee Yard
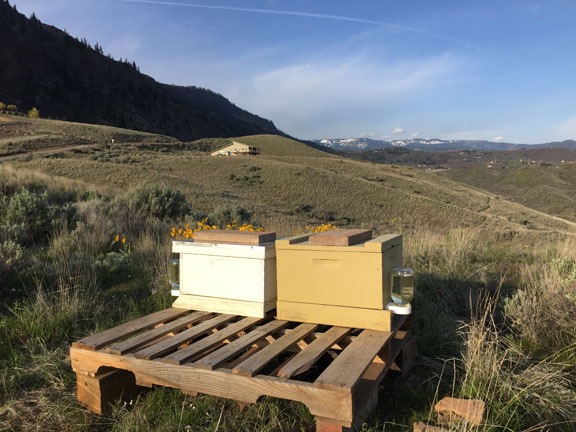
My bees are within sight of my home — and Mission Ridge, which is still snow-covered.

This Year’s Plan

I’ve decided to be a good and dedicated beekeeper this season. That means doing a hive inspection every 10 to 14 days, keeping copious notes about hive conditions, using integrated pest management, and making sure my bees are well fed and healthy before winter. I can’t use hot weather as an excuse to avoid a trip to the bee yard — I bought a vented bee suit at Mann Lake when I was there last month. I’ll also harvest honey on a more timely basis — as I learned last season, a late harvest is not fun.

I’m also working on some plans to put my bees in other locations, including a resort about 40 miles from here. If I get the resort contract, I’ll do some beekeeping seminars for resort guests when I do hive inspections there, thus earning some additional revenue to support this “hobby.” And that’ll open up a whole new market for honey sales.

I’ve already decided that if I have another total loss winter, I’ll give up as a beekeeper. But I think that if I do what I need to do to keep my bees healthy, I’ll have enough colonies next spring to continue without another bee purchase.

Wish me luck!

Bees: The Riskier Hive Split

Just a quick note another long, drawn out post to document a recent hive split and the results so far.

I started my beekeeping hobby in June 2013 and have been blogging about it periodically. If you’re interested in reading the other posts in this series, follow the Adventures in Beekeeping tag. Keep in mind that the most recent posts always appear first on this blog.

Last year, I split my original hive into 2 hives. I called it “the risky hive split” because of the way I did it — kind of haphazardly with my fingers crossed. I basically pulled a few brood frames with swarm cells out of an existing hive and stuck them in a new hive box with some honey and empty frames. The split worked because at least one of the queens hatched and took over. But that new hive was never very healthy and was the second to die after winter. The original hive was the first to die.

Mites on a Sticky Board
The actual size of this square is 1 inch.

Now you could say that they died because of the split. Instead of one strong hive, I wound up with two week ones. But I did the split in mid-July and prevented a swarm. The original hive continued to thrive. I think the reality was much more sinister. Both of those hives had terrible varroa mite infestations — I documented this with sticky boards in late summer. Although I did what I could to get rid of the mites, including drone frames, screened bottom boards, and miticide, I think the damage was done and the colonies were weak going into winter. The winter was harsh with few warm days and the bees simply didn’t make it.

Springtime at My Mobile Apiary

Fast forward to this year. Of my three hives, only my swarm capture hive survived the winter. Not only did it survive, but it was going like gangbusters within a few days of setting it up in my temporary home in the Sacramento area of California. (That hive, by the way, had very few mites in late summer. Coincidence? I don’t think so.)

If you’re not a beekeeper, all this is probably meaningless to you. Let me try to explain as simply as I can.

Each hive must have a single queen and a whole bunch of worker bees. It might also have drones, but doesn’t really need them. (Strong women really don’t need men either, but I digress.) The queen’s job is to lay eggs to make more bees. The workers’ jobs are to do everything else — tend to the eggs and larvae (or brood), maintain the hive, guard the hive, gather pollen and nectar, and make honey.

If there isn’t a queen, no new bees can be added to the hive. Within a month or two, all the bees will have died and the colony will have collapsed. The workers instinctively know this. They also know if the current queen is sick and needs replacement (supercedure) or if the hive is becoming so crowded that half the bees need to move out with the queen so there’s room for a new queen to start fresh (swarming).

The workers have the ability to turn any egg into a queen when they think they’ll need one. They do this by forming a special elongated cell for the egg and feeding it a diet of royal jelly, which they make, until the cell is capped. After a longer-than-usual larval stage, a queen emerges. If there’s more than one queen in a hive, the strongest queen will kill the weaker ones.

I’ve done four pretty thorough hive inspections since arriving here and setting up the bees — including the initial setup/inspection about a month ago. The second inspection showed impressive brood development but not much in the way of honey storage. In addition, I was very surprised to see that the queen’s laying pattern covered almost an entire brood frame — not just the middle as most queens do. There were brood cells all the way to the side and bottom edges of each brood frame with just areas along the top and in the corners filled with honey.

The other surprise was how many of the frames were being used for brood. The deep body had just nine frames in it — a strategy I’d like to avoid in the future — and there was brood in six or seven of them. At that rate, I figured the queen would soon run out of space for brood and the bees would need more room for honey. So I placed a queen excluder atop the deep box, a spacer with an entrance on top of that, and a medium box with mostly drawn out — but otherwise empty — comb on top of that. The idea was to encourage the bees to move the honey upstairs, where I could pull frames for extraction and replace them with empty frames. The queen excluder would keep the queen downstairs. In theory, it should work.

It didn’t. On the next inspection, I found that the queen just kept laying eggs downstairs, making the hive ever more crowded, but the bees had not started to put honey in the medium super above them. I looked for signs of swarm preparation but found none. Just a whole lot of bees and a whole lot of brood.

That gave me the idea that they wanted to make bees. That was fine with me; I was hoping to go home with at least three active hives. Maybe I should try another hive split?

The Riskier Hive Split

Now, the last time I did a hive split, I had swarm cells — that means that the workers were already trying to make queens, likely in advance of a swarm event. What made that split risky is that I never actually found the queen. I just made sure that each hive had brood frames with swarm cells on them. I figured that the bees would continue to tend to those swarm cells until a queen emerged. If a hive wound up with more than one queen, they’d sort it out for themselves.

And that’s what they apparently did. They certainly didn’t swarm and I have no way of knowing which hive wound up with the old queen — or even if she was killed by a new queen.

But in this case, I didn’t have any swarm or supercedure cells. No future queen.

What I did, have, however, was the location of the queen. I found her on one of the three primary brood frames during my third inspection. I was prepared. I’d already assembled another deep hive box with brood and honey frames. I slid the frame with the queen on it back into her hive and then pulled out the other two primary brood frames, each of which had very young larvae in them. I can only assume there were eggs as well — the damn things are so small that I just can’t see them in cells against the yellow background. (Note to self: only buy black foundation for deep frames from now on.) I slid those frames with their bees into the new box and put empty brood frames from that box into the original hive. Then I took one of the honey frames full of bees and put that into the new box. In all, I probably put about 30% of the original hive’s bees and 20% of its brood into the new box. I closed up the new box and pointed its door 90° to the left (south)

What I was hoping, of course, was that the bees in the new hive would quickly realize that they were queenless and do something about it — namely, take a few of those cells containing eggs or newly hatched larvae and do what they needed to do to turn them into queens. That would be the best case scenario. The worst case is that they’d abandon the hive and find their way back into their old hive, which was sitting right beside them with its door pointing 90° to the right (west), leaving the brood untended so it would die.

Of course, you won’t find many bee books that tell you to do this. Most tell you that if you want to split a hive, you should buy a queen, put bees from an existing colony into a new hive box, and introduce the new queen to them. If they accept the queen — which they should if you do everything right — the queen will get right to work making more bees.

I had a few more things to do with the original hive before I closed it back up.

I had a drone frame in there and it was more than half full and capped, but I pulled it out and replaced it with a regular frame. Trouble is, it won’t fit in my RV’s freezer and I had to borrow freezer space at the airport office. Doing that once is okay, but I don’t think they’d like to see a new frame full of bee larvae every three weeks. (Yes, I did wrap it in a black plastic bag.) I’ll save the drone frames for when I get home and can access my chest freezer.

In the meantime, I’d bought a comb honey setup with shallow frames and wax foundation. Not knowing what else to do with it, I stuck it on top of the medium box on the original hive. Maybe they’d prefer that kind of foundation over the medium frames. (That would certainly make me happy, since I want to make comb honey.)

I closed the hive back up, put away my tools, wished the bees luck, and left them.

Throughout the week, I visited the hives. I saw bees coming and going from both hives, but far more at the original hive than the new one.

Progress Report

And that brings me to my most recent hive inspection, which I did earlier today. My main goal was to see what was going on in that new hive. Were there bees in there? Were they working? Most importantly, had they built queen cells?

I suited up and opened their box. I immediately saw bees inside — a good sign. I pulled out a few frames along the edges. No new brood — but I really didn’t expect any.

Queen Cell
This photo shows a queen cell and some drone cells from last year. I didn’t take any photos of the queen cells in my new hive.

Then I pulled out one of the middle brood frames — one of the ones that had been inside the old hive box. I was thrilled to see queen cells on one side. I counted two of them. The other frame had five queen cells. This was looking good. I put everything back in place and closed it up. No need to disturb the bees any more than I needed to.

Of course, now I have a new worry. If the queen hatches successfully, will she find drones to mate with when she goes out for her mating flights? Maybe freezing that drone frame was a bad idea. (Cut me some slack; I’m new at this.)

The original hive, however, was a bit of a disappointment. The bees still hadn’t put any honey in either of the upper boxes. To make matters worse, they’d begun to fill the queen excluder with wax. I had quite a time clearing it out. Not knowing what else to do, I reassembled the hive the way it had been. If the new hive produces a queen and she starts laying eggs, I’ll put one of the honey supers on that hive.

In the Meantime…

A beekeeper with a pollination business here in California is selling his hives. He has 50 left and is selling them in palettes of four. I’ll be visiting him next week. Who knows? I might come back to the airport with another four beehives.

Bees: More about Mites

My own observations prove another beekeeper’s theory true.

I started my beekeeping hobby in June 2013 and have been blogging about it periodically. If you’re interested in reading the other posts in this series, follow the Adventures in Beekeeping tag. Keep in mind that the most recent posts always appear first on this blog.

As I mentioned in a previous post, I’m concerned about varroa mites in my beehives. Mites can weaken a colony to the point that winter survival is impossible. Since I’d like all my hives to survive the winter, I’m starting a war on mites now, before it’s too late.

My Setup, as it Relates to Mites

There’s a few points I want to make here without spending a lot of time on a long narrative.

  • My three hives come from two sources:
    • My original hive was a nuc I purchased from a beekeeper in Peshastin. That hive grew and thrived very quickly, producing 2-1/2 gallons of honey in about a month. When a hive inspection showed signs of swarm cells, I split it off to form my third hive.
    • My second hive was a swarm capture. The swarm came from a colony living in the wall of a friend’s shop building. These are as close to “wild bees” as you can get.
  • My hives aren’t all set up exactly the same way. As I experiment with different hive components, I use them on different hives. For example, my first and second hives have standard wood bottoms while my third hive has a bottom with a varroa trap screen drawer. When setting up this third hive, I placed a sticky board in the drawer and left it there for about a month (which is really too long.)
  • My first and second hive have drone frames installed. As I discovered earlier this month, the drone frames work — once they’re adopted by the bees — and my first hive was confirmed to have mites.

Mite Count

On Wednesday, after a normal hive inspection, I placed sticky boards (with screens) in my first and second hives. Remember, I’d already learned that my first hive had mites; the idea behind the sticky board was to see how bad the mite problem was in each hive. Because I’d left the sticky board in the third hive so long, I couldn’t really gauge the mite problem. So I got serious for this test and left the boards in for just two days. If I had a third board, I would have tested that third hive again, too.

Mites on a Sticky Board
I’d say this hive has a mite problem, no?

When I pulled them out yesterday morning, I was surprised to find that the sticky board from Hive #1 was full of mites. Here’s a magnified image of just one square inch of the board. The dark ovals are dead mites — you can even see the legs on a few of them. The light ovals are also mites, but I don’t know if they’re some sort of shedded skin or exoskeleton or the actual mite itself after being dead for a day. The other dots on the image are mostly litter from the hive as well as some propolis that the bees laid down between the holes on the screen. Keep in mind that this sticky board has 176 square inches and although not all of them are as full of mites as this one, some are a bit worse.

All this was gathered in less than 48 hours.

But what was even more surprising to me — at first, anyway — was that the sticky board for Hive #2 had very few mites on it. In fact, because I pulled it out first, I thought that I’d pulled it out too soon. It wasn’t until I pulled out the other sticky board that I realized that the boards had done their job; I just had far more mites in one hive than the other.

Why the Difference?

Last night, I was at a BBQ gathering of helicopter pilots and mechanics who are based in the area for fire season. One crew — pilot, mechanic, and fuel truck driver — are based in a really nice house in a farm just down the road from where I’m currently living. They had a fire going in the fire pit and grilled up some steaks and brats and corn. It was a really nice night out.

I got to talking to one of the pilots, a guy who flies the Cessna Skymaster “push-pull” used for observation and direction to fire crews. He lives in the Snohomish area of Washington and keeps bees at home. We got to talking about mites and he asked me where I’d gotten my bees. When I explained their source, he told me that commercial bees always had mites.

I thought about what he said. It completely jived with what I had observed. The hive from the nuc had a bad mite problem. The hive from the swarm had very few mites at all.

He said that because so many hives were moved around for pollination, the mite problem spreads. He keeps mites out of his hives by keeping them away from commercially available bees.

Certainly something to think about.

Three Means of Attacking Mites

Because I’m serious about eliminating — or at least greatly reducing — the mite population in my hives, I’m currently using a two-prong attack:

  • The drone frames, as I discussed in another post, can help concentrate most of the mite reproduction on one frame, where they can be easily removed. Unfortunately, the queen is far less likely to lay drone eggs as the summer season comes to a close. In addition, only one hive (so far) has adopted the use of the drone frame.
  • I’ve purchased a miticide and dosed each of my hives with it. Although it can’t be used when the bees are producing honey for human consumption, using it now, before winter, should help reduce the number of mites and make a stronger hive.

The third method, which I hope to be able to institute soon, is to have sticky boards beneath screens on the bottom board of each of my hives. While it would be great to do this via a varroa trap with drawer for each hive, the $27 price tag makes that a bit more than I want to spend. So I’ll likely cook up my own solution using some “hardware fabric” I already have on hand to make the screen. I’ll talk to a beekeeper friend to see what we can rig up.

In this area, bee colonies have a 50% overwinter survival rate. I have three hives. I want to have all three colonies survive the winter. That’s going to take some work — and I’m willing to do it.