Another chapter in my never ending saga: any excuse to fly.
Early this week, it rained.
That might not seem like a big deal to most folks, but it rains very seldom in Arizona. In fact, I hadn’t experienced a good rainstorm since my drive back from Washington state in October.
This week, it was cold and rainy for two days in a row. With rain comes three things:
- Clouds, which make our normally plain blue sky more interesting and give it depth.
- Cleansing, by which I mean that the dust is washed off the desert rocks and plants, making their colors more vibrant.
- New growth in the desert, which makes everything look just a tiny bit greener than it otherwise would.
You need to be a desert dweller to really appreciate these things.
There’s nothing I like more than to go flying over the desert right after a good rainstorm. So on Wednesday, as the storm clouds moved north and blue sky started to appear again, I loaded up my GoPro cameras and mounts, hopped in the car, and drove up to Deer Valley Airport, where my helicopter is living part-time this season. When I arrived just before 9 AM, my helicopter was sitting out on the pavement, ready for me to preflight, set up my cameras, and go.
The Camera Setup
I took my time about setting up the three GoPros. I have three different models and I use each one for a different purpose.
- GoPro HD Hero2 Professional – With its sound-in port and better lens and recording capabilities, I normally mount it on the helicopter’s nose as the “nosecam” and connect it to an audio-out port I had put into the helicopter a few years back. It captures not only intercom communications, but all radio communications. Basically, anything I hear in my headset is also sent out through that port to my GoPro. Here’s an example of an image from the video on this camera, shot at 720p:

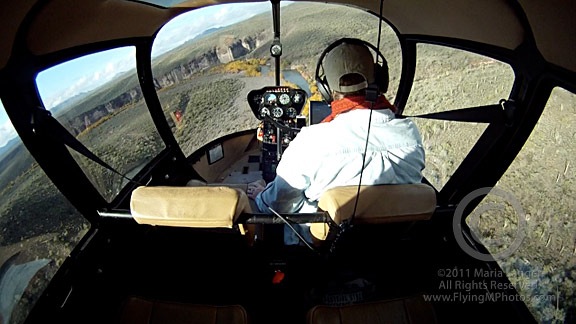
- GoPro Hero HD Original – I mount this between the helicopter’s two back seats, inverted, to capture a wide-angle view of what’s going on inside the helicopter and beyond. This “cockpitcam” view works fine with passengers, but it doesn’t give a close-up view of the instrument panel. For that, I need to mount the camera forward, on the bar between the two front seats. Here’s a view from the camera as I had it mounted Wednesday, also shot at 720p video:
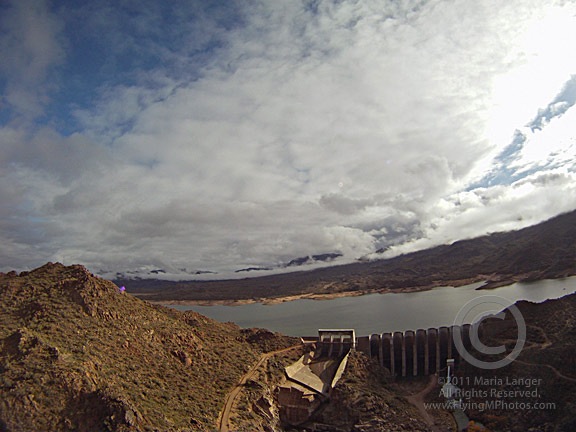
- GoPro Hero 960 – Because I haven’t been exactly thrilled with the 1080p video coming out of my original GoPro HD Hero, when I decided to invest in a second one, I went with the cheaper model, which can’t shoot 1080p video. Instead, it shoots up to 1280×960. I like the widescreen format, so I shoot 1280×720. I saved about $100. On Wednesday, I used a new skid mount and set it up to snap a 2592 × 1944 still image every 10 seconds. (In the 20-20 vision of hindsight, I should have set it up for every 2 seconds; 6 shots per minute isn’t quite enough when you’re cruising at 100 miles per hour.) Here’s a sample image from that “skidcam”:

So to summarize: I set up the helicopter as a camera mount for three different cameras: 2 shooting video and 1 shooting stills.
The Flight and Some Photos
I turned on all the cameras, climbed into the cockpit, and started up. Five minutes later, I was overflying Deer Valley Airport at 500 feet AGL, northbound. Here’s a nice shot of the airport from the nosecam:
The beauty of all this was that with this setup, I’m able to capture images from three cameras without having to even think about any of them. Absolutely no distraction for me, allowing me to keep my full attention on my primary duties as a pilot: aviate, navigate, and communicate.
The flight was not quite what I had in mind. I was hoping to overfly Lake Pleasant and get all the way to Wickenburg. But as I neared Lake Pleasant, I saw low clouds over the lake. There was mountain obscuration to the northwest — which means the clouds were pretty darn low, since those mountains aren’t exactly lofty peaks. Here’s a nose cam image of the marina at Lake Pleasant near the dam; you can see the low clouds at the north end of the lake:
I wasn’t very interested in getting images and video shot in overcast conditions. So I decided to head east, where the sky was clearer and sunlight was filtering through to the desert floor.
There was a balloon flying southeast of Lake Pleasant and I tried to get some shots of it with the skidcam. Trouble is, the GoPro’s very wide angle lens exaggerates the distances. If I wanted a good shot of the balloon where it looked close, I’d have to get much closer to the balloon. While I think I could have gotten closer safely, I didn’t want to give the balloon operator or his passengers heart failure so I stayed clear. This is the best I could get; again, a shot every 2 seconds would have given me more to choose from.
As I flew east, the two front-facing cameras were pointing toward but not exactly into the sun. GoPro cameras get their best images when the sun is at an angle of at least 60 degrees from the lens. According to the LightTrac app on my iPhone, at about 9:45 AM the sun was at about 140 degrees. I was flying at about 90°, so the sun was at 50° angle to the front-facing cameras. At the same time, it was at a 40° angle to the skidcam, which was facing almost due south. (Obviously, I didn’t look up the angles while flying.) As a result, the images from this leg of my flight were pretty disappointing. Here’s an example from the cockpitcam as I flew over the intersection of I-17 and Carefree Highway:
I flew all the way out to the Verde River and then headed up the river as far as Bartlett Dam. The two photos near the beginning of this post shot nosecam and skidcam views. Since more gray skies and low clouds covered Bartlett Lake, I turned around and headed south. The cockpitcam shot near the beginning of this post shows my view as I headed approximately southwest. After a tiny bit of shallow canyon flying (see nosecam photo below), I headed toward Scottsdale where sun, low clouds, and rocky outcroppings made for interesting views.
I got a nice shot of Pinnacle Peak from the skidcam at several altitudes for use in a book project I’m working on.
I also got nosecam and cockpitcam footage as I approached the peak. Interesting to see the difference between these two views, shot at about the same time.
By that point, I’d been in the air for about an hour and thought I had enough footage to test my setup thoroughly. I headed back to Deer Valley. The one mistake I made was that I flew along side a power line, with the power line on my right — right in the view for my skidcam. This was very unfortunate because the camera was facing north at this point and could have captured a lot of nice footage. Instead, all the footage features the damn wires.
I guess that proves that I wasn’t really thinking much about the cameras.
And for those who are interested in such things, this is the track log of where I flew, as recorded on my iPad.

The End Result
In all, I got just over 300 photographs and 2 hours of video — an hour from each camera. Quite a bit of it is useable and will likely appear in edited video content I produce in the future.
I plan to try shooting video from the skidcam. I could see it from my window and checked it a few times in flight to see how much it was vibrating — it didn’t seem to be vibrating much at all. Of course, you can never tell until you shoot the video and see the results. So that’ll be my next test, probably tomorrow.
A Final Note about the Camera Setup
I took photos of all my cameras as they were mounted before beginning the flight. I hesitate, however, to share them or provide detailed information. Although I know many pilots who regularly mount cameras on the outside of their aircraft, it’s one thing to talk about it and another to document it with photos for the world to see. I’m very confident in two things:
- Any camera I mount on the outside of my aircraft will not fall off. I use several safeguarding measures to ensure this. I am positive I will not lose a camera.
- None of the mounting locations affects the aerodynamics of my aircraft. In other words, it flies just as well with the cameras attached as it does without them.
These are the only things that should concern a pilot or anyone overseeing that pilot’s activities.
Comments? Questions?
I welcome your comments, questions, and suggestions. Post them here.

 I did a “first light” photo flight this morning. The client: me.
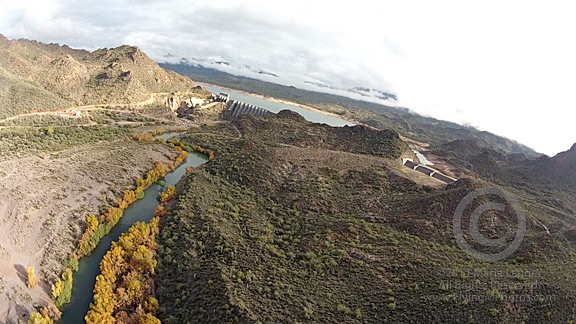


 This morning, while on
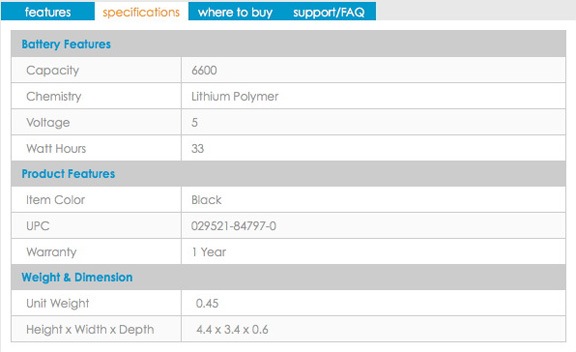
  I’m interested in devices like these. In fact, the other day, I’d added the