May Morel Mushrooms

I find and bag my first morel mushrooms.

Science Friday, an NPR radio show (also available as a podcast), did a show last Friday about mushroom hunting. It got me interested in mushrooms all over again.

Last October, I attended a weekend-long seminar at the North Cascades Environmental Learning Center about mushrooms. We learned about mushrooms, hunted for mushrooms, identified mushrooms, and ate mushrooms. It was a fun weekend.

About a week later, I went mushroom hunting in the Leavenworth area with one of the other seminar attendees. We didn’t do too well, but didn’t come back empty handed, either: two chanterelles, some oyster mushrooms, and something else I can’t remember. I took home the chanterelles; my companion took the rest. I returned to the area several times since then but haven’t had any success.

I’d pretty much given up on doing any serious mushroom hunting.

And then Science Friday did their story, “Mushrooms: On the Hunt for Edibles.” And I started thinking about foraging for mushrooms all over again. After all, it was the right season for them and I knew places where the conditions might be right. So I emailed my hiking buddy Susan, who also has some mushroom foraging experience, and asked her if she was interested. Of course she was! We went out around 9 AM Monday morning.

We took the Jeep up into the mountains. That’s about as specific as I’ll get for the location. As any serious mushroom hunter will tell you, locations are never divulged. Morel mushroom hunting is serious business in Washington state; hordes of hunters cross the Cascades every weekend this time of year. Some are commercial hunters; Susan says morels are worth about $30/pound. Others are hobbyists like us who use a mushroom hunt as an excuse to get outdoors and walk around in the woods.

Although we were unable to take the Jeep as far as I’d hoped, we parked at a familiar parking area, grabbed our bags, and headed into the woods. Penny ran ahead. For the next three hours, we wandered around the underbrush on either side of trails or roads, looking for just the right environmental conditions.

Trouble was, I didn’t know the right environmental conditions. I’d never hunted for morels. The only thing I’d every heard was that they grew in areas damaged by forest fires. The Science Friday story said they grew under oak and apple trees, but we don’t have oak trees here and there aren’t any apple trees other than in orchards.

After wandering around the woods off to one side of the road, Susan climbed back down to the road. “I think there’s an easier way down over here,” she called back from up ahead.

Morel Mushrooms
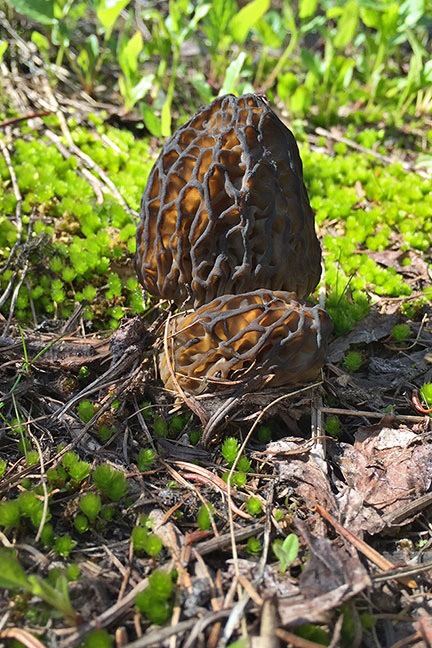
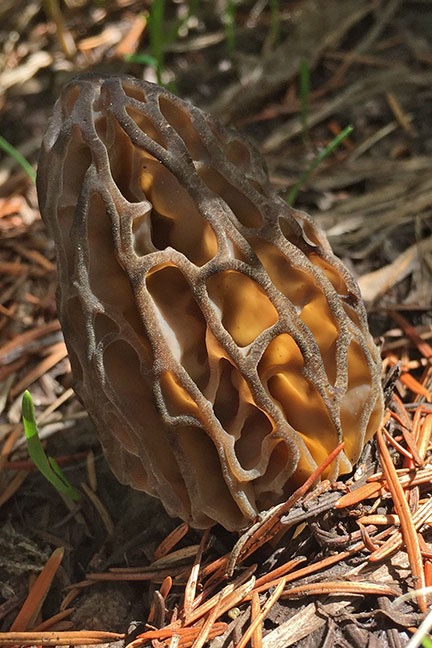
From my first find. Aren’t they gorgeous?

Morel Mushrooms
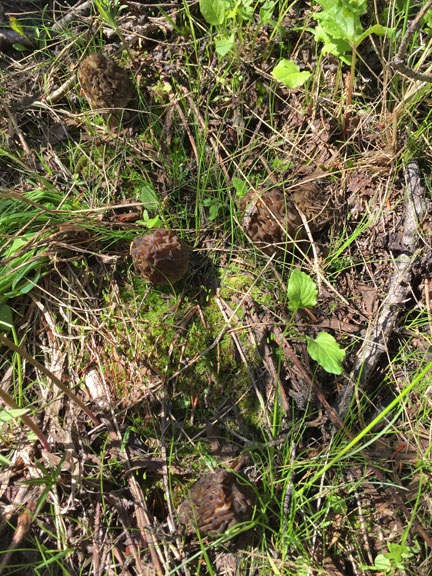
Can you see all five mushrooms here? Hint: two of them are together.

Morel Mushroom
Here’s a closeup of one of the last morels I found. As you might imagine, from a distance, pinecones look similar.

I made my way through the underbrush. I was about halfway down the steep slope when I looked down and saw it: a very large morel mushroom. Within seconds, I’d seen three more.

They were beautiful — I mean, really beautiful. Perfectly shaped, popping up through the dirt looking clean and brown and exactly the way a morel should. I took photos. I marked GPS coordinates on my phone. And then I cut them and put them into my canvas bag.

Susan found the next batch not far away and packed them away in a paper bag she’d brought for the purpose.

We talked about the conditions they were growing in. Plants growing nearby. Moistness. Amount of sunlight. We found things in common between the two patches. We began getting a real idea of what to look for.

We continued wandering around, on and off the road, for the next two hours. We took turns finding mushrooms. At one point, Susan found a huge one about three inches from my foot and I spotted a smaller one nearby. At another point, I found five of them within a square foot of space. Much later, the two of us, working within 15 feet of each other, found several patches of them.

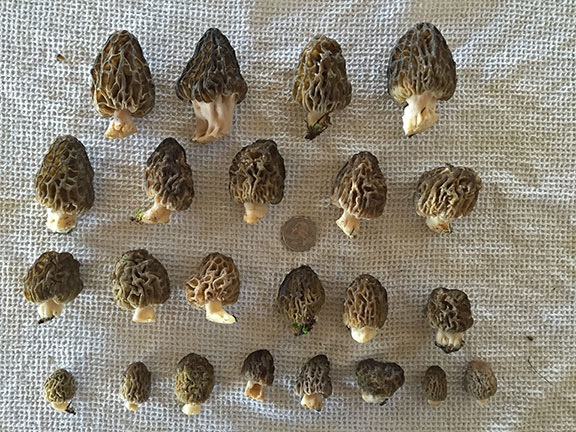
Now I don’t want you to think that the mushrooms were all over the place. Well, mushrooms were all over the place — mostly shiny brown round ones — but the morels were elusive. One of us would find a patch and then twenty minutes might go by before the other found a patch. We were out there for three hours and we each brought back maybe enough for a meal. I weighed mine when I got home: 9 ounces.

It was fun and, because we weren’t getting skunked, it never got frustrating.

It was nearly 1 PM when we called it quits. We’d only walked a little more than a mile according to my GPS tracker.

I drove us back to Susan’s place and took a quick tour of her backyard rose bushes and gardens. We talked about the mushrooms we’d found and how we each planned to double-check that we’d found morels and not false morels, which were not recommended for consumption. Then I headed home.

Later, I laid out the mushrooms I’d brought home to take a photo. I also weighted them on my postal scale: 9 ounces even. Good thing we weren’t hunting mushrooms for a living.

Morel Mushrooms
Not bad for a first time out, eh?

Dinner tonight or tomorrow: Pizza with Ramps, Morels, and Eggs. I might also try one of the recipes I found for fried morels.

And since mushrooms grow so quickly, there’s a pretty good chance there will be more to pick later this week in the same places we found them today. I’m game for another outing on Friday. I hope Susan is, too.

Blender Bullshit

Do people really fall for this crap?

I used to own a Kitchenaid blender. It was a pretty simple model with a glass jar. I didn’t use it often, but it worked well enough when I did. Until it broke.

I’d bought one of those Magic Bullet blenders to use in my RV when I traveled. Because I didn’t replace the Kitchenaid, I started using it at home, too.

Magic Bullet
A Magic Bullet blender

A Magic Bullet is basically a blender base with two different blade assemblies and a bunch of plastic cups that the blade assemblies screw into. You fill a cup with what you want to blend, screw on the blade assembly, turn the whole thing upside down, and stick the bottom of the blade assembly into the blender base. When you push down and twist, the blender turns on.

Nowadays the “original” Magic Bullet comes with only a few cups and lids. But when I bought it, it came with about a dozen. I’m not sure why. They were a pain in the ass to store so I threw most of them away, keeping just one of each size. Ditto for the rings that turn the screw-top cups into smooth-top cups. (I’m not going to drink out of a plastic blender cup.) And the lids.

Let me be clear: the Magic Bullet is junk. It’s the same kind of disposable appliance so many Americans bring into their lives. Cheap and functional, but not exactly reliable. I knew mine would break and I knew I would throw it away. The only thing that surprised me is how long it lasted before it finally broke: maybe 8 years?

But it did break. And I was left blenderless.

Immersion Blender
My Braun immersion blender is part of a set that includes a chopper and whisk. I often use the whisk to make fresh whipped cream. I don’t think I’ve ever used the chopper. Maybe I should?

Well, that isn’t exactly true. I have one of those immersion blenders. It’s like a stick that you put blade side down into a pot of soup to puree it while it’s cooking. Mine’s a Braun and it works very well. I didn’t use it often until my Magic Bullet broke. Then I started using it to make smoothies. It got the job done — I’d just stick it into a big cup full of the ingredients and whir it until it was smooth — but I had to be careful if I didn’t want smoothie all over my kitchen.

Clearly, it was time for a replacement blender.

I mentioned it to my Facebook friends and the recommendations started coming in. Apparently, there are a lot of folks out there willing to pay in excess of $300 or $400 for a blender. I think they must use it a lot more than I do. I just wanted a small and functional kitchen appliance that I could store on a shelf in my pantry when not in use.

I was in Costco last month and saw that they had a Nutri Ninja, which another smoothie-making friend had mentioned. Yesterday, I went in to look for it. It was there, next to the $350+ Vitamix, selling for just $99. But it had a lot of parts — those damn blender cups — and I seemed to recall another model with fewer cups and a lower price. I found it hiding behind the Vitamix display for $69. Less parts, less money. I put it in my cart with the other things I’d come to Costco for.

NutriBullet
Not the blender I thought I was buying, but I honestly don’t care.

It wasn’t until I got home that I discovered I’d bought another Magic Bullet.

What fooled me was the larger size and the prefix “Nutri” in the product name. It was a NutriBullet, not a Nutri Ninja. Sheesh. I really should pay attention when I shop.

Another person might have taken the damn thing back to Costco. But I honestly didn’t care. All I wanted was another cheap blender and that’s what I got. This one was bigger and beefier with bigger plastic cups than the old one. If I got 5 years out of it, I’d be happy.

The Cookbook
On the surface, this looks like a recipe book, right?

What surprised me, though, was the hard-covered book that came with it. On the surface, it looked like a cookbook. Later, when I went to bed, I took it with me to browse it before I went to sleep. It took only moments to realize what it really was: a piece of marketing material designed to fool people into thinking that they’d bought some kind of special nutrition machine that would make them healthier and help them lose weight like no regular blender could. After all, they’d bought a “nutrition extractor,” not a blender!

Nutrition Extractor!
“Nutrition extractor”? It’s a freaking blender.

Yes, the book had recipes, but it also had a lot of nutritional information about trendy “superfoods” like cacao nibs, organic chia seeds, organic goji berries, and organic maca powder. There were pages and pages about these “foods,” along with information on how you could order them from the NutriBullet website.

And the testimonials! Pages and pages of them from people praising the NutriBullet to high heaven. Here’s an example closing line for one that stretched two full pages:

It has touched my life in more ways than I can explain.

Seriously? A blender? You really need to get out more, Daniel.

I especially liked the recipes that required you to cook a bunch of ingredients, wait for the mix to cool, and then “extract” it in batches before reheating it again. News flash: an immersion blender like my Braun can do it without cooling the soup down, saving hours of food prep time.

In all honesty, I found the recipe book offensive. Cover to cover, it was full of marketing bullshit, touting the mostly imaginary benefits of a crappy blender. I couldn’t believe anything I read inside it and felt insulted that someone thought I might. And the stock photos of the attractive 60+ men and women enjoying their healthy lifestyle were a real turn off. Is this blender for old people?

It amazes me how low marketers will stoop to sell an inferior product.

Anyway, I’ve already tossed the book into my Goodwill box. Maybe someone more gullible than me will find it worth reading.

And yes, today I’ll give it a try. But I won’t be making a “nutriblast.” I’ll be making a good, old fashioned smoothie, just like I always have. And you can keep the goji berries.

Pressure Cooker Mongolian Beef

Another recipe for my Instant Pot.

Back in December I took delivery of 1/4 cow: about 100 pounds of local grass-fed beef. The meat was butchered and packaged and frozen and most of it is still in the freezer I bought primarily to store it.

Mongolian Beef
Here’s what my first try looked like. I cut the green onions too long. (Not sure what I was thinking there.) And yes, I know I can benefit from a course on food photography.

Among the cuts of meat I got in my package was a lot of stew meat. I’ve been using it to make a variety of things, including beef barley soup, in my Instant Pot pressure cooker. The other day, while looking for something different to make with an Asian flair, I found this recipe for Mongolian Beef.

I made it today, tweaked to the beef I had on hand. I wasn’t thrilled with the results. In general, it was too sweet and not flavorful enough. I made some minor changes to the recipe that I think make it better — at least for me. Here’s my version.

Ingredients

  • 2 pounds beef stew meat, cut into 1-1/2-inch cubes. The original recipe called for sliced flank steak.
  • 1/2 teaspoon salt
  • 1/4 teaspoon pepper
  • 1/2 teaspoon Chinese five spice. This was not in the original recipe, but I think it adds flavor.
  • 1 tablespoon sesame oil. Vegetable oil may be substituted.
  • 6 cloves garlic, minced or pressed
  • 1/2 cup soy sauce. Low sodium would probably be best, since this recipe can be quite salty. I might even consider cutting the soy sauce in half the next time I make it.
  • 1/2 cup water
  • 1/3 cup brown sugar. The original recipe called for 2/3 cup dark brown sugar, but I think it comes out way too sweet so I cut it in half. I use light brown sugar.
  • 1 teaspoon minced fresh ginger. The original recipe called for 1/2 teaspoon.
  • 2 tablespoons cornstarch
  • 3 tablespoons cold water
  • 4 green onions, sliced into 1-inch pieces. The original recipe called for only 3 green onions.

Instructions

These instructions assume you’re using an Instant Pot or a similar electric pressure cooker.

  1. Mix salt, pepper, and five spice in a medium bowl. Add beef and toss to coat as evenly as possible.
  2. Add oil to the pot and press Saute.
  3. When oil begins to sizzle, add meat and brown on all sides. You may have to do this in multiple batches so as not to crowd the meat. When browned, transfer meat back to the bowl.
  4. Add the garlic to the pot and sauté for one minute.
  5. Add the soy sauce, 1/2 cup water, brown sugar, and ginger. Stir to combine.
  6. Add browned beef and any accumulated juices.
  7. Press Keep Warm and then press Manual. Set the timer for 20 minutes. Make sure High pressure is selected.
  8. When pressure cooking cycle is done and beep sounds, press Keep Warm. Then release the pressure (carefully) by turning the release knob. When all the pressure has been released, carefully remove the lid.
  9. Combine the cornstarch and 3 tablespoons water, stirring until smooth.
  10. Stir the cornstarch mixture into the beef mixture in the pot.
  11. Press Saute and bring to a boil, stirring constantly until sauce thickens.
  12. Stir in the green onions.

Serve with rice and steamed vegetables or a salad with a ginger dressing.

This is not spicy at all, although I think it could use some heat. If anyone has any suggestions on what kind of chili or pepper I should add, please leave your suggestion in the comments for this post.

Maria’s Most Excellent Eggnog Coffee

If you love eggnog and coffee, try this.

Eggnog Nutrition
Nutritional information, courtesy of Google.

I love eggnog. But due to the crazy calorie count — 223 calories for just 8 ounces — not to mention the fat and cholesterol content, I try to minimize how much I drink. (Seriously, eggnog is just not really good for you.)

Eggnog latte from Dutch Brothers or one of the other drive-thru coffee shops around here help. I ask them to thin out their eggnog lattes with some non-fat milk. This reduces the richness while maintaining the flavor.

But I also make a similar drink at home when eggnog is available. Here’s my recipe, should you care to try it:

Ingredients:

  • 2 parts eggnog
  • 1 part low- or non-fat milk. (I typically use 2%.)
  • 3 parts strong, hot coffee

Instructions:

  1. Combine the milk and eggnog in a microwave safe cup.
  2. Microwave on high for 1-1/2 to 2 minutes, until very hot but not boiling.
  3. Add coffee. I normally brew my coffee right into the cup of eggnog and milk using a Brew and Go.
  4. Stir and enjoy!

If you’re interested in a spiked version of this, be sure to check out this review of eggnog spiking options. I tend to enjoy this in the morning, so I haven’t tested any alcohol additives for myself. Yet.

Beef Barley Soup

Skip the mushrooms!

Freezer full of meat
Here’s what 100 pounds of beef looks like in a mid-sized upright freezer. The other meat I’ve been storing is on upper shelves. The doors are filled with plastic containers of homemade heat-and-eat meals.

Yesterday, I took delivery of 100 pounds of grass fed, locally raised beef. This “1/4 cow” came butchered, wrapped, and frozen solid. Although I already had a chest freezer I’d brought with me from my Arizona home, I bought another freezer primarily to store this meat. It just about filled the bottom two shelves.

(I should mention here that our local supermarkets often put “expiring” meat on sale for 30% to 50% off. I can’t tell you how many amazing deals I’ve gotten on normally very pricey meats just because their last date of sale is that day or the next. One day I scooped up four racks of lamb for about $7 each and a large boneless leg of lamb — which was great in a Moroccan lamb dish — for about $10. Last week, Safeway had a sale on baby back ribs that were still frozen: $2.99/pound instead of the normal $4.99. I bought four racks for smoking on my Traeger. Having a big freezer makes it possible to take advantage of these deals as they come up. And when you consider how much I’ve been using my new Instant Pot lately, I don’t expect to have any trouble keeping that freezer full of meat or homemade heat-and-eat meals.)

I had some control over what I’d get in my beef package — basically a menu where I could choose a certain number of cuts in certain categories. In addition to a bunch of steaks cut from all over the place and a lot of ground beef, I also got short ribs, roasts, a very large brisket, and stew meat.

With a winter storm coming, I figured that some comfort food was in order. So when I went down into town to run errands and pick up the beef, I stopped at the supermarket for the few ingredients I needed to make beef barley soup.

I found the recipe on MyRecipes.com. I chose it over other recipes I found online primarily because it looked so hearty in the photo and wasn’t tomato-based. Although I made the recipe pretty much as it was written, I wasn’t satisfied with the results. The reason: mushrooms. In my opinion, mushrooms ruin the flavor of this soup.

So here’s my new take on this recipe.

Ingredients:

  • 1 tablespoon olive oil. The original recipe called for cooking spray. But why not use a little olive oil instead?
  • 1 to 1-1/2 pounds stew meat, trimmed and cut into 1/2- to 1-inch pieces. You can make it with less meat, but if you have more, use it. It’ll make a heartier soup. The beef I got was amazingly lean and didn’t need a bit of trimming.
  • 3-4 large carrots, sliced. Carrots are a must-have in any meat-based soup.
  • 2-3 stalks of celery, sliced. The original recipe called for 1-1/2 cups of celery. Seriously? That’s way too much.
  • 1 large onion, chopped. The third member of the aromatic trilogy, I put onions in most soups and stews. The original recipe called for 2/3 cup, but more is better.
  • 1 large parsnip, sliced. If you can’t find parsnips, add another carrot or two.
  • 1 medium turnip, cut into 1/2-inch cubes. This will really round out the root vegetable flavor.
  • 4 cups fat-free, low-sodium beef broth. I could not find real beef broth (vs. “beef flavored” broth) in my supermarket that was both fat free and low sodium. So I bought what I found.
  • 1 bay leaf.
  • 2/3 cup uncooked pearl barley. This was the first time I’d ever bought or cooked barley, despite the fact that I really like beef barley soup. Go figure, huh?
  • 1/2 teaspoon salt. You can probably omit the salt if you don’t use low-sodium beef broth. I did, but then again, I’m trying to keep my salt intake down. Remember you can always add salt; you can’t remove it.
  • 1/2 teaspoon black pepper. Pepper is always good with beef.

Instructions:

These instructions assume you’re making this on the stovetop. I’ll update this blog post when I have pressure cooker instructions. I need to experiment.

  1. Heat oil in a heavy-bottomed pot over medium-high heat.
  2. Add beef to pot; cook 4-6 minutes or until browned, stirring frequently.
  3. Remove beef from pot with a slotted spoon and set aside.
  4. Add vegetables to pot; cook 6-8 minutes or until liquid almost evaporates.
  5. Return beef to pot with beef broth and bay leaf; bring to a simmer over medium-high heat.
  6. Cover, reduce heat, and simmer 1 1/2 hours or until beef is tender, stirring occasionally.
  7. Stir in pearl barley; cover and simmer 45 minutes or until pearl barley is tender.
  8. Stir in salt and pepper.
  9. Discard bay leaf before serving.

Keep in mind that the longer you cook the pearl barley or let it sit in the hot soup, the more liquid it will absorb. The net result could be more of a stew than a soup. If you want a soupier soup, either reduce the amount of barley or increase the amount of broth.

This yields about six-eight servings, depending on serving size. I think it would be excellent with some crusty bread on a cold winter day.

Want a printable version of this recipe? Download it as a PDF.