Cowboy Cookies

I think I can do better than The New York Times and Laura Bush.

The Harvest Foods supermarket in Quincy, WA, makes the most incredible cookies I’ve ever eaten. They call them Cowboy Cookies and they contain the best of all worlds: chocolate, oatmeal, coconut, and nuts. They’re relatively large, not too sweet, and just soft enough to give you the satisfaction of a soft, chewy cookie.

Because Quincy is a bit farther away than I’m willing to drive for cookies, I hunted down a recipe to make at home. I found this recipe from the New York Times. It has a backstory:

This recipe came to The Times in 2000 during the Bush-Gore presidential campaign when Family Circle magazine ran cookie recipes from each of the candidates’ wives and asked readers to vote. Laura Bush’s cowboy cookies, a classic chocolate chip cookie that’s been beefed up with oats, pecans, coconut and cinnamon, beat Tipper Gore’s ginger snaps by a mile.

I made the cookies today. Not a full recipe; I made a 2/3 recipe. (The recipe is very easily cut into thirds.) They were good, but not Harvest Foods good.

Too much sugar, I think. Not cakey enough; very crispy. With all those goodies in them, they should have been substantial. But they weren’t.

I started thinking about my favorite cookie recipe, for Oatmeal Chocolate Chips. I blogged the recipe 14 years ago and still love them. I suspect that I could modify that recipe to have fewer chocolate chips, a bit less oatmeal, and some additional coconut and nuts.

So that’s how I’ll be doing it next time. If you try it first, let me know how it goes.

Maria’s Marvelous Stuffing, 2021 Edition

My favorite part of Thanksgiving Dinner.

It’s about 7 AM on Thanksgiving day. Even though I’m not hosting Thanksgiving dinner at my home, I’ll be a guest at a friend’s house and I asked her if I could bring the stuffing.

(Yes, I said stuffing. I know it doesn’t go in the bird so it shouldn’t be called stuffing, but I refuse to call it dressing. It’s stuffing. Period. No discussion will be accepted.)

What’s In It This Year

I love making stuffing and eating my stuffing. Why? Because not only is it delicious, but it’s also it’s a meal in itself. It has all kinds of things in it and every year that list is different. Here’s what’s in this year’s stuffing:

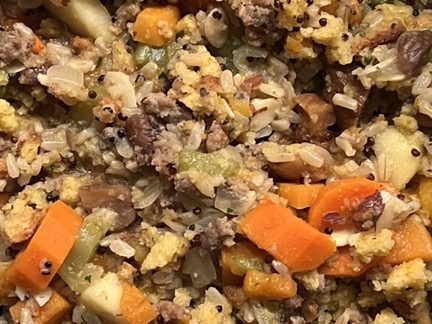
  • StuffingCloseup
    A closeup of this year’s stuffing, still in the pan.

    Jimmy Dean Sage sausage

  • Onions
  • Celery
  • Carrots
  • Garlic
  • Sweet potatoes (from my garden)
  • Butternut squash
  • Brown rice
  • Quinoa
  • Chestnuts
  • Almonds
  • Apples
  • Figs (dried)
  • Stove Top Cornbread Stuffing Mix

So yeah: it has meat, veggies, fruit, and bread in it. Because it has twice as much (by volume, anyway) non-bread ingredients than bread, it’s not really what most folks would call stuffing (or yes, dressing). In fact, it sounds like a meal in itself to me.

It’s great beside turkey or chicken and a good turkey gravy and cranberries can’t hurt it.

I make some version of this every year, whether I’m hosting a meal at my home, going to someone else’s home, or camped out in my RV out in the desert. Way back when I hosted family meals in my old home, I made huge quantities of it. It’s always the first thing I do (after having my coffee, of course) on Thanksgiving day.

I’ve never had any complaints about it. Most folks seem to like it, although probably not as much as I do.

That’s okay. The less they eat, the more is left for me after the big day.

Make It Yourself!

If you’d like to try making this, have at it. But don’t expect me to provide you with measured quantities. I wing it every year with whatever I’ve remembered to buy (like the chestnuts) with whatever I find in the fridge or pantry (most everything else). The only thing I measure is the water that has to hydrate the dried stuffing mix — and that’s so it’s moist enough. Even then, I usually add more so it’s plenty moist and survives some time in the oven or a microwave for reheating or keeping warm. I usually don’t add salt because the stuffing mix and sausage (and likely the gravy that’ll go over it) are salty enough; it’s easier to add salt later than try to remove it, no?

If you’re completely clueless about how to get started, start by lightly browning the sausage (or bacon works, too) with the onions, celery, and garlic. Then add the other ingredients that need cooking, stirring so they get some time on the bottom of the pan. Then stir in the ingredients that don’t need cooking. Then add the water, preheated to boiling. Cover the pan and let it cook for 5 minutes or so. Then add the dry stuffing mix, stir well, and remove from the heat. You’re done; it’ll be done in 5-10 minutes. I try to keep it warm until dinnertime, usually in a covered oven/microwave safe dish in the oven. That helps the flavors meld and the whole thing gets soft.

Yum.
Orange Banana Dessert and Waffle Topping

A quick recipe for a hot fruit topping.

I’ll keep the intro stuff brief since I really hate drawn out intros to recipes and I bet you do, too.

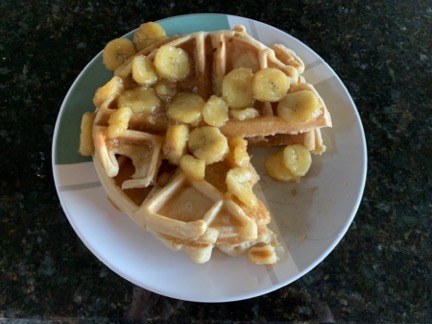
Waffles with Bananas
My breakfast this morning. The waffle recipe I found was very plain/boring and it needed something to spice it up. I had the ingredients for this so I made it.

I made waffles from scratch this morning and needed something — other than maple syrup [yawn] — to put on it. I had the ingredients for this, which I sometimes make to top vanilla ice cream. Try it the next time you want a hot fruity topping for an otherwise plain dessert or waffles.

Ingredients

  • RIPE banana(s)
  • Butter
  • Brown Sugar
  • Orange Juice
  • Orange liquor (optional)

Yeah, I realize I didn’t put in amounts. The amounts you use depend on how much you want to make and how sweet you want it to be. If you’ve got any cooking experience at all, you should be able to figure it out. For the purpose of this recipe, I’m assuming that you use 1 to 3 bananas.

Preparation Steps

  1. Slice up the banana(s) into 1/4 to 1/2 inch slices.
  2. Melt a tablespoon or two of butter in a pan.
  3. Add the bananas and 2 to 4 tablespoons of brown sugar to the pan.
  4. Saute for a minute or two. The banana slices should start losing their definition as they soften. With luck, the brown sugar isn’t a solid mass (like mine was) and will melt quickly. If it doesn’t, it will during the next step.
  5. Add 1/4 to 1/2 cup of orange juice to the pan.
  6. Bring mixture to a simmer. It should thicken a little. The longer you cook it, the thicker it’ll get. I usually cook it until the bananas are heated through and dissolving in a syrup. If the syrup is too thick for your taste, add more orange juice.
  7. If desired, add a splash of orange liquor. Then cook 1 more minute.
  8. Pour hot topping directly over ice cream, pound cake, waffles — whatever.

This absolutely rocks over vanilla ice cream. But it was pretty good over my waffles, too.

Chicken Barley Stew with Vegetables and Kale

A Mediterranean Diet friendly meal.

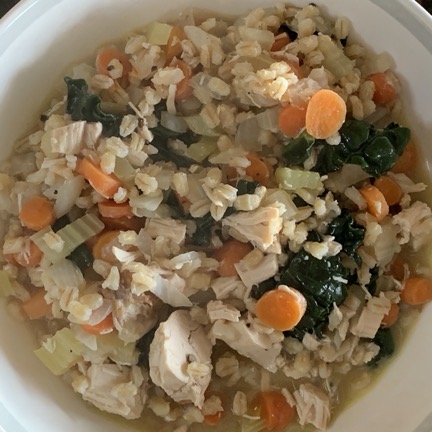
Chicken Barley Stew
Veggies, whole grain, and lean chicken. What could be healthier?

I blogged recently about going on the Mediterranean diet for my health as I’m getting older. I’ve got a few cookbooks with recipes, but after a while you get a feel for what you can come up with on your own. This quick stew is my own concoction.

Ingredients

  • 1/2 tablespoon olive oil
  • 2 ounces chopped carrots
  • 2 ounces chopped celery
  • 2 ounces chopped onions
  • 1/4 cup uncooked pearl barley, rinsed
  • 1 1/2 cup low sodium, low fat chicken broth
  • 3 ounces cooked chicken
  • 1 large kale leaf, stem removed, chopped
  • salt and pepper to taste

If you don’t have a scale, 2 ounces is about 1/4 cup; 4 ounces is about 1/2 cup. If you don’t use low sodium chicken broth, you won’t have to add salt. I buy roasted “pulled” chicken at the supermarket. (Thanks, Bill, for the tip!) I only used 3 ounces of chicken because it looked like enough and I’m trying to keep calorie count down.

Steps

  1. In a small saucepan, heat oil.
  2. Add carrots, celery, and onions. Cook for 5 to 8 minutes on medium heat until soft.
  3. Stir in barley and cook for another minute or so.
  4. Add chicken broth. Bring to a boil, then turn down to simmer and cover. Cook 30 minutes or until barley is soft. It will absorb much of the liquid.
  5. Add chicken and kale. Simmer until chicken is heated through and kale is wilted.
  6. Serve with salt and pepper to taste.

Yields one very generous serving or two small servings. Total calories is about 450. You can reduce the calories by using less barley (1/4 cup is 163 calories) or less chicken (3 ounces is 142 calories). I’m thinking I’ll make it with 2 tablespoons of barley, 2 ounces of chicken, and 1 cup of broth next time. That’ll chop off 100 calories and yield a single normal serving.

-o-

Oh, and isn’t it refreshing to read a recipe on a website that doesn’t bombard you with a million pictures and a long, boring story about making the recipe? Seriously: what are some of these food bloggers thinking? When I look for a recipe, I want the recipe, not details of the blogger’s intimate relationship with it.

Saving the Season

I start canning. Again.

Saving the Season
Saving the Season is just the book I needed to come up with creative ways to store what I harvest.

My garden is neither small nor large. It would probably be just right for a family of four.

I am a family of one.

While it’s wonderful to be able to pull 75% of the food I consume right out of my own garden, it’s horrible to harvest far more food than I can possibly eat or give away. After all, my friends and neighbors have gardens, too. Although mine was a bit earlier than most, they’re all caught up and trying to give me zucchini, tomatoes, etc. Needless to say, my chickens are feasting on soft tomatoes, peppers, zucchini, and other things these days.

Canning Tomatoes

Last year, I had what I thought was a pretty good crop of roma tomatoes. I set about canning them with my boiling water bath setup, which, because I have a glass-top stove, must be done on the burner beside my BBQ grill out on the deck.

Canning tomatoes is not fun. First you have to boil the jars and lids to sterilize them. Then you have to wash the tomatoes, remove the skins by scalding them in boiling water, dropping them into ice water, and sliding the skins off. Then chop them. Then put them in the prepped jars with a tablespoon of lemon juice to add acid. Then boil them for the required time in the canning setup.

It took me two hours to can two pints of tomatoes last year. I swore I’d never do it again. After all, what does a can of tomatoes cost at the supermarket? Why am I wasting my time canning mine?

Trying Again with Carrots

A few years ago, I’d bought a book at a bookstore up in Winthrop called Saving the Season. It’s all about canning and preserving what comes out of your garden. This year, I finally opened it when I was ready to “save” something I was taking out of my garden: carrots.

Yes, I grew carrots this year for the first time. I cannot believe how well they grew — even in my raised beds, which are only one foot deep! And as one batch was getting big, I planted another batch.

Very Large Fresh Carrots
After pulling one or two carrots a week, I finally pulled the rest of the entire first batch. They were huge.

I soon discovered two things:

  • Carrots keep getting bigger if you don’t harvest them.
  • Freshly harvested carrots lose their stiffness quickly after harvesting. (I won’t tell you what they remind me of after just a few days in the fridge.)

I realized that I’d have to harvest them before the next batch was ready and use them as quickly as I could. Harvesting was easy. Just pull them out from their tops. I had a bunch of really large ones to work with. (Although I only want the orange part, my chickens really seem to love the green tops.) Unfortunately, I just didn’t feel like eating carrots.

The answer was to pickle and can them. The recipe I chose was “Picked Carrots, Taquería Style.” This would produce carrots like those that can sometimes be found at a real Mexican restaurant’s salsa bar. The best part of this recipe: not only would it use up all the carrots I’d picked, but it also called for red onions, jalapeño peppers, and garlic, all of which I also harvested from my garden.

Pickled Carrots
One of my four pint-sized jars of Mexican pickled carrots.

So I put aside memories of peeling tomatoes and got to work following the recipe, dragging my canning setup out of storage in the garage, and prepping the four pint jars I’d need for canning. It went remarkably well, even though I never got the canner up to a full rolling boil. (The recipe said 30 minutes at 180° to 185° was fine.) Although my kitchen looked as if I’d just cooked for a party of 10 when I was done, I had four beautiful jars of pickled carrots that I could store in my pantry until I was ready to eat them.

I also had about a half cup of carrots with some liquid leftover. I put those in a jar in the fridge. This morning, I opened it up for a taste — I knew I wouldn’t like them hot so I didn’t taste them while I was making them. They were delicious.

Now I’m looking forward to that second batch of carrots to be ready to pull. I want to make another four jars to take me through the winter.

And beets….do I have a recipe for those? Let’s see….