2016 Honey Harvest — So Far

Twelve frames of honey — so far.

I spent about two hours this morning in one of my beehives. I’ve got nine of them these days and need to open each one before September month-end to harvest excess honey and begin pre-winter care. In all honesty, the sooner I get the honey out, the better off I’ll be; I know how hard it is to extract honey once temperatures drop.

This Morning’s Bee Encounter

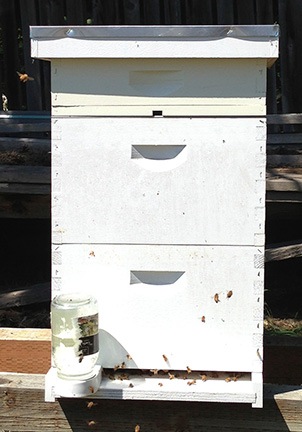
The hive I did this morning has two supers: one deep and one medium. It’s extremely crowded; the bees don’t seem to fit inside — many of them are clustered on the front of the hive at night and during the day. I thought it might be because they were preparing to swarm, but when I opened the hive, I didn’t see any queen cells. What I did see, however, was that the medium super on top was filled with ten fully-capped honey frames. Wow!

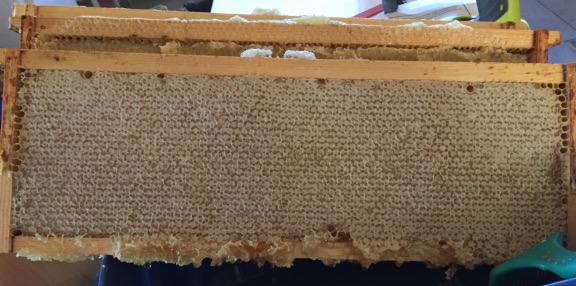
Capped Honey Frame
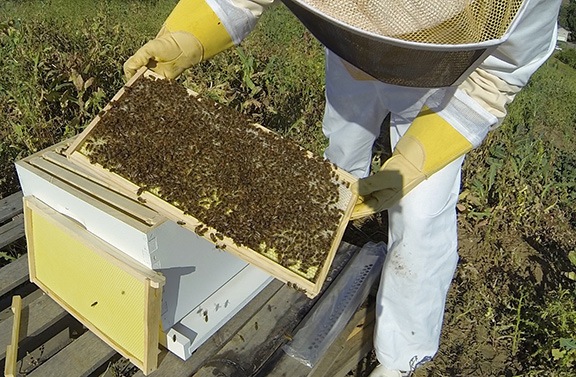
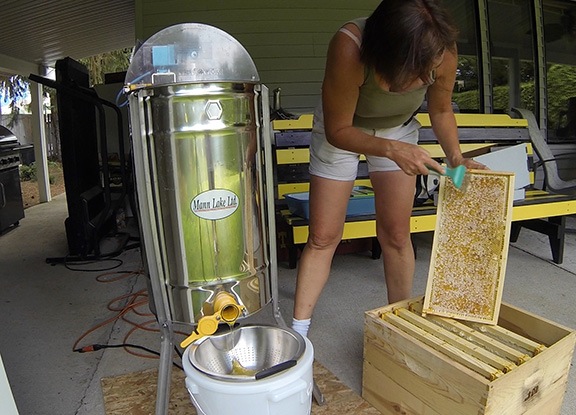
Capped honey frame. This is what honey looks like when it’s ready for harvest. It’s capped with wax that needs to be scraped away before extraction.

I took six of them. I was only going to take three, but as I worked with the bees, they got really pissed off and, in turn, got me really pissed off. I had to go back to the house to put on boots after getting stung on the ankle through my thick socks. While I was there, I fetched three more empty medium frames and swapped them for full ones.

Part of the reason they got so angry is my fault — I’m a hands off kind of beekeeper so there’s lots of burr comb to scrape off when I finally get into a hive. And in preparation for winter, I’m dusting them with sugar. That means taking every single frame out and sprinkling home-made powdered sugar on each side. Dusting the bees with powdered sugar is a chemical-free way to help reduce varroa mites; as the bees clean the sugar off, they also dislodge mites which fall through the screened bottom board and can’t get back up into the hive. I can’t use off the shelf powdered sugar because of additives; instead, I grind regular sugar to a powder in a blender.

I debated adding another super to the hive, but with six new empty frames, it didn’t seem to make sense. Besides, the only equipment I have left is a deep super with frames and I hate to put deep supers on top of mediums, especially this late in the season.

This Year’s Harvest So Far

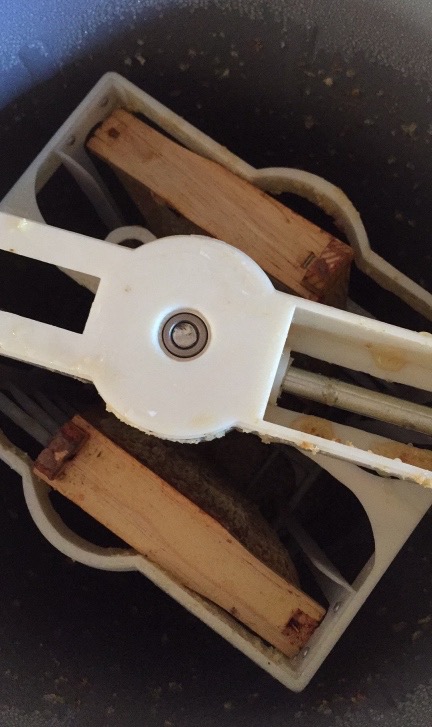
Extractor
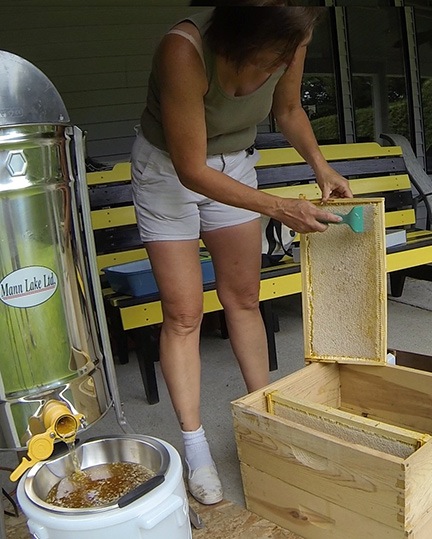
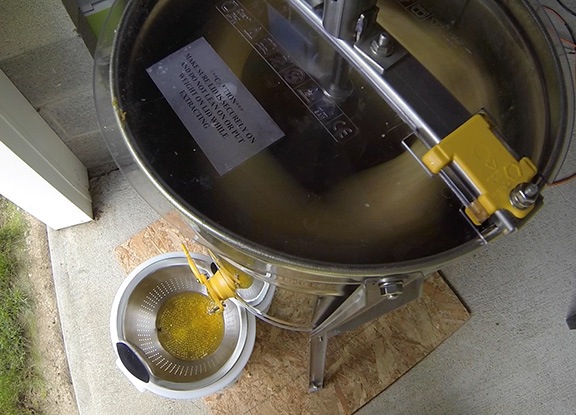
A view looking down into my extractor with two medium frames in place. The frames spin to extract honey by centrifugal force. The extracted honey runs down the inside of the extractor and accumulates at the bottom. A valve allows the honey to be poured out.

The six medium frames I pulled out today are only part of my harvest so far. I also pulled two medium frames and four deep frames from hives back in July. Together, that could come out to 5-6 gallons of honey.

Because it was warm and because I have a new extractor I was dying to try, I decided to start extracting honey today, too. The extractor is a budget model with a hand crank that holds two frames at a time. But, as you might imagine, I wasted no time automating it. I bought an adapter for my drill and use it instead of the crank handle to spin the frames. When the frames are well balanced, it works very well and I can get some good speed going. But when they’re not, there’s a good amount of wobble at high speeds. This is something I’ve learned to deal with over the years.

When the level of honey in the extractor reaches the bottom of the frames, it needs to be poured out before I can extract any more. I managed to get the six frames I pulled today extracted and start on two more.

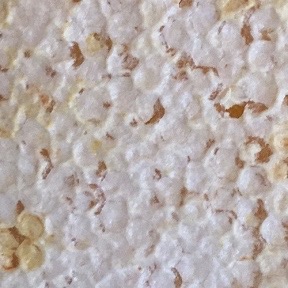
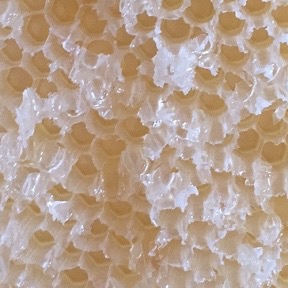
Capped Cells Uncapped Cells
A closeup look at full/capped (left) and uncapped/extracted (right) cells on a honey frame.

Straining Honey
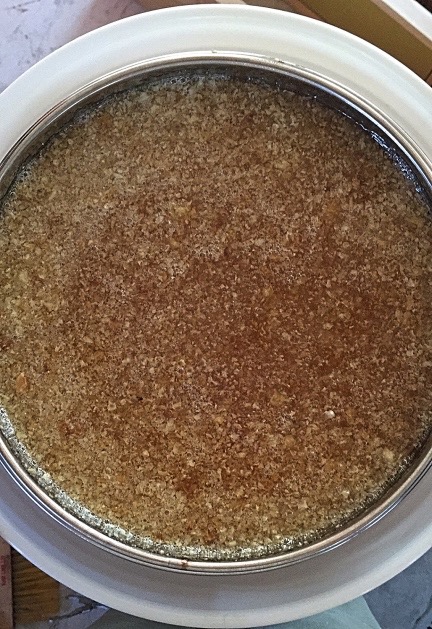
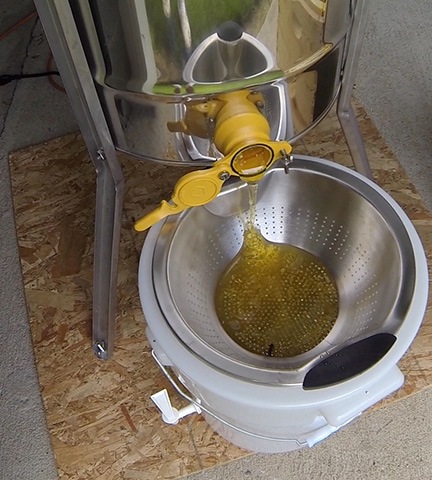
From the extractor, the honey goes into a series of two stainers that strain away the wax cappings, which is what you see here.

Because I use an uncapping fork instead of a hot knife, there’s lots of wax in my extracted honey. Right now, I’m waiting for it to get through the two layers of strainers and into my storage bucket. I hope to extract the rest tomorrow. I’m hiking in the morning, but should be able to do it in the afternoon.

And yes, I’ve seen Hive Flow. But no, I don’t think it’s a good idea for serious beekeepers. Too complex, too costly, and too likely to fail. I would definitely love to chat with someone who has been using one for at least a year, though.

More Bee Stuff to Come

This is just the start of harvest for me.

Although I have two trips scheduled over the next week or so — when cherry season ends, I don’t spend much time home — I hope to get into the other eight hives early in the mornings when I get back. I really hate sweating my brains out in a bee suit on a hot summer day, so I go in when it’s cool, even though that’s when most bees are “home.” My comfort trumps their rest. They should be glad I don’t open them weekly or biweekly like so many backyard beekeepers do.

The last time I open the hives for the winter will be in October. That’s when I’ll check food stores, add more honey frames if necessary, and give the bees some medication for varroa and nosema. I don’t insulate my hives, but I do make sure they have good ventilation for the winter months. Last year four out of six hives survived the winter and one of the ones that didn’t make it entered winter pretty weak anyway so the loss was no surprise. If 50% of my hives survive each winter, I’ll be in good shape each spring.

Buy My Honey!

I sell my honey in jars suitable for gift giving. Buying my honey is a great way to support this site and my beekeeping activities. You can learn more at Maria’s Malaga Honey.

I’d like to expand my beekeeping activities — especially after this very good year. But I’ve learned that I can only support 3 to 5 hives on my property, due to dry summers with little forage. This summer was unusual because it rained a lot though July and there were more wildflowers for a longer period than usual. I think my garden helped, too — the sunflowers were seriously out of control here. So I have five hives at home and four on a trailer up Squilchuck Canyon, not far from a cherry orchard where there’s lots of water and wildflowers/flowering weeds. If I expand much more, I’ll need another trailer and another place to put my bees for the summer.

Something to think about.

Getting the Facts Straight on Honey

A beekeeper ought to know, right?

I started keeping bees in June 2013. So, yes, it hasn’t been that long and no, I’m not an “expert” (yet). But I do know some things about bees and beekeeping and honey.

Maria the Beekeeper
This is me last year, examining a honey frame in one of my hives. Can’t believe how clean my gloves still were!

I posted a status update on Facebook yesterday that mentioned snacking on a piece of honeycomb from my beehives. The comments I got from my friends made me realize that there are some misconceptions — or simply knowledge gaps — out there about honey. I thought I’d take a few moments to clear things up.

Nature’s Perfect Food

I like to think of honey as nature’s perfect food. It’s created by nature, requires no refrigeration to preserve, and it doesn’t go bad. Smithsonian’s “The Science Behind Honey’s Eternal Shelf Life” elaborates on this. It mentions that the bees “regurgitate the nectar from their mouths into the combs combs to make honey.” But no, honey is not bee vomit.

Beeswax

Extracting Honey
In this shot, I’m scraping the wax caps off a honey frame before putting it into the extractor to the left.

Bees store honey in wax honeycomb they create. Most beekeepers use Langstroth hives that provide their bees with frames specially designed for them to create nice, neat honeycombs. This makes it easy to extract the honey using centrifugal force in a honey extractor.

Some beekeepers prefer more natural hives, such as top-bar hives, which allow the bees to create comb as they might in the wild. (I don’t know how they extract honey from natural comb. Maybe they just sell the honey in the comb.)

Bad Comb
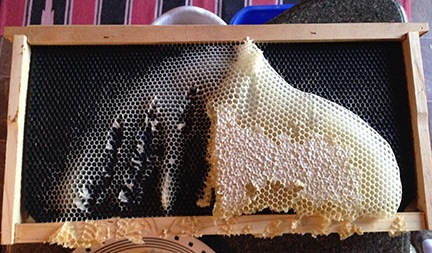
This photo shows some natural comb made on a Langstroth frame. This is not normal. I think it was a result of the frame’s plastic surface not being properly coated with beeswax by the manufacturer. I won’t be buying my frames there anymore.

Beeswax is edible. If you buy comb honey, you can eat the entire thing. I occasionally have comb honey that I get from removing unwanted natural comb from my Langstroth hives. I eat it with a spoon, chewing it gently until the honey is gone from the wax. The wax does not stick to my teeth. It ends up as a little wax ball that I spit out (like gum). Swallowing it would not hurt me, but I don’t think there’s any reason to.

Buying Honey

The absolute best place to buy honey is at a farmer’s market. A real farmer’s market. Chances are, you’ll be buying the honey from the beekeeper.

And if you don’t think there’s a difference between store-bought honey and fresh honey from a beekeeper, think again. The first time I tasted my own honey, I threw away all the store-bought crap I had in my cabinets. Then I gave away too much of my honey and had to ration the last jar so it would last a whole year. (It didn’t.)

Raw honey is best. Don’t buy the flavored crap. Who knows what they added?

Creamed honey is honey that has been processed to control crystallization. Nothing is added. It’s just been stirred or whipped at a specific temperature.

Spending a lot of money for honey does not mean you’ll get better honey. It just means that someone’s marketing scheme worked on you.

Honey sold in glass jars is not necessarily any better than honey sold in plastic jars. In fact, many beekeepers package their honey in plastic containers — even the bear squeeze containers! — for sale because they’re cost effective, they’re lightweight, and they don’t break. Do you think it’s a good idea to shlep heavy cases of glass jars around from one farmer’s market to the next?

Storing Honey

Store honey in the container you got it in. I generally put my honey comb in plastic containers so that’s what I store it in. When I extract honey, I usually put it in quart-sized glass mason jars so that’s what I store it in.

If you’re refrigerating your honey, take it out of the refrigerator now. It doesn’t belong there. Refrigerating it can hasten crystallization. While crystallization doesn’t make the honey taste bad, it does ruin its nice, smooth texture.

If your honey gets crystalized, you can heat it to dissolve the crystals. You can do this in the microwave if you like or by putting the honey container in a bath of warm water. They crystals will come back when the honey cools.

Beekeeping Costs

The main cost of producing honey is buying the equipment: hive boxes, frames, bottoms and tops, beekeeper suit, etc. My initial investment was about $500. I’ve since spent about $1,000 more — I really do know how to throw money at a hobby — but now have what I need for six hives. You can save money by building your own bee boxes and frames.

All of the equipment is reusable, so once you’ve made the investment, the only thing you’ll spend to keep bees and make honey is your time. This year, I was neglectful — my new home under construction kept me very busy — but my bees didn’t seem to care. They did their thing — including keeping my vegetable garden pollinated — and I pulled another 6 frames of honey out of my hives. That’ll probably yield about 2-1/2 gallons.

And yes, I do hope to sell some of it. In glass jars with fancy packaging. In roadside fruit stands that cater to tourists from Seattle.

Heck, if a fancy jar and high price tag makes people think they’re getting something extra special, why not play the game?

Bees: First Honey Extraction

How sweet it is!

I started my beekeeping hobby in June 2013 and have been blogging about it periodically. If you’re interested in reading the other posts in this series, follow the Adventures in Beekeeping tag. Keep in mind that the most recent posts always appear first on this blog.

On Tuesday, I extracted honey from my first beehive for the first time. The yield from this 6-week old hive was amazing — but I’ll get to that in a moment. First, some backstory.

Why I Extracted

The odd part about the whole thing is that I never intended to extract honey from this hive at all. I was told that I’d started late and that the bees would likely need any honey they made to get them through the winter. This was okay with me. I’m not interested in extracting honey and putting it in jars as gifts or to sell. I’m interested in comb honey, which hardly anyone seems interested in producing or selling. I’m also interested in increasing my hive count and producing nucs for sale to other beekeepers. And maybe next year getting serious about raising queens.

Hive #1 in Mid July 2013
My first hive looked like this right before I extracted honey. The honey was in the middle box; the top box contains Ross Rounds.

But this particular hive had grown very quickly — so quickly, in fact, that I put a second deep hive box on it right after my first hive inspection. Being a new beekeeper, I really didn’t have a handle on the way colonies build. I was under the impression that if I put a deep hive box on a hive, bees would use it for brood and honey. The medium “honey” supers were for honey; I’d add one of those later.

Bees, however, don’t read beekeeping books or take advice from beekeepers. They do whatever they want. And this colony had used virtually all of the top hive box to store honey and pollen. Seven full frames plus two half frames of it. The tenth frame was partially drawn out with comb with some honey deposits. (This was all made in about a month. These were busy bees.)

Do you know how much a deep super weighs with 10 frames of honey in it? Estimates run between 50 and 80 pounds.

It’s for this reason that many beekeepers use only medium hive boxes. They want full boxes to be lighter and easier to handle.

But I want my hives to be compatible with accessories such as drone frames and in-hive feeders. And nucs, which nearly always come with deep frames in them. So I’d like all of my hives to have a deep hive box.

But just one of them. This hive had two.

Meanwhile, I’d done a hive split the week before and the bees from the new hive were living in a nuc box until I could get another deep hive box for them. It would cost $62 and I’d have to wait a week for it to arrive. The bees didn’t seem happy and I was eager to get them into more comfortable living quarters. I didn’t want to wait (or pay) if I didn’t have to.

The logical thing to do was to use the second deep hive box on my first hive. But that was full of honey. I needed to get rid of the honey. The only way to do that — without throwing away the frames — was to extract it.

So that’s what I set out to do on Tuesday.

Special Equipment

Honey ExtractorTo extract honey, you need a honey extractor. There are a few types and they range in price due to features and size. Prices start at about $200 and go up to well over $1,000. The expense of buying one of these units is one of the reasons I didn’t want to deal with extracting honey. Who wants to spend $800 on a machine that’s only used a few times a year and needs to be cleaned, maintained, and stored when not in use?

Fortunately, my friend Jim had an extractor and was willing to let me use it. He’d also hang around and walk me through the process. So that’s where I went on Tuesday.

Uncapping ScratcherThe only other special equipment needed was a pail to collect the honey, a stainer to separate out the wax cappings and anything else that wasn’t honey (don’t ask), and an uncapping scratcher, which I already had.

Pulling the Frames

My first hive is at Jim’s house, so it was simply a matter of removing the honey-filled frames from the hive and carrying them to the patio at the back of his house where he usually used the extractor. I suited up, opened the hive, removed the Ross Rounds box and queen excluder on top, and got to work. I’d brought along a clean nuc box to hold the frames five at a time. Bee BrushThe trick was removing the frames, using my bee brush to brush the bees off the frame and back into the hive, and putting the frame sans bees into the nuc box.

I wish I had photos of this process, but with uncertain weather — remember, I’m still on contract for cherry drying — and a general feeling of urgency about getting the job done, I simply forgot to set up my camera.

Jim was extremely helpful. As I prepped each frame, he stood ready with his hands on the nuc box cover. I’d pull out a frame and then run my brush gently over the frame surface. It was amazing how easy it was to simply sweep the bees away. Then I’d turn the frame and do the other side. And then go back to the first side where a few more bees had landed again. Then Jim would pull off the cover, I’d slip the frame in, and he’d cover it back up. We did this until the nuc box was full.

He ran the box back to his house while I pulled the now half-empty deep hive box off the hive and set it aside. I placed the medium hive box with its ten empty medium frames on top of the bottom box. When Jim returned, we continued, but now I brushed the bees into the medium box they’d be using for future honey stores.

We wound up with a total of seven frames that were ready for extraction. All seven were full and mostly capped.

Capping, by the way, is what the bees do to a full cell of honey. They create wax caps to seal them off. Beeswax, by the way, is completely edible, including the caps. (Bees also cap brood, but I wasn’t interested in any of that.)

Honey Comb
This closeup shot of a honey frame shows capped honey cells on top with uncapped honey cells beneath them. This frame would not be ready for extraction.

While Jim brought the nuc with the last two frames back to the house, I reassembled the hive, placing the queen excluder back on top of the new hive box, a spacer with an exit above that, and the Ross Rounds box above that. Then the inner cover and outer cover.

I left the deep hive box with the remaining three frames set aside. I was hoping that while I was busy extracting the bees would realize that they were no longer in the hive and would leave. Then I went back to my truck and stripped out of my bee suit. I wouldn’t need it to extract and it was a warm day.

Extracting the Honey

The extraction process was pretty straightforward. First, I used the uncapping scratcher to scratch away most of the honey caps. All I really had to do was puncture them, but I dragged the scratcher across the surface to do the job quickly. I then slid the frame into one of the extractor’s three slots with the scratched side facing out. I did this for three frames.

Uncapping Honey-filled Frames
Here I am, uncapping one of the frames.

Next, we spun up the extractor. The machine spins the frames, using centrifugal force to get the honey out of the cells. The honey hits the side of the extractor and drips down into the extractor’s well.

Extracting Honey
The extractor spins the honey out of the cells.

Honey Bucket
Once the honey began flowing, it continued for well over an hour.

Jim opened up the gate at the bottom and let the honey drip into the strainer over a bucket. We watched as the first thick drip appeared. “Quick!” Jim said. “Get something to grab that first taste!”

The something was my less than clean finger. I captured the first drip and sucked it off my finger. It was heavenly. (Honestly, if you haven’t tasted fresh, raw honey you’re missing quite an experience. Warning: You probably won’t ever eat mass-produced, supermarket honey again.)

Jim complemented me on the color. It was a light yellow. I suspect there was a lot of clover content; there’s a ton of clover in the area near the hive.

When the first side of the frames were about half done, I stopped the extractor. One at a time, I removed the frames, scratched the other side, and replaced them facing the other way. Then I ran the extractor again, this time up to full speed. Jim had advised me to avoid full speed when I was running the first side to prevent the frame foundation from warping. After about five minutes, I flopped the frames again to get the remaining honey out of the first side.

Meanwhile, the honey just globbed out through the gate into the strainer. As I mentioned earlier, it was a warm day so the flow was pretty quick and smooth. By the time I’d finished the second group of three frames, the strainer was full with the honey dripping through it slower than it poured in. The wax cappings were clogging the strainer. We had to shut the tap and wait for the strainer to catch up. By then, it was clear that I had over a gallon of honey.

I still had one fully capped honey frame to extract. Doing so in the spinning extractor could be tricky since it would be out of balance when it spun, even if I put two empty frames in with it.

Besides, it was clouding up and I didn’t want to spend any more time than necessary away from base. I’d already gotten check-in calls from both of the pilots working with me. Rain was in the forecast for that evening and the next day. With a total of more than 230 acres of cherry trees still under contract, I had important responsibilities elsewhere.

Jim and his wife Kriss offered to keep the extractor set up and let the rest of the honey flow into the strainer when the strainer had caught up. I could pick up the bucket and strainer the next day and put the honey in jars at home. In the meantime, I could take the deep hive box and frames home so I could use them in my newest hive.

I commented proudly on Twitter and Facebook that I’d extracted a gallon of honey. Later that evening, Kriss corrected me: two gallons.

Putting the Honey in Jars

Early the next day, the two other pilots and I hovered over about 120 acres of cherry trees in Quincy, East Wenatchee, and Wenatchee Heights after thunderstorms rolled through. By 10 AM, the weather had cleared out. I was hosting a party that evening that included smoked beef ribs and I lacked one ingredient for the rub I was making. I needed to get the ribs on before 1 PM for them to smoke all afternoon.

And, of course, I still had to fetch the honey.

So I set out to run my errands, finishing up at Jim and Kriss’s house. I don’t know if they were home; I didn’t want to knock on their door and bother them if I didn’t have to. I just went out back. The honey bucket was there, covered up to keep it safe from bugs — mainly Jim’s bees.

I looked at the clear, thick yellow liquid in the bucket. Tick marks along the side indicated that it contained over two gallons of honey.

I left a 12-pack of quart sized jars and some money on the patio table, then took the honey out to my truck. As we’d agreed, I also loaded 10 medium hive boxes from the stacks Jim had bought from a retired beekeeper into my truck. They were in new condition, although unpainted and somewhat dirty. At only $7 each, I couldn’t pass up the deal.

Back home, I finished prepping the ribs and got them on the smoker. Then I set about putting all that honey into the quart- and pint-sized jars I’d bought while running my errands.

For some reason, I thought I needed to run the honey through a finer strainer to filter out the remaining tiny bits of wax cappings. In hindsight, I realize this wasn’t really necessary. All it added was another messy step to what was already a very messy job.

Filtering Honey
I’m not sure why I filtered the honey again. It really didn’t need it.

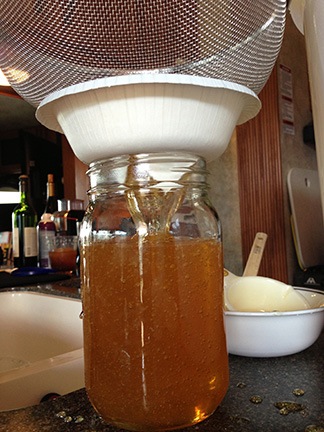
Trouble is, the spigot at the bottom of the bucket was too small for the honey to pass through. So all the honey had to be scooped up out of the top of the bucket. I used a half-cup measuring cup. I poured it into a strainer that I’d placed over a paper bowl fashioned as a wide funnel.

I’m not exaggerating when I say it took me about 90 minutes to go through it all. My guests arrived just as I was finishing up.

Everyone had a taste of honey. They all loved it.

Honey Jars
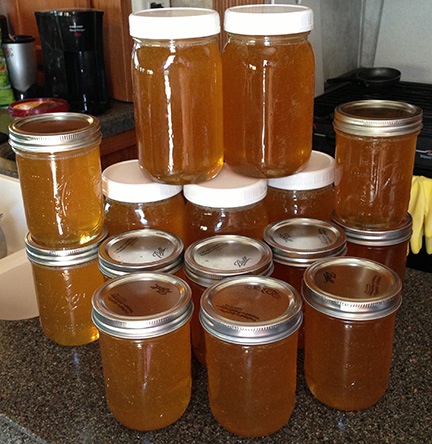
The final product. (I’d already stowed my personal pint.)

My friend Cheryl and I arranged the jars on my countertop for a photo. The final tally was 5 quart sized jars and 11 pint sized jars.

I’ve already given away five pints.

The Aftermath

Clean up wasn’t difficult with lots of hot water to melt the honey. I’ll return Jim’s honey bucket and stainer today, along with a bunch of cherries I picked yesterday morning. I sure do appreciate him letting me use his extractor and walking me though the process. I’d offer him some honey to thank him — but I know he has plenty of his own.

As for what I plan to do with all that honey — well, I’ve been thinking of brewing some mead

Bees: My First Hive Inspection

I open my new hive for the first time to see what my bees are up to.

I started my beekeeping hobby in June 2013 and have been blogging about it periodically. If you’re interested in reading the other posts in this series, follow the Adventures in Beekeeping tag. Keep in mind that the most recent posts always appear first on this blog.

I set up my first beehive and loaded bees into it on Tuesday, June 4. On Tuesday, June 11, I went back to inspect the hive.

Hive inspections are something beekeepers should be doing about once every 1-2 weeks during the productive summer months. The idea is to check the health of the colony, remove things that shouldn’t be in there, and get a general idea of what the bees are doing in their box(es).

Preparing for the Inspection

To prepare, I looked up a few checklists online. I wanted a guideline that would help keep me focused on what I needed to do so I could minimize the amount of time the hive needed to be open. I found two good ones:

  • Hive Inspection Sheet is a great one-page checklist to record information from an inspection. This is the sheet I wound up using, even though it includes many items that I didn’t need for this inspection.
  • Hive Inspection Checklist comes with 7 pages of information to help you understand what you’re doing and how to do it. Although I didn’t like the actual checklist format, I found the accompanying explanations extremely valuable.

I also made notes in a looseleaf book I’ve been using to keep track of things I need to remember. (Seriously: the memory loss that goes with aging and having a very busy life sucks big time.) I divided it into two parts:

Prep:

  • Hive body. I needed to put the second hive body in the Jeep so I wouldn’t forget to bring it.
  • Smoker setup. I wanted the smoker all set up with ignition paper and fuel so all I had to do was light it.
  • Food. Didn’t want to forget the sugar syrup I’d prepared.
  • Camera charged. I was bringing along my GoPro to document the inspection and I needed to make sure it was fully charged.

Tasks:

  • Light smoker. Seriously, I even need to remind myself to do something like this.
  • Open hive. Duh-uh.
  • Remove frames one by one and check:
    • Brood development. Are there larvae? Capped brood cells? The health of the colony depends on a constant inflow of new bees via hatching.
    • Eggs. Is the queen laying eggs?
    • Honey / Pollen. Are the bees making honey? Storing pollen? They should be!
    • Queen Cells / Drone Cells. These are brood cells for queens or drones. They are larger than regular brood cells. I didn’t expect (or want) to see queen cells — one queen is enough and the presence of queen cells indicates either an unhealthy queen or the possibility of swarming. Drone cells should be present, but not in great numbers.
    • How many frames are full? The bees should have filled out their original five nuc frames and begun work building out comb and filling it on the additional five frames I provided in their hive.
  • Add hive box on top. Only if they’d made good progress on the five new frames.
  • Close hive. Duh-uh.
  • Feed bees. I needed to refill their feeder with the sugar syrup.

My notes were the bold text. I didn’t need the explanations. (Those were for you, dear reader.) Not a huge amount to do or remember. Just right for this first time.

I also printed out the checklist. I’d fill it out when I was finished.

The Inspection

I had a great day on Tuesday. Very relaxing. I blogged about it here. By the time I got to Jim and Kriss’s house in Wenatchee, I was feeling good. Very mellow and relaxed. In no hurry. And I stayed that way. That’s really important when you’re working with at least 10,000 live bees.

Hive Inspection PhotoI arrived around 4 PM, when the temperature was around 70°F. A nice warm afternoon when many of the bees would be out foraging. I brought my gear into what I’ve come to think of as the “bee yard” and was happy to see bees coming and going through the hive entrance. I saw Jim and Kriss and Jim came in to keep me company. I lighted the smoker and suited up. Jim remained in plainclothes, but stood back as I got to work.

Rather than give you a blow-by blow of the inspection, I’ll let you watch the video. It’s 9 minutes long, edited down from 30 minutes of raw footage. It was shot with a GoPro camera on a tripod. (I’ll do this again in the future and talk more directly to the camera.) Throughout the video, you’ll hear Jim and me talking about what we’re seeing.

Here’s the video:

The long and the short of it is that I have a healthy hive with friendly bees. Did you notice how Jim gets closer and closer throughout the video until at one point, he sticks his bare finger right next to the hive? My bees didn’t mind. They’re mellow. Mellow yellow bees. Jim says his bees aren’t that nice.

We saw drones and I actually spotted the queen, which surprised me very much. Jim and I seemed to see her at the same time.

We did find one swarm cell — a queen cell near the bottom of the hive. They likely built this before the frames were put into the hive, thinking they were running out of space in the nuc (which they were). I removed it.

We didn’t see any eggs, but we did see plenty of developing larvae and capped brood cells. And tons of honey and pollen.

I got to scrape clean honey comb off the top of the inner box. I munched on it later in the car. Next time, I’ll bring a container just for my spoils. I’ll be leaving most of the honey for the bees this year — they’ll need the stores for the winter.

Next Inspection

My next inspection will be about 10 days after this one — sometime next week. I’ll do pretty much the same thing, but this time I have the challenge of working with two boxes full of frames.

I’ve been giving my frame setup a lot of thought. I’m thinking that I want to reconfigure the hive to have just one deep frame on the bottom and then mediums above it. I’ll still allot two hive bodies for brood, but I think that having medium bodies/frames above the hive will give me more flexibility for honey production while making the hives lighter overall. And I’ll still have the deep boxes on bottom for installing or creating nucs. Of course now that I’ve already put the deep box on top, I can’t really make any change until I get a second hive setup and either split the colony or use the occupied frames from the top box in a new hive. Neither is possible right now.

I’m also thinking of putting in a frame with beeswax foundation might be a nice way to harvest a single frame of honeycomb before winter. I think the bees can spare that for me — especially given the amount of sugar I’ve been feeding them.

More video — but shorter and more pointed — with the next inspection. As usual, your comments and feedback here is always welcome.