Bees: Filling My Hive

I get some bees and begin caring for them.

I started my beekeeping hobby in June 2013 and have been blogging about it periodically. If you’re interested in reading the other posts in this series, follow the Adventures in Beekeeping tag. Keep in mind that the most recent posts always appear first on this blog.

Hives don’t usually come with bees in them and my hive was no exception. It arrived in a series of big cardboard boxes. Each box contained a hive body and ten frames with foundation. Another box included the base, an inner cover, and an outer cover. All I had to do was stack these in the right order and put bees inside the resulting box and I was in business.

As I discussed in a previous post, I got a line on some bees locally from someone who answered a Craig’s List ad I’d placed. I knew very little about bees and felt weird going to pick them up by myself. Fortunately, my friend James, who kindly lent me some real estate to put my hive at his North Wenatchee home, agreed to come along.

Assembling the Hive

But first I had to assemble my hive.

Although I’d bought a traditional hive with two deep hive bodies and two medium hive bodies, I didn’t need the whole thing. When you establish a colony of bees, you give them enough space for the queen to lay eggs and the workers to tend to the brood and start storing honey and pollen. Then, when they’re almost out of room, you add another hive body with more frames.

It’s like waiting until you’ve almost run out of space in your bookshelf to buy and install another bookshelf.

My Hive
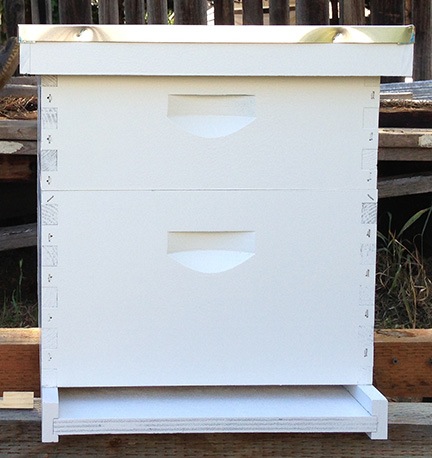
My initial hive setup.

I figured I’d set up a deep hive body for brood and a medium for honey. So that’s what I did. It looked very nice on the hive stand James had thoughtfully provided for me. (I guess he didn’t want me using the palette I’d found and rescued in his backyard. I can’t really blame him.)

I should mention here that I had been regretting my purchase of the two deep hive bodies for some time — since reading the book that came with my beekeeping kit, in fact. I read the book on the flight from Seattle to Phoenix and then from Phoenix to Seattle a few days later. I nearly finished it. In it, the author so strongly recommends that beekeepers buy only 8-frame medium hive bodies that she assumes every reader has done so. And although I have yet to meet a beekeeper who is using 8-frame hive bodies, I know quite a few who are using only medium depth hive bodies. I had decided that I ordered the wrong equipment even before I began using it. And I kept wondering how I was going to make the switch in the future.

That’s what I was thinking about as I assembled my hive and prepared to pick up my bees.

Then James got a phone call about two swarms. I went with him to track them down and (hopefully) capture them. More about that in another post.

Picking Up the Nuc

I was buying a nuc or nucleus colony. As I discussed in a previous post, a nuc is a box of bees with a queen already installed, mated, and laying eggs. It’s basically a very small hive. My Vermont beekeeping friend, Tom, says that this is the best way to get bees because all the bees already know the queen and there’s already brood and honey and pollen stored up.

The nuc was in Dreyden, which is about 15 miles from where my bees would live. After James and I finished chasing down swarms, we headed right to Dreyden. I called the seller, Randy, along the way. He’d meet us at the Shell station, which James knew. I told him what we were driving and he told me what he was driving. It was a typical Craig’s List meet.

We got there first and he pulled up next to us a few minutes later. He was a big guy — think horizontal — in blue denim overalls. He told us to follow him. We crossed the main road and got on a narrow drive. A minute or two later, we were pulling into a yard with lots of grass, a garden, a double-wide mobile home, and lots of parked cars and trucks, some of which looked as if they hadn’t moved in a long while.

A Nuc
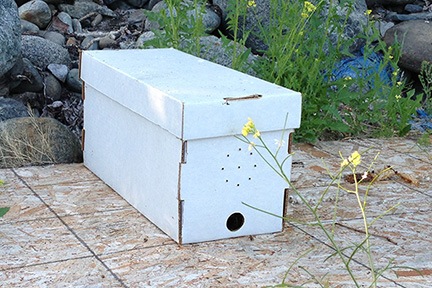
This is actually the nuc I didn’t take. We’d already loaded the other one into James’s truck when I realized I should have gotten a picture.

The nucs — he had two of them — were sitting on a board on the edge of the property. They were wax-coated cardboard, with a round hole in the front for the bees to come and go. Bees were flying in and out of each of them. Not too many, though — it was getting late.

And this is when I was suddenly glad I’d bought deep hive boxes. You see, the nucs use deep frames. If I only had medium frames in my hive, I wouldn’t be able to use the frames in the nuc. That was James’s situation. He wanted to buy the other nuc because he’d lost a queen in one of his hives but he couldn’t because the frames wouldn’t fit in any of his hive bodies.

Randy and James chatted quite a bit. It seemed they’d met before. James used to work for the cable company and had been to Randy’s house up by Blewett Pass. Randy was a nice guy. Very friendly.

Finally, it was time to do business. Randy asked me which one I wanted. I asked him which one was better. He and James agreed that whichever one was heavier probably had more bees. Randy checked them both. He put the round cap in one of them to close off the entrance and lifted it up. He handed it to James and James handed it to me.

I was holding a 15-20 pound cardboard box containing 5,000 to 10,000 live bees.

Cool.

We tucked the box in the back of James’s truck. I gave Randy a $100 bill. We shook hands. He told me to call him if I had any problems at all. Then we drove back down to Wenatchee.

Putting the Bees in the Hive

Back at James’s house, his neighbor’s son, Seth, came out to greet us. When he realized we had new bees, he asked if he could help.

“Suit up,” James told him.

Seems that Seth, who was maybe 10 or 12 years old, was really into bees. Even though his mom wouldn’t let him get any, she did let him get a bee suit and James let him help out. That was fine with me.

I unwrapped my brand new bee suit and pulled it on over my jeans and tee shirt. I put on the pith helmet and arranged the veil over it. Then I tried to zip the veil to the suit. I couldn’t do it. Neither could James. Neither could Seth — although he told me he had a lot of trouble with his, too. So I just let the veil hang over the neck of my suit and hope that the bees couldn’t find their way in. I put on the long gloves, grabbed my hive tool, and, feeling pretty silly, looked at James and our helper and asked, “Do we need smoke?”

Smoke calms the bees. I had a smoker, but I hadn’t used that either. James told me I wouldn’t need smoke. That was okay with me.

I carried the nuc box into the yard where my empty hive was waiting. James told me to take off the top box because I wouldn’t need it. Just the bottom box to get started. I pulled it off and set it aside. Then I pulled five empty frames out of the middle of the bottom box and set them aside. The five frames in the nuc would go into their places.

The moment of truth had arrived. I took the lid off the nuc box.

There were a lot of bees in there. They didn’t seem too interested in me. The tops of the frames were dirty and they were filled with thick comb. And dark brown goo.

James used my hive tool to scrape off a piece of burr comb on top that was filled with honey. “Your first harvest,” he said, handing me the comb.

I set it aside. I’d suck the honey out later.

Using my hive tool, I tried to pry one of the frames loose from the box. Bees create something called propolis — a dark brown goo — which is like a glue they use to seal up cracks. It’s the main reason a hive tool is necessary. I began prying up one side of a frame and tried to get the other.

The bees didn’t like that. A bunch of them came out and started swarming around my veiled head.

I tried again, but the bees were stressing me.

“Do you want some smoke?” James asked.

“If you think it would help,” I replied.

He and Seth left to get a smoker going. While they were gone, I just stood around, holding my hive tool in one hand, while bees swarmed all around me. I didn’t move my head much; I was afraid they’d find the gap between the veil and my suit and get inside. I was very happy to see them coming back about 5 minutes later. They puffed smoke into the nuc. It seemed to have some affect on the bees. Or maybe on me. I calmed down and got back to work.

One by one I removed the frames from the nuc. I didn’t really look at them, although I suppose I should have. I just wanted to get the job done. It was late and the light was fading.

I got all the frames from the nuc into the space in the hive body, making sure to put them in the same orientation and order so as not to confuse the queen.

Me and my Beehive
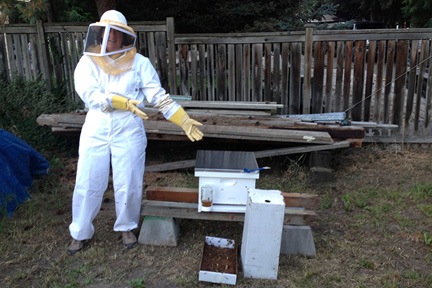
Here I am with my beehive. The nuc box and its cover are nearby so the bees remaining in/on them can find their way into the hive. The sugar water looks brown because I use unbleached sugar.

There were lots of bees still in the otherwise empty nuc box and clinging to the box cover. James said to leave them; the bees would find their way into the hive overnight. That was fine with me. Finished, I put the inner and outer covers on my now occupied hive.

One thing left to do: fill the feeder. I’d prepared a 1:1 sugar:water mixture in advance in a jar. I fit the lid of the feeder on the jar, inverted it, and slipped it into one side of the entrance.

I was done.

I posed for a picture, then went back to the truck. I stripped out of my bee suit and my companions did the same. After a bunch of goodbyes, I left. It was just getting dark.

The tiny bit of honey in that burr comb was good.

Two More Visits

I visited the bees — mostly to feed them — on each of the following days.

On Wednesday, I arrived after my meeting with surveyors, lunch, and a lot of divorce bullshit that I wrote about in another blog post. My main reason to visit was to give the bees more sugar water. I got my veil zipped onto my bee suit. I also got my smoker going — although I really didn’t need it. I didn’t need to open the hive. All I needed to do was take the lid off the feeder jar, refill it, and then put it back in place. Bees were coming in and out of the entrance. All looked good.

The bees were mostly out of the nuc box. I shook the last few out and used my hive tool to scrape away the propolis and wax on it. Back at my RV, I’d put the five frames I’d removed into the nuc box for safekeeping. I now had a good place to put a swarm if I had the opportunity to catch one.

On Thursday, I arrived after spending too much time at Hooked On Toys, getting a fishing rod set up for salmon fishing. (Too bad salmon season doesn’t start until July 1!) I’d brought enough sugar water to keep them for two days. This time, I wore the suit — call me a coward — but skipped the smoke.

I didn’t visit them at all on Friday. North Wenatchee is 40 miles from where I’m living right now. Those bees are going to have to learn to fend for themselves. I can’t visit them every day.

I’ll likely visit again this weekend, though, to give them more sugar water. I’ll also use that opportunity to inspect the hive and hopefully add another deep hive body and frames. Later, I’ll add a queen excluder and honey super. I don’t expect to harvest any honey this year — the bees will need it all to get through the winter — but I’m eager to give them what they need to keep the colony growing.

More in another post. Stay tuned!

Bees: Finding Residents for My Hive

A beehive isn’t much good without bees inside it.

I started my beekeeping hobby in June 2013 and have been blogging about it periodically. If you’re interested in reading the other posts in this series, follow the Adventures in Beekeeping tag. Keep in mind that the most recent posts always appear first on this blog.

Now that I’d finally made the plunge into this new hobby, I couldn’t wait to get started. But the equipment was only part of what I needed. I’d also need bees.

I had a problem there. Most people who buy bees do so in the spring. I was planning to start in June, after the big pollen season had ended. Although the beekeepers I spoke to seemed to think that it wasn’t too late to start, most agreed that I probably wouldn’t be able to collect any honey the first year. The bees would need it for the winter.

That was okay with me. I just wanted to get started and get a feel for it. Honey could come later.

But where to get the bees? Most mail order sources simply did not ship bees anytime other than spring. I’d have to find another source.

How You Get Bees

Of course, before I could get bees, I had to learn about the options for getting them. There are different ways to get them.

  • A Package. The most common way to get bees is in a package. They arrive in a box with the queen inside a special container called a queen cage. You literally dump the bees from the box into the top of your hive. Then you place the queen cage where the other bees can eat away a “candy” stopper that’s holding her in. She moves into the hive with the others and they go right to work.
  • A Nucleus Colony or Nuc. This is a box of bees with a queen already installed, mated, and laying eggs. It’s basically a very small hive. Most nucs are 5 frames in a single box. You take five frames out of your lowest hive body and put the five frames from the nuc into their place. The bees then go about their business, building on the additional frames you provide in the hive bodies. My Vermont beekeeping friend says that this is the best way to get bees.
  • A Split. Some skilled and knowledgable beekeepers can split one colony into two by manipulating the frames so that the queen and a bunch of bees go into a new hive body. The remaining bees in the original hive body are suddenly queenless so they make a new queen. Of course, you need a beehive to split it. You can learn more about splitting hives in this video.
  • A Swarm. When bees get too cramped in their living space, they move out in a swarm. Swarms are relatively common in May and June. Beekeepers who can catch them basically get free bees. (Heck, some people are even willing to pay beekeepers to take the bees away!) I watched a swarm get caught last May. This is the cheapest way to get bees and it’s surprisingly easy if you have the right equipment and the swarm is within reach.

Although I would have loved to have gotten a swarm — and not because I’m cheap — I was hoping to get a nuc. The trick was to find one.

Craig’s List to the Rescue!

A fellow member of the North Central Washington Beekeepers Association (NCWBA) knew I was looking for bees and immediately began to help. He forwarded me some Craig’s List ads for nucs available in the Spokane area.

Spokane is about 140 miles from where I’m currently living and nearly 180 miles from where my bees would live. Needless to say, I wasn’t terribly excited about driving 360 miles in one day to get bees.

But if I had to, I would.

There was no real rush. At first, I was waiting for my equipment to arrive. It did — the day before I had to go back to Arizona for some personal business. I simply didn’t have time to set up a hive and get bees all in one day. It would have to wait until my return.

In the meantime, I placed my own Craig’s List ad:

New Beekeeper Wants Bees (Wenatchee area)

New beekeeper seeks bees for hive. Healthy nuc or swarm or split. Yes, I know it’s a little late in the season to start, but it isn’t TOO late. Can you help?

Also interested in coming along to observe/assist swarm removal in area, even if I can’t have the bees.

I was in Arizona when I got a response:

hi my name is randy I have 2 five frame nucs I want 100.00 each you can call me at 470 XXXX for info

Thus began an email exchange with questions and answers about the nuc. They were 5-frame nucs with queens that were laying eggs. The queen was a Carniolan — a breed known for gentleness. The frames were quickly filling with comb, brood, honey, and pollen. They needed to be put in a hive soon.

The best thing about it: it was in Dryden, less than 15 miles from where the bees would be living in my new hive.

I made an appointment to meet with him and pick up the bees late one afternoon when I returned to Washington. More on that in another blog post.

Bees: Choosing and Buying Equipment

I consider and order my first hive and related equipment.

I started my beekeeping hobby in June 2013 and have been blogging about it periodically. If you’re interested in reading the other posts in this series, follow the Adventures in Beekeeping tag. Keep in mind that the most recent posts always appear first on this blog.

Once I’d decided to move forward with beekeeping, it was time to buy equipment. Unfortunately, there were many options to choose from. Without going into an in-depth discussion of how bees live and thrive — I’ll let you read up in the books like I did — I’ll go through my equipment choices and explain why making decisions isn’t so straightforward.

Deep vs. Medium Hive Bodies

My Hive
This simple beehive consists of five parts (top to bottom): telescoping cover (with aluminum roof), inner cover (not visible), medium hive body, deep hive body, hive base (with entrance for bees).

A hive body is the box that contains the bees. A bee hive consists of one or more hive bodies, each filled with vertically hung frames.

In general, beekeepers — and I hesitate to say “most beekeepers” because I really don’t know — use so-called deep hive bodies at the bottom of the hive and medium hive bodies at the top. A deep hive body holds frames that are 9-5/8 inches tall; a medium hive body holds frames that are 6-5/8 inches tall.

From my research, I learned that the benefit of medium hive body over deep hive body is weight; consult the table for details. It’s for this reason that medium hive bodies are usually used at the top of the hive for “honey supers.”

Hive Body Weights

This table, created with data from “Beehives, A Guide to Choosing the Right Size Boxes,” shows the difference in weight for a hive body full of honey at each standard size.

 10-frame8-frame
Deep80 lbs64 lbs
Medium50 lbs40 lbs

Seems like a no-brainer, right? Get all medium hive bodies so I can more easily lift them when necessary. The trouble is, the queen bee seems to prefer laying eggs in deep hive bodies. So there’s a possibility that a hive consisting of just medium hive bodies might not be as productive as one with deep hive bodies.

I consulted my friend in Vermont, who has been doing this for years. He recommended deep hive bodies at the bottom and medium hive bodies at the top. The “traditional” way.

10-Frame vs. 8-Frame Hive Bodies

Hive bodies can also hold either 10 frames (the traditional size) or 8 frames. Again, the main difference between these sizes is weight; consult the table.

Another no-brainer, right? Well, the way I saw it, the larger boxes would give the hive more room to grow so I’d have to add hive bodies less often to prevent swarming. Giving the bees more horizontal space would also eliminate the need to give them more vertical space — I wouldn’t be building bee towers. That’s the way I saw it, anyway.

Wood vs. Plastic

Hive boxes and frames are available in wood or plastic. The plastic boxes seemed to have more insulating properties for the winter, but all the beekeepers I talked to scoffed at the idea of using anything but wood.

Assembled vs. Unassembled

Hive bodies and frames come assembled or unassembled. They also come painted or unpainted. Frames come assembled or unassembled. Coated or uncoated. With foundation or without foundation. You can save money by buying hive components unassembled and putting them together yourself and then painting them or coating them with wax (as necessary). (You can also build your own bee hives from scratch, but I certainly didn’t want to go there.)

This was definitely a no-brainer for me. I’d buy them fully assembled and painted/coated.

Other Hive Parts

I’d also need some additional parts to each hive:

  • Frames. This is where the bees build their honeycombs, rear their brood, and store honey and pollen. They hang vertically in the hive bodies and usually include a wax-coated foundation on which the bees can build. There are a lot of frame foundation choices, but I think it’s best to start with whatever is standard.
  • Inner and outer covers. This protects the bees from the elements. Because each hive body is open on top and bottom, the top one must be covered.
  • Bottom board. This provides a base for the hive and an entrance for the bees. A reducer enables you to adjust the size of the opening.
  • Hive stand. This is a platform to keep the beehive off the ground. Most people build makeshift hive stands out of cinderblocks and scrap wood, although you can buy fancier ones.
  • Queen excluder. This keeps the queen from moving up into the part of the hive that’s reserved for honey storage.
  • Mite screen. This helps control varroa mites. (That’s a whole discussion in itself.)
  • Feeder. When you first get your bees, you have to feed them a 1:1 sugar water solution to keep them going until they can find their own source of food. You do this with a feeder. My vermont friend recommended an entrance feeder, although I’ll likely need to switch to a top feeder in the winter time.

The Importance of Sticking to Standards

Over and over, in every beekeeping information resource I consulted, the importance of standards was stressed. It’s pretty simple: you want your equipment to follow standards because you will be mixing and matching pieces down the road.

Some of the books also mentioned that standards aren’t always followed to the letter. They suggested finding one source of equipment and sticking to it. This would ensure uniformity so all the pieces fit together properly.

Sure, there are lots of pretty beehives out there, designed for gardens or patios or even inside an urban home. They’re more for show than for actual bee rearing. They usually don’t have standard parts so they’re not very practical if you’re serious about beekeeping.

Other Equipment

The hives are the homes for the bees. But other equipment is also necessary to keep bees. I had to get that, too.

  • Bee suit, gloves, hat, and veil. These items protect me from the bees themselves. I don’t think I’m allergic to bee stings, but who wants to take chances?
  • Smoker. Beekeepers use cool smoke to calm bees. I’d need a smoker for each time I opened the hive and manipulated the frames.
  • Hive tool. This is a specialized metal tool used to pry frames apart, scrape away accumulated propolis and wax, and work with the hive components.

Placing My Order

Although my Vermont friend had suggested Betterbee as an online source of beekeeping equipment, the local beekeeping group I joined suggested Mann Lake. They said Mann Lake had quick turnaround time and free shipping for orders over $100. I went with Mann Lake.

I had a choice of placing my order piecemeal (a la carte, so to speak) or ordering a kit. If I ordered a kit, I could order a complete beekeeping kit, which included everything I needed (other than the bees), or just a hive kit, which included a complete hive and still required me to order the other things I needed.

The Bee Kit
This is the bee kit I ordered. (No, it didn’t come with the guy.)

With so many choices to make, I decided to keep it super simple and order the Deluxe Traditional Starter Kit, which included four 10-frame hive bodies (two deep and two medium), 4 frames (in appropriate sizes, inner and outer cover, bottom board with reducer, bee suit with zip-on veil, hat, gloves, queen excluder, smoker, smoker fuel, hive tool, bee brush, and a book titled The Backyard Beekeeper. I also ordered an entrance feeder and a drawer-style varroa screen.

Now that I’d finally made the plunge into this new hobby, I couldn’t wait to get started. More on that in another post.

Bees, Please

I consider, reconsider, and prep for a new hobby.

I started my beekeeping hobby in June 2013 and have been blogging about it periodically. If you’re interested in reading the other posts in this series, follow the Adventures in Beekeeping tag. Keep in mind that the most recent posts always appear first on this blog.

I don’t know exactly when I started thinking seriously about keeping bees as a hobby. I know it was within the past few months, but if I had to give you an exact date, I’d come up empty.

I think it started as a tiny germ of an idea, like a speck of pollen clinging to a bee’s wing as it buzzes around, going about its business. Somewhere along the line it was noticed and moved to a place where it could be closely examined and considered. I immediately realized that I needed more information to make a decision one way or the other and I got to work gathering that information.

Doing My Homework

I started by querying my friend Tom, who has been keeping bees for some time now in Vermont. He has nothing but good things to say about beekeeping and I was very encouraged. He gave me a few details, but it all went over my head. I didn’t know enough. Yet.

Beekeeping BookI bought a book — as I usually do when I want to learn something. I chose The Complete Step-by-Step Book of Beekeeping by David Cramp. It’s a nicely illustrated, hardcover book that covers all the basics of beekeeping, written in a way that folks who know nothing about it can quickly grasp. It was published in the U.K., so it has more information about beekeeping in Europe than I’d find in a U.S. published book. It didn’t go into much depth on any topic, however. This might be because of constraints related to the spread-based presentation of the material — each topic had to be covered on one 2-page book spread. (This is something you notice when you’ve worked in publishing long enough.) But, in general, I highly recommend it to anyone who is clueless and curious about beekeeping — as I was.

Tales from the HiveI also rented NOVA: Bees – Tales from the Hive from Netflix. This video offers some amazing footage that clearly shows some of the more interesting aspects of bee life. I admit that I fell asleep halfway through it — I really can’t watch TV late in the evening anymore — but I fired it back up early the next day and watched the part I’d missed. I recommend this, even if just for the quality of the footage. NOVA documentaries are usually very good and this was no exception.

Natural BeekeepingIf that wasn’t enough, I bought and sat through (in two sessions again) Natural Beekeeping with Ross Conrad on DVD. This is an incredibly long video that isn’t particularly well-produced. It jumps from video footage of Mr. Conrad lecturing in a classroom about bees with very few visual aids to video footage of Mr. Conrad talking to the camera out in the field while showing off a few things. I wouldn’t recommend this video at all if it weren’t for the fact that it is jam-packed with detailed beginner, intermediate, and advanced information about keeping bees. If he could redo this video to show more than tell — and organize it into real chapters or segments on the DVD — he’d have a real winner.

Storey's Keeping BeesBecause I liked the Storey Guide series book about raising chickens, I figured I’d try Storey’s Guide to Keeping Honey Bees. I bought the Kindle edition so I could read it on my iPad and annotate it. I admit I was a bit disappointed. The book didn’t translate well to the Kindle format; illustrations and tables simply did not appear right. Sometimes paper really is better.

Beekeeper BibleBy this point, I’d pretty much decided that I wanted to move forward and give beekeeping a try. So I bought one more book, this one to use for general reference: The Beekeeper’s Bible: Bees, Honey, Recipes & Other Home Uses by Richard A Jones and Sharon Sweeney-Lynch. This 416-page hardcover book covers pretty much every aspect of bees and beekeeping. I’m certain I’ll turn to it again and again to learn as I work with my bees.

Join the Club

Of course, homework wasn’t limited to books and videos. I also wanted to meet with other local beekeepers — if I could find them.

So I asked all-knowing Google and, of course, Google gave me an answer: The North Central Washington Beekeepers Association (NCWBA) on Facebook. I “Liked” the page so I’d get updates.

I also posted a comment introducing myself and asking other members if I could see their beehives:

I am very interested in getting started with this as a hobby soon. Is anyone in the Quincy or Wenatchee area interested in showing a complete newbie their setup and giving her some pointers? I’ll buy lunch afterward. Let me know.

I almost immediately got a response that included an invitation to see a member’s apiary in North Wenatchee. The next day, I was pulling up to a complete stranger’s house on the edge of town and knocking on their door. I met Kriss and Jim, who escorted me out to their incredibly huge backyard to see Jim’s two hives. We chatted for a while about bees, took a walk in their yard, and checked out Jim’s honey extractor. They suggested I go to YouTube and watch videos by FatBeeMan. I left feeling glad that such nice people shared the same hobby so close to where I’d soon be living.

The NCWBA meets twice a month: once for an informal “chat” at an area restaurant and once for a formal association meeting in a hotel conference room. I was unable to attend the next chat, but I was able to go to the formal meeting. I met a bunch of great people and told them about my situation — that I wanted to get started with bees but didn’t have a place to put my hives yet. Soon, I told them, I’d close on a 10-acre parcel in Malaga. They talked about hive conditions now and what each beekeeper should be expecting. They talked about needing a webmaster for their website. (No, I didn’t volunteer. I have enough on my plate right now.) They talked about their involvement in the Chelan County Fair in September. (Can anyone lend them a mannequin with a head so they can dress it in a bee suit, hat, and veil?) And they talked about swarm season; I gave out my phone number and asked to be called if they went after a swarm so I could watch and/or help.

At the end of the meeting, Kriss and Jim offered to let me put my hive in their backyard so I could get started with my bees before the season is too far gone. We’d move the hive when I closed on my land. I accepted their very generous offer and started thinking about ordering my hive.

Another Friend with Bees

The following Tuesday, I was in Auburn, WA, picking up my sad little jet boat, which was in storage at my friend Don’s house. Don offered to take me to late breakfast at the Puyallap Airport. That meant flying over in his helicopter. He pulled it out of his hangar and preflighted it and we climbed aboard. While it was warming up, I told him I’d decided to keep bees. I then immediately suggested he and his wife might like to do the same — they’d make a good match for their goats and llama and chickens.

“We already have bees,” he replied.

I was dumbfounded. I didn’t know he had bees. We talked about them at breakfast. He told me that there was a woman nearby who did seminars and sold beekeeping equipment. Her place was closed just one day a week: Tuesday. Just my luck.

When we got back to his house, he showed me his two bee hives. He told me that they’d had one hive the previous year and that the bees had been killed by mites over the winter. He showed me the mite screen they’d just installed.

Two white molded plastic chairs were positioned in front of the hives, about five feet away, facing them. “Do you sit here?” I asked.

“Yes,” he replied. “It’s kind of fun to watch them come and go.”

I told him I was going to pick his brain about bees when I had questions. He didn’t seem to mind at all.

Prepped with Information

That was on May 21, less than a month after receiving that first bee book in the mail from Amazon.com.

At that point, I fully understood about 90% of what my beekeeping friends — both old and new — were talking about. Only a month before, I didn’t know much about bees other than that they lived in hives, had a queen, and made honey. Within a month, I’d learned the terminology and understood more than just the basics. I could communicate with others to ask questions and understand the answers. My homework — with books — had really jump-started my knowledge base.

It was time to make equipment purchase decisions. But I’ll save that for another post.