Lights at Night

Beautiful, but at a cost.

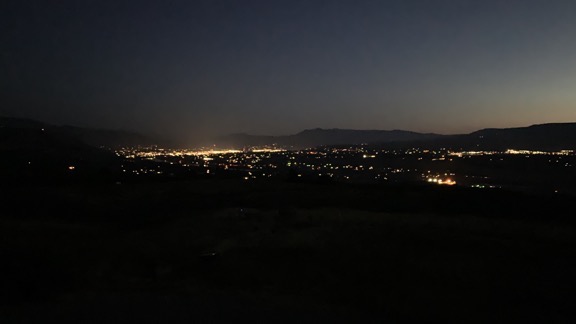
As the days are getting shorter, I’m finally rising and going to bed when it’s dark out again. This morning, I took a few moments to contemplate the predawn lights of Wenatchee from my home. And it really is beautiful.

Lights at Night
The view from my deck looking out towards Wenatchee at 4:51 AM this morning.

When I was a kid, my family would occasionally take a drive up to the east side of the town we lived in, Cresskill, NJ. Back in the 1960s and into the 1970s and beyond, developers had begun building luxury homes on a hillside that climbed away from the town toward the Palisades. We used to call it “the rich people’s hill” because the homes were huge and it was obvious that only rich people lived there. I remember one of those drives being in the evening, after the sun had set and the lights of Cresskill had come on. I remember seeing all those lights, like diamonds in the darkness.

That’s what my nighttime view here reminds me of sometimes.

I cannot begin to describe how wonderful it is to live in a place so removed from, yet within reach of, a small city like Wenatchee. I have all the conveniences that the little city offers — shopping, dining, theaters, nightlife, services, and even an airport with airline service to a real city (Seattle) and beyond. Yet I’m not down in it, crawling around in — or listening to — traffic. Even as I sit here now, typing out my thoughts as the sky brightens out my windows, the only sound is my wine fridge humming and my rooster crowing. Even when they’re spraying down in the orchards far below me, the sound seems more earthy, more natural, than the sounds of the city.

But the lights. Sigh.

I’ve begun to notice bright ones getting closer. When I returned from my winter travels in spring 2018, I noticed four new bright spotlights over some sort of maintenance yard down by the river. You can see them on the right side of this photo: three in one color and one in another. And last spring I noticed a new bright light across the river, likely shining down into someone’s yard. Why?

Here at my home, I have subdued lighting at night. There are solar accent lights along my driveway and the path to my tent and the posts tops on the uncovered side of my deck. There are motion-sensor lights that go on when someone — or something — walks near them. None of these lights shine up. And that’s it. I see no reason to pollute the sky with light at night.

And that’s what it is: light pollution. The only complaint I have about my home is the fact that it never gets truly dark here. (Well, it actually does, but only at night when it’s foggy.) And because I don’t have (or need) curtains on my windows, it never gets dark inside my home.

It was with a bit of sadness that I sold my old telescope last year. It was parked near the door to the deck for years and only used, with disappointing results, once or twice. Although I’m likely to pick up a more compact one with tracking that I can take on my winter travels — plenty of dark sky out in the desert! — I just have no use for one here.

It’s blue hour right now, light enough to see the empty sage land between my home and the orchards and lights beyond it. The city lights are starting to fade. It’ll be a hot sunny day today.

But at night, I’ll see those lights again, enjoying the view while lamenting my loss of dark night sky.

Helicopter Tour: Dam to Dam

A video from the FlyingMAir YouTube channel.

COME FLY WITH ME on a narrated tour of the Wenatchee, WA area from the Rock Island Dam to the Rocky Reach Dam.

I managed to squeeze in this 15-minute flight just before I had to pick up paying passengers near the Rocky Reach Dam. Never one to miss an opportunity, I got the cameras rolling and wound up with two video tracks to combine for this video.

About Me and the Helicopter

  • I have been flying for about 20 years. My nearly 4,000 hours of flight time is in Robinson R44, Robinson R22, and Bell 206L (Long Ranger) helicopters.
  • The helicopter is a Robinson R44 Raven II — the same one that appears in the photo at the beginning of the video. You can learn more about them here: https://robinsonheli.com/r44-specifications/ I own this helicopter. It is the third helicopter I’ve owned since 2000.
  • My helicopter has ADS-B Out and is picked up by radar facilities. You can see my track for recent flights on Flightradar24: https://www.flightradar24.com/data/aircraft/n7534D This is a great site for tracking any almost any flight, including the airlines.

About the Video

  • The video was recorded with a pair of GoPro cameras, one of which is connected to the helicopter’s intercom system. Both cameras record audio, but I dialed down the helicopter sound to about 25% of normal volume so it wouldn’t be annoying. I wouldn’t mind leaving it out altogether, but lots of folks seem to want it, so there it is.
  • The video was edited on a Macintosh using Screenflow software. (Screenflow was the only affordable software I could find that allowed me to do picture-in-picture.) Learn more about it here: https://www.telestream.net/screenflow/overview.htm
  • The intro music is by Bob Levitus, famed “Dr. Mac.” You can find him here: http://www.boblevitus.com/

I’m trying to drop flying videos like this one every Sunday morning and usually drop “extras” with more info about owning and operating a helicopter midweek. I’m also working on putting together occasional livestreams with Q&A chat. Subscribe so you don’t miss anything new! And tell your friends. The more subscribers I have, the more motivated I am to keep producing videos like this one.

Still reading? Thanks! Maybe you’ll consider buying a T-shirt, mug, or sticker to help fund my video equipment acquisitions? Check out my Teespring Store!

Why I Shop on Amazon

Where else can I get exactly what I want when what I want is something weird?

If you’ve been following this blog, especially lately, you know that I’ve been doing a lot of video work. A bunch of it requires two cameras that create a pair of videos that must be synchronized. As I explain in my video about the setup, I was creating a sort of key frame for synchronization by clapping my hands between the two cameras, which face each other.

That’s not the way professionals do it. They use what’s called a clapboard. It’s the iconic black and white (usually) device that’s snapped together right after the director calls “Action!” Typically, it’s got spaces on it that are filled in with information about the scene being shot, including the date, take, and scene identifying data.

The real benefit of a clapboard is that when you snap it shut hard, it makes a sharp clapping sound. If your video clips have an audio track, this clap appears as a spike in that audio track. That makes it super easy to align the clips so both spikes appear one after the other. Perfect alignment, right up to the frame.

I decided I wanted one of these things.

Now, I live in a rural area. While Wenatchee is a nice little city nearby, it doesn’t have any shops that cater to video producers. This isn’t Los Angeles. Although we have a few video production companies in town — I’ve done some flying work for two of them — the demand for video equipment will never be enough for someone to open a shop that carries the equipment they need.

Besides, I had very specific needs. I wanted one that was small so it would fit in my video kit but not a toy or novelty item. I wanted it to work with dry-erase markers instead of chalk. I wanted it to be sturdy with a good snap.

So I did what most people in the U.S. do these days: I went to Amazon.com and searched for movie clapboard. And Amazon immediately showed me hundreds of search results.

To be fair, some of them were really off-base. A coffee mug with a movie clapboard on it. A novelty director’s party kit that included a fake Oscar, megaphone, and clapboard. A picture frame designed to look like a clapboard. Clapboard keychains. Pillow covers with a movie theme that included a clapboard.

But the vast majority of the hundreds of items listed were actual, usable movie clapboards.

I went through them. It took some time — but not nearly as much time as it would to find a brick and mortar shop that sold clapboards, get to it, make my selection (if they had what I wanted), and get home. I eventually found the one I wanted: Action Cut Board, Andoer Acrylic Clapboard Dry Erase Compact Size TV Film Movie Director Cut Action Scene Clapper Board Slate (whew!). It was $10.99 with free shipping.

I read the reviews with a grain of salt. Amazon reviews are notoriously untrustworthy. You have to read a bunch from “verified purchasers” to get a real idea of the pros and cons of the item you’re considering. Disregard the 5 star reviews that seem a bit too glowing and short on details. Disregard the 1 star reviews that seem too critical and short on details. You know the kind. The rest of the reviews were good enough. One mentioned the solid clapping sound. I think a few complained about the small size — which is actually a feature I wanted.

So I ordered it. It arrived in two days.

The clapboard really is exactly what I wanted, but I admit it did not arrive in perfect condition. Two of the nuts/bolts holding the clapboard on were a tiny bit loose; I tightened them. And the acrylic board that had been glued into a slot on the clapper part wasn’t exactly aligned. Fortunately, it also wasn’t glued in very well, which made it loose in the slot. I pulled it out and glued it back in with more glue and better alignment. What do I expect for $11, right?

Clapboard
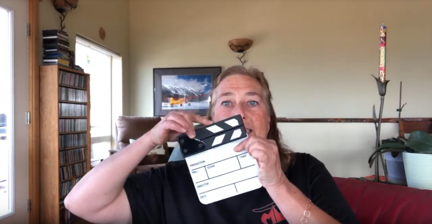
Here I am, showing off my new little clapboard during a livestream event on YouTube.

I showed it off to my YouTube channel viewers at the beginning the AMA Livechat I did last night. I snapped it for them.

This is the kind of thing that’s impossible to find in brick and mortar shops unless you’re in a large enough city with a large enough market for a niche item like this. And that’s why I turned to Amazon. Although it’s often a pain in the butt to wade through the search results and quality is becoming a bigger issue every day as they allow more and more junk to be listed, I will almost always find exactly what I’m looking for, usually at a price that I’m willing to pay.

Behind the Scenes: FlyingMAir Audio/Video Setup

A video on the FlyingMAir YouTube channel.

Ever wonder how I get the great sound and pictures for my cockpit POV videos? This video explains my setup in detail.

Products mentioned in this video

I purchased all of the equipment shown in this video. These are not paid endorsements — I use it all and recommend it based on my experience with the products shown. That said, if GoPro wants to send me a Hero 7 Black, I’ll gladly take it and thank them publicly for it. (Just saying.)

Buy On Amazon

If you want to buy any of these things, please use these affiliate links. When you shop on Amazon with one of my links, I get a tiny commission to help fund my own audio/video purchases and it doesn’t cost you a penny more.

About the Video

  • The video was recorded with an iPhone Xs. ‘Nuff said.
  • The video was edited on a Macintosh using Screenflow software. (Screenflow was the only affordable software I could find that allowed me to do picture-in-picture.) Learn more about it here: https://www.telestream.net/screenflow/overview.htm
  • The intro music is by Bob Levitus, famed “Dr. Mac.” You can find him here:
    http://www.boblevitus.com/

About My Channel

I’m trying to drop POV flying videos every Sunday morning and usually drop “extras” like this one midweek. I’m also working on putting together occasional livestreams with Q&A chat. Subscribe so you don’t miss anything new! And tell your friends. The more subscribers I have, the more motivated I am to keep producing videos like this one.

Still reading? Thanks! Maybe you’ll consider buying a T-shirt, mug, or sticker to help fund my video equipment acquisitions? Check out the Teespring links on any video page.

R44 Helicopter Autorotation Practice

A video from the FlyingMAir YouTube channel.

Join me and Trevor Hale, a certified flight instructor from Mesa, AZ, for a 30-minute flight where I practice straight-in and 180° autorotations. Before we finish up, Trevor demonstrates — or tries to demonstrate — the Vuichard Maneuver for recovering from settling with power/vortex ring state. This is a complete video of our flight and includes all conversation, both on topic and off-topic. It’s basically two pilots practicing together, chatting about the maneuvers and sharing flying stories. I considered editing out the downwind portions of each pattern we flew, but thought there was enough interesting chatter to keep it. We’re real people and we’re not trying to prove anything. We’re also not trying to show off, so don’t expect anything fancy.

Because so many folks seem to like the scenic flying I do in the area, I also include my flight to the airport and back to base from the airport. If all you care about are the autorotations, start the video at about 5:00 and end it when Trevor and I land. If you’re here for the scenery, just watch the first and last 5 minutes.

There’s a lot to say about this video and I sure hope folks read this description before they fill the comments with questions I answer here.

First of all, autorotation is a maneuver that helicopter pilots use to land safely in the event of an engine failure. (No, we don’t drop like a brick out of the sky when the engine fails.) Depending on the level of our certificates (private or commercial) we are trained to perform a variety of autorotations, including straight in, 180°, hovering (low), hovering (high), and full-down. We can also be taught more advanced versions that include slipping, spiraling, or making S-turns to hit a spot. In autorotation, the pilot has control of the helicopter and can go in just about any direction except up. (And even that is sometimes possible to a tiny extent.) We are tested on autorotations in check rides and practice it in biennial flight reviews. So yes: every helicopter pilot you fly with should know how to fly the helicopter safely to the ground in the event of an engine failure. If you still think “drop like a brick,” get over it.

I should mention here that if you want to learn how helicopters work, I highly recommend the FAA’s Helicopter Flying Handbook, which is available on the FAA’s website in HTML and PDF formats. This is a free book that tells you everything a helicopter pilot needs to know about flying helicopters in general. (A pilot also needs to know specifics about the helicopter he’s flying; you can find that in the Pilot Operating Handbook (POH) for the aircraft itself.) I’m willing to bet that any question you have about helicopter controls and maneuvers is answered in this book. Please don’t get annoyed if you ask a question in the video comments that’s answered in this book and I don’t answer it.

I’m flying with Trevor on this day to practice autorotations in preparation for an annual FAA Part 135 check flight. Although this will be my 16th or 17th Part 135 check ride, I’m still nervous every time I have one scheduled. I’m not a flight instructor and have never been one. So while a flight instructor practices autorotations almost every day with his students, I don’t. The result: in my 20 years of flying, I’ve done hundreds of practice autorotations when the average helicopter pilot, who was a flight instructor for at least part of his career, has done thousands. Although I’m confident that I could perform a survivable autorotation in the event of an engine failure at altitude — in other words, outside the shaded area of the height velocity diagram (see my blog post about the Deadman’s Curve here) — I like to get practice before a check ride to make sure I can do them within practical test standard requirements for my commercial helicopter certificate. (You can find the FAA’s Commercial Pilot Practical Test Standards for Rotorcraft (FAA-S-8081-16B) as a PDF). The other challenges for me in check ride situations are “text book” flying, which I generally don’t do. I’m referring to flying in traffic patterns at predetermined climb and cruise rates and doing other maneuvers to the exact specifications recommended in text books. Fortunately, pilot examiners understand the difference between text book and real world flying and they don’t usually ding me for sloppy traffic pattern work.

When I edited the video to combine synchronized footage from both cameras, I dialed down the helicopter’s engine/rotor audio to 40% rather than the 25% I usually use. I did this so you can hear how quiet it gets when I throttle down for the autorotation. The engine is still running, but it is not driving the rotor blades. This is how we practice autorotations without putting ourselves or the aircraft at added risk. While practice autorotations can still be dangerous — occasionally an engine actually does quit when you throttle down — keeping the engine running makes it possible to power back up when things start going south — as they started to my first practice 180° autorotation. I don’t practice full-down autorotations in my helicopter because of the increased risk of blade strike on the tail boom in the event of a hard landing. Why risk it? Experienced helicopter pilots might also notice that my flares at the bottom are not very aggressive. That’s because I worry a bit about a tail strike very close to the ground. Again, why risk it?

When Trevor says “bump it,” he’s advising me to lift the collective a tiny bit to prevent rotor overspeed. This is an R44 thing that is not an issue in R22s. There’s so much inertia in the R44’s rotor blades that if you push the collective full down in an autorotation, you run the risk of overspeeding the rotor system. In a real life engine failure, who cares? (We actually allude to that after one of the practice autos.) But when you’re practicing, you don’t want to mess up the helicopter with an overspeed so you’re constantly monitoring rotor RPM to prevent it. (The horn, which I discuss next, will warn you if rotor RPM starts to droop.) On my first practice 180 auto, I came dangerously close to overspeeding, which got me frazzled enough to screw up the rest of the maneuver. In real life engine failures, the only thing you really care about is getting the helicopter on the ground safely, so you’re thinking about keeping RPM high enough to keep flying, make your spot, flare to bleed off airspeed, and cushion your impact when you touch down. The flare will also build RPM, so you want to make sure you’re not already near the redline when you practice.

The sound you hear at the end of some of the autorotations is the low rpm warning system. In a Robinson, it’s set to go off at 97% RPM. That’s an unusually quick warning and part of the reason for that is that early R22 owners were unaccustomed to the low inertia rotor system and the extra early warning was an attempt to help prevent them from getting into unrecoverable low rotor RPM situation. A rule of thumb for Robinsons is that you can fly at 80% RPM plus 1% RPM per 1000 feet of density altitude. So if I’m flying at 2000 feet density altitude — which is about right for that day — the helicopter should stay airborne with just 82% RPM. Years ago, in advanced training at the Robinson Safety Course, the instructor demonstrated this by flying at 90% RPM for a lot longer than my horn-adverse brain wanted to. I blogged about low rotor RPM way back in 2010 here.

Trevor’s biggest problem when trying to demonstrate the Vuichard Maneuver for me (and you) was getting into settling with power/vortex ring state. This normally occurs when a helicopter settles into its own downwash and is the primary reason we don’t land vertically except perhaps at very slow descent rates. To practice a recovery from this condition, you need to get into it. We usually do this by getting into a high hover (zero airspeed) and then starting to descend until the descent rate becomes uncontrollable with the collective. There was simply too much wind that day to really start settling — it was blowing the downwash away from us. Trevor was still able to demonstrate it enough for me to get the gist of it. You can learn more about this maneuver in this Rotor and Wing article by the legendary Robinson flight instructor, Tim Tucker. This excellent article also explains what vortex ring state is and how it can be a problem. It’s a little technical, but so are most aerodynamics topics.

I hope you find the video interesting (at least) and educational (if you’re a pilot who really wants to learn about this). I know it’s not as exciting as the dramatic autorotations you can find in other YouTube videos. I don’t fly like that so if that’s what you come to my channel for, you’ll be disappointed. I believe in flying within my limitations and the limitations of my aircraft. That’s the only thing that can keep me and my passengers safe.