Helicopter Flight: Icicle Creek to Wenatchee

A cockpit POV video from the FlyingMAir YouTube Channel.

COME FLY WITH ME for the second half of my July 27 flight from Malaga to Leavenworth to Wenatchee. I start by making a U-turn in the canyon where Icicle Creek comes out of the mountains, showing off a waterfall, and taking a higher level direct flight to Wenatchee. Along the way, I talk about radio communications and helicopter operations. You’ll hear radio calls and see Penny the Tiny Dog make a half-hearted attempt to find shade in the front seat.

About Me and the Helicopter

  • I have been flying for about 20 years. My nearly 4,000 hours of flight time is in Robinson R44, Robinson R22, and Bell 206L (Long Ranger) helicopters.
  • The helicopter is a 2005 Robinson R44 Raven II — the same one that appears in the photo at the beginning of the video. You can learn more about them here: https://robinsonheli.com/r44-specifications/ I own this helicopter. It is the third helicopter I’ve owned since 2000.
  • My helicopter has ADS-B Out and is picked up by radar facilities. You can see my track for recent flights on Flightradar24: https://www.flightradar24.com/data/aircraft/n7534D This is a great site for tracking any almost any flight, including the airlines.

About the Video

I try to drop cockpit POV videos every Sunday morning and “extras” with more info about owning and operating a helicopter midweek. (Some channel members get early access to some of these videos.) I also host occasional livestreams with Q&A chats. Subscribe so you don’t miss anything new! And tell your friends. The more subscribers I have, the more motivated I am to keep producing videos like this one.

Any Amazon links on my channel are affiliate links (https://amzn.to/32PLHTD). If you click one of them and buy something, Amazon sends me a few pennies. Enough pennies make a dollar. Enough dollars buy new equipment. It doesn’t cost you anything so I hope you’ll shop with one of those links. Thanks.

If you’re not a subscriber, please subscribe and click to turn the notification bell on. Then share the videos you really like with your friends and family so they can enjoy them, too.

Still reading? Thanks! Maybe you’ll consider buying something from my Etsy store to help support this channel? Start here: https://www.etsy.com/shop/FlyingMAir

Or better yet, to support this channel on an ongoing basis, consider becoming a member. This link will get you started: https://www.youtube.com/channel/UCLGD_GbGsS6YKK_Ekx0QMqQ/join

Helicopter Flight Controls: The Collective

Another video from FlyingMAir’s YouTube Channel.

This is the second in my Helicopter Flight Control series covering the four flight controls in a helicopter. In this video, I show you the collective and how it controls main rotor blade pitch. Then I take you for a flight and demonstrate two landings and a takeoff, as well as how I can reduce/increase speed without descending/climbing. Although I don’t provide details about the cyclic, it does play a part in this video; hold your cyclic questions for that video, okay?

One thing I failed to make clear in this video: the collective controls the manifold pressure in a Robinson. It does this because the collective is tied to the throttle through the use of a correlator and electronic governor. So when I “pull pitch” — lift the collective — the throttle automatically increases to compensate for the additional drag of the blades at a higher pitch setting. When the throttle increases, the manifold pressure increases. Because of this, it’s common to use the manifold pressure setting to indicate the collective pitch setting even though manifold pressure is an engine indicator and not a main rotor blade indicator. I hope that makes sense to you; it should when you watch this entire video and listen to my manifold pressure references.

BIG DISCLAIMER: I am not nor have I ever been a flight instructor. The purpose of this video is not to teach you how to fly a helicopter. It’s simply to explain, mostly to non-pilots or fixed wing pilots, what the collective control does. If you want more information, I strongly urge you to consult the Helicopter Flying Handbook, which is FREE on the FAA Website: https://www.faa.gov/regulations_policies/handbooks_manuals/aviation/helicopter_flying_handbook/ You’ll find Chapter 3 especially informative.

About Me and the Helicopter

  • I have been flying for about 20 years. My nearly 4,000 hours of flight time is in Robinson R44, Robinson R22, and Bell 206L (Long Ranger) helicopters.
  • The helicopter is a 2005 Robinson R44 Raven II — the same one that appears in the photo at the beginning of the video. You can learn more about them here: https://robinsonheli.com/r44-specifications/ I own this helicopter. It is the third helicopter I’ve owned since 2000.
  • My helicopter has ADS-B Out and is picked up by radar facilities. You can see my track for recent flights on Flightradar24: https://www.flightradar24.com/data/aircraft/n7534D This is a great site for tracking any almost any flight, including the airlines.

About the Video

  • The video was recorded with a pair of GoPro Hero 7 cameras (https://amzn.to/2Lxyzwl), one of which is connected to the helicopter’s intercom system with an NFlightCam audio cable (https://amzn.to/31syLTm). Both cameras record audio, but I dialed down the helicopter sound to about 25% of normal volume so it wouldn’t be annoying.
  • The camera mounts are MyPilotPro Spider Mounts (https://amzn.to/2BnbcQv” target=”_blank”>https://amzn.to/2BnbcQv and https://amzn.to/2Muou3N) which are made specifically for aircraft operations. Utilizing three suction cups, they make it possible to mount cameras on rounded surfaces. You can see one of the mounts in the video near my vertical compass. For more information about camera mounting options for aircraft, visit https://mypilotpro.com/; I will be reviewing these mounts in an upcoming video.
  • The video was edited on a Macintosh using Screenflow software. Learn more about it here: https://www.telestream.net/screenflow/overview.htm
  • Additional audio in this video was recorded in Screeflow using a Røde Podcaster microphone (https://amzn.to/2IFnbNr).
  • The intro music is by Bob Levitus, famed “Dr. Mac.” You can find him here: http://www.boblevitus.com/

I try to drop cockpit POV videos every Sunday morning and “extras” with more info about owning and operating a helicopter midweek. (Some channel members get early access to some of these videos.) I also host occasional livestreams with Q&A chats. Subscribe and turn on the notification bell so you don’t miss anything new! And tell your friends. I’m trying hard to deliver good videos and grow my subscriber base.

Any Amazon links on my channel are affiliate links (https://amzn.to/32PLHTD). If you click one of them and buy something, Amazon sends me a few pennies. Enough pennies make a dollar. Enough dollars buy new equipment. It doesn’t cost you anything so I hope you’ll shop with one of those links. Thanks.

If you’re not a subscriber, please subscribe and click to turn the notification bell on. Then share the videos you really like with your friends and family so they can enjoy them, too.

Still reading? Thanks! Maybe you’ll consider buying something from my Etsy store to help support this channel? Start here: https://www.etsy.com/shop/FlyingMAir

Or better yet, to support this channel on an ongoing basis, consider becoming a member. This link will get you started: https://www.youtube.com/channel/UCLGD_GbGsS6YKK_Ekx0QMqQ/join

Helicopter Flight: Autumn at Rock Island Creek

A cockpit POV video from the FlyingMAir YouTube channel.

COME FLY WITH ME as I take my Robinson R44 Raven II helicopter (Mr Bleu) and Penny the Tiny Dog for a flight over the fall colors at Rock Island Creek, north of Wenatchee. This is a narrated cockpit point of view video that starts and ends at Wenatchee airport. Along the way, I’ll be cruising at about 100 knots and flying close to treetops in a deserted canyon.

This video was shot after recording some footage for other videos about helicopter flight controls, so I’ve already got the engine running as I’m sitting on the taxiway at the beginning of this video. Although audio was recorded using the camera facing me, that camera also cut off the top of my head — I think it shifted during my final adjustment — and you don’t need to see me anyway, so I didn’t include much of that video. (Except at the end, for those who watch the whole thing.) Instead, I use all footage from a single camera mounted over the passenger seat with a new camera mount. I had a little trouble with the cameras before the start of the flight so they’re not aimed quite the way I like them to be. Sorry.

About Me and the Helicopter

  • I have been flying for about 20 years. My nearly 4,000 hours of flight time is in Robinson R44, Robinson R22, and Bell 206L (Long Ranger) helicopters.
  • The helicopter is a 2005 Robinson R44 Raven II — the same one that appears in the photo at the beginning of the video. You can learn more about them here: https://robinsonheli.com/r44-specifications/ I own this helicopter. It is the third helicopter I’ve owned since 2000.
  • My helicopter has ADS-B Out and is picked up by radar facilities. You can see my track for recent flights on Flightradar24: https://www.flightradar24.com/data/aircraft/n7534D This is a great site for tracking any almost any flight, including the airlines.

About the Video

  • The video was recorded with a pair of GoPro Hero 7 cameras (https://amzn.to/2Lxyzwl), one of which is connected to the helicopter’s intercom system with an NFlightCam audio cable (https://amzn.to/31syLTm). Both cameras record audio, but I dialed down the helicopter sound to about 25% of normal volume so it wouldn’t be annoying.
  • The camera mounts are new in this video. They are MyPilotPro Spider Mounts (https://amzn.to/2BnbcQv and https://amzn.to/2Muou3N) which are made specifically for aircraft operations. Utilizing 3 suction cups, they make it possible to mount cameras on rounded surfaces. You can see one of the mounts in the video near my vertical compass. For more information about camera mounting options for aircraft, visit https://mypilotpro.com/; I will be reviewing these mounts in an upcoming video.
  • The video was edited on a Macintosh using Screenflow software. Learn more about it here: https://www.telestream.net/screenflow/overview.htm
  • The intro music is by Bob Levitus, famed “Dr. Mac.” You can find him here: http://www.boblevitus.com/

I try to drop cockpit POV videos every Sunday morning and “extras” with more info about owning and operating a helicopter midweek. (Some channel members get early access to some of these videos.) I also host occasional livestreams with Q&A chats. Subscribe and turn on the notification bell so you don’t miss anything new! And tell your friends. I’m trying hard to deliver good videos and grow my subscriber base.

Any Amazon links on my channel are affiliate links (https://amzn.to/32PLHTD). If you click one of them and buy something, Amazon sends me a few pennies. Enough pennies make a dollar. Enough dollars buy new equipment. It doesn’t cost you anything so I hope you’ll shop with one of those links. Thanks.

If you’re not a subscriber, please subscribe and click to turn the notification bell on. Then share the videos you really like with your friends and family so they can enjoy them, too.

Still reading? Thanks! Maybe you’ll consider buying something from my Etsy store to help support this channel? Start here: https://www.etsy.com/shop/FlyingMAir

Or better yet, to support this channel on an ongoing basis, consider becoming a member. This link will get you started: https://www.youtube.com/channel/UCLGD_GbGsS6YKK_Ekx0QMqQ/join

Helicopter Flight: Fog in the Cascade Mountains

A cockpit POV video from the FlyingMAir YouTube channel.

Sit on the nose of my old helicopter as I fly over the Cascade Mountains and its fog-filled valleys. There’s some narration in the beginning; you can apply your own music.

This “Flashback Friday” video is an 11-minute clip from about 90 minutes of footage shot from takeoff in Wenatchee Heights (WA) to landing at Hillsboro (OR) Airport in July 2012. The flight was done on one of those very rare occasions when I could fly a direct, straight line route – normally, there are low clouds in the Cascades that force me to go around them to the south. You can find a montage of clips from the entire flight in a video I released back then, “Helicopter Flight from Wenatchee to Hillsboro” at https://youtu.be/hnIbY2y69Ug.

I remember this flight like it was yesterday. I had to take the helicopter to Hillsboro for a 100-hour inspection and needed to rush back to Wenatchee to finish cherry season. In this segment, I’m flying over the Cascade Mountains and the valleys below me are full of fog. I had taken off just after dawn and the mountain ridges cast long shadows ahead of me. It was absolutely gorgeous.

Back in July 2012, my divorce had just begun and it wasn’t in its crazy ugly stage yet. At this point in the flight, I recall thinking how much my future wasband would have enjoyed the flight and I was sad about that. (Now I can’t help thinking what an idiot he is and how much better off I am without him. Oh, well. Time does heal all wounds.)

I was also a little uneasy on this part of the flight. Flying VFR on top – which means flying in visual flight rules conditions over clouds – is not something I do very often. Helicopters normally fly quite low and I’m seldom above the clouds. I remember being surprised to see the fog and then nervous with the realization that if I had to make an emergency landing I wouldn’t be able to see my landing zone as I descended. But isn’t all that fog just wonderful to behold?

This was also memorable because it was Penny the Tiny Dog’s first helicopter flight. She was about 5 months old at the time and I had no idea how she would react. I put her in the front seat on a leash that would prevent her from getting into my controls. But after I started up, she just curled up in her bed on the seat and went to sleep. She slept until I began my descent at Hillsboro.

About Me and the Helicopter

  • I have been flying for about 20 years. My nearly 4,000 hours of flight time is in Robinson R44, Robinson R22, and Bell 206L (Long Ranger) helicopters.
  • The helicopter is a 2005 Robinson R44 Raven II — the same one that appears in the photo at the beginning of the video. This was my first R44, which was lost in a crash back in 2018. You can learn more about R44s here: https://robinsonheli.com/r44-specifications/ I owned this helicopter and now own another one very much like it, but blue. I’ve owned a helicopter since 2000.

About the Video

  • This video was recorded in 2012 with a GoPro Hero 3 camera mounted on the nose of the helicopter. Audio comes from the camera’s built-in speaker and has been incorporated into this video at 20% normal volume.
  • The video was stabilized prior to editing in iMovie software. Although I don’t like to edit in iMovie, it does have decent stabilization. If you compare this video to more recent nosecam video (for example, “Helicopter Nosecam Flight: Dawn on the East Side of the Cascades #2” at https://youtu.be/HXBznbtc54U), however, you’ll see that a GoPro Hero 7 Black shoots much more stable video than a Hero3.
  • Narration was done using a Røde Podcaster microphone (https://amzn.to/2IFnbNr) connected to a Macintosh. I recorded the brief narration while I was watching the video in the editing software.
  • The video was edited on a Macintosh using Screenflow software. Learn more about it here: https://www.telestream.net/screenflow/overview.htm
  • The intro music is by Bob Levitus, famed “Dr. Mac.” You can find him here: http://www.boblevitus.com/

I try to drop cockpit POV videos every Sunday morning and “extras” with more info about owning and operating a helicopter midweek. (Some channel members get early access to some of these videos.) I also host occasional livestreams with Q&A chats. Subscribe so you don’t miss anything new! And tell your friends. The more subscribers I have, the more motivated I am to keep producing videos.

Any Amazon links on my channel are affiliate links (https://amzn.to/32PLHTD). If you click one of them and buy something, Amazon sends me a few pennies. Enough pennies make a dollar. Enough dollars buy new equipment. It doesn’t cost you anything so I hope you’ll shop with one of those links. Thanks.

Still reading? Thanks! Maybe you’ll consider buying something from my Etsy store to help support this channel? Start here: https://www.etsy.com/shop/FlyingMAir

Or better yet, to support this channel on an ongoing basis, consider becoming a member. This link will get you started: https://www.youtube.com/channel/UCLGD_GbGsS6YKK_Ekx0QMqQ/join

On Tripods

To use a tripod or not to use a tripod — that is the question.

I was on a photography cruise last week and dutifully brought along my tripod. That was a good thing because in our very first lecture on the cruise, we were told to always use our tripods to shoot photos.

Some version of this piece of advice is on every single “Top Ten” list for photography that I’ve ever seen. Search Google for photography tips and see for yourself. The smart lists say to “use a tripod whenever possible” or “know when to use a tripod.” But the lists for people who are apparently incapable of thinking for themselves just say “use a tripod.” And that’s the approach the instructors for this cruise had for shooting on land.

Honestly, I liked the guys. This steadfast “use a tripod” rule is the only complaint I had about them. It came to a head on our first outing when I took my camera off the tripod so I could get down close to the ground to take a shot. One of the guys saw me and reminded me to use the tripod.

“But I want to get down close to the ground,” I told him.

“Your tripod can do that,” he told me. “Let me show you.”

“You don’t need to,” I replied. “I know how.”

It’s true, of course. Every good tripod has the ability to flatten out its legs so they’re all spread out while the tripod head is closer to the ground. But there are two problems with this. First, my tripod features a central pole about a foot long that the camera sits on. That means my camera head can never be less than a foot from the ground when it’s on the tripod. Second, setting up the tripod like that means splayed legs that cannot easily be adjusted when you’re perched on the edge of a cliff (as I was then). The tripod was not going to help me get the shot. It was going to hinder me.

And that’s my point: tripods often hinder more than help.

Fortunately, he backed off. I respect him for that. I think he was thinking that I’d learn the hard way, by screwing up photos. But I knew a little more about photography than I think he thought I knew and I did okay.

Why Use a Tripod

The primary reason to use a tripod for photography is to steady the camera. This prevents (or should prevent) camera shake, which is a common cause of blurriness in a photo. While exposure and saturation and composition can all be fixed in a photo editing application, blurriness usually cannot.

I say “should prevent” because using a tripod also requires the use of a shutter release cable or other device to push down the shutter button on the camera. The thought is that even your gentle pressure on that button might shake the camera enough to move it while the photo is being taken. A workaround — which I usually use — is to set the self-timer for 2 seconds and use that: push the button, move your finger away, and 2 seconds later the camera will snap the photo.

The photo guys on this cruise also claimed that using a tripod slows you down so you really think about the composition and camera settings.

I agree that it slows you down — how can it not? Even if the camera is already firmly mounted and the legs extended, you still have to stop on appropriate terrain, spread the legs, adjust the leg length for the right height or to level the tripod on uneven ground, adjust the tripod head to get the camera pointed at the subject, and then repeat a variety of these things to get the composition you want. (Obviously, this is not an option with a moving subject, but we’ll pretend the subject isn’t going anywhere fast.) What if the optimum position for getting the shot you want is to balance on a slope of boulders? Or lie on your belly at the edge of a cliff?

As for it helping me think about the composition and camera settings, well, composition is always forefront in my mind — which is why I don’t like using a tripod. Forcing me to set up the tripod to get the composition I want is often frustrating, taking all the fun out of photography. (Remember, I don’t do this for a living; it’s a hobby.)

And while I admit that I don’t pay as much attention as I should to camera settings, I’ll also point out that after spending five minutes setting up a tripod to get as close to my desired composition as I want, the last thing I want to do is play around with camera settings. I just want to make the picture and get on with my life.

Patience is something I’ve always struggled with. While it’s nice for a hobby to be challenging, it shouldn’t try your patience.

Of course, there are times when you absolutely must use a tripod; I’ll get to that shortly.

Carrying a Tripod

I think another one of my gripes about using a tripod is carrying it.

Manfrotto Tripod
Although my tripod is an older model, it looks just like this newer one.

My tripod is a big, sturdy Manfrotto with a ball head — excellent quality but heavy. Good tripods are heavy by default. They need to be heavy if they’re going to be sturdy enough to actually stabilize the camera.

I have at least one other decent quality tripod, a Slik, but it’s smaller and lightweight — the kind of tripod you wouldn’t mind carrying but couldn’t trust to hold up your DSLR with an 85-300mm zoom lens attached.

(I suppose an exception to heavy being better would be a carbon fiber tripod, but if I have $450 to spend on a tripod, I’ll likely spend it on something else. And I can’t imagine something lightweight holding up in the wind, now matter what it’s made of.)

Carrying a heavy tripod along with a bag full of camera gear on an otherwise pleasant hike in the woods or along a narrow shoreline path isn’t fun. ‘Nuff said.

But Really: Do you Need a Tripod?

Given that tripods are meant to prevent camera shake that could blur the image, take a moment to consider the conditions under which blurring from camera shake might occur: slow shutter speeds.

You need to know a little about how real (not smartphone) cameras work. When you press a camera’s shutter button, light goes through the lens and onto a surface that records what the camera sees. In the old days, it was film. Nowadays, it’s a sensor.

The more light that is recorded onto that surface, the brighter the resulting photo is. That’s called the exposure. The goal is to get a perfect exposure that shows detail in both the highlights and shadows. Sometimes that’s difficult to the point of being downright impossible, but let’s set that aside for now. If too much light comes through, the highlights will be blown out — too bright to see detail. If too little light comes through, the shadows will be too dark to see detail. So exposure becomes very important.

Cameras (and photographers) control the exposure using three different settings that work together:

  • Shutter speed is the amount of time the camera lens is open to let light in. This is measured in fractions of a second, although it could be more than a second. The higher the shutter speed, the more light comes through. Higher shutter speeds can freeze motion (including camera shake) while slower ones can turn motion into a blur (which might be a desired effect in your situation).
  • Aperture is the size of the lens opening. This is measured in what’s called f-stops. The lower the f-stop number, the bigger the aperture opening is and the more light that comes through. Aperture is important because it controls depth of field — the higher the f-stop, the more depth of field is available for close subjects. The bokeh effect that everyone likes is created with a low f-stop (wide open lens) while focusing on something relatively close.
  • ISO in digital photography is the sensitivity of the camera’s sensor. (In the old days of film, it was called ASA and it measured the sensitivity of film to light, which is nearly the same thing.) The higher the ISO, the more sensitive the sensor is. That means it can record more information with less light. The drawback to very high ISO settings is that they tend to introduce noise — digital artifacts — into your photos.

(By the way, if you want a better explanation of these terms, check out Digital Photography School‘s pages on shutter speed, aperture, and ISO.)

These three factors work together to form what’s commonly called the Exposure Triangle. You see, if you set any two of these factors, the third factor must be manipulated to get the correct exposure.

For example, if the ISO is set at 1000 and the aperture is ƒ 18, you might need a shutter speed of 1/500 second to get the right exposure — depending on the light conditions.

Bird
Seagull, shot from a moving boat. (No tripod.) ISO 1000, focal length 300mm, aperture ƒ 18, shutter speed 1/500 second.

(This, by the way, is what the instructor was referring to when he talked about having more time to consider camera settings. These are the settings he was referring to.)

So blurriness from camera shake is caused by slow shutter speeds. And there are two ways to avoid camera shake. I’ve already told you one of them: use a tripod. The other is to simply increase the shutter speed.

What shutter speed to you need? Well supposing that you want to freeze the action and prevent camera shake from blurring the image, that depends on the focal length of your lens. There’s a rule of thumb that says you need a shutter speed with a denominator (the bottom part of a fraction) that’s larger than the focal length of a lens. So if you’re using a 50mm lens, you need a shutter speed of at least 1/50 but since that option doesn’t exist on any camera I’ve seen, you’ll likely use 1/60 or faster.

So it’s a bright overcast day. I’m in the woods. My ISO is set for 1600, which is still below a setting where noise becomes a problem in my camera. I’m using a zoom lens set to 70mm. I want a blurred background, so I’ve got my lens wide open to f5.6 (which is the widest this lens opens). I should have plenty of light for a fast shutter speed — certainly fast enough to avoid camera shake.

Mushrooms
It’s not the best photo, but it does illustrate my point. ISO 1600, focal length 70mm, aperture ƒ 5.6, shutter speed 1/200 second. (No tripod.)

So why in hell would I use a tripod?

Yes, it would be impossible for me to get my tripod this close to the ground for this shot. But if I made this shot work without a tripod, I can make nearly any shot work without a tripod.

That’s my point.

Why would I carry around a heavy tripod that’s a pain in the butt to set up and use and takes most of the fun out of photography when I don’t need it?

Look at my previous post, where I went into detail about the cruise. Check out the photos. Which of those do you think I used a tripod for? I’ll give you a hint: it was only two of them.

Using a Tripod When Necessary

I mentioned earlier that tripod use is broken down in various photography tip lists to three different presentations:

  • Always use a tripod.
  • Use a tripod whenever possible.
  • Use a tripod when necessary.

The instructors on our cruise were basically in that middle school of thought. Their instruction was to always use a tripod when you’re on land and don’t use it when you’re in a boat. (Using a tripod in a moving vehicle is pretty dumb because it defeats the purpose of using a tripod.)

Tafoni
Tafoni rock formation, shot from a moving boat. (No tripod.) Focal length 145mm, ISO 1000, aperture ƒ 16, shutter speed 1/500.

But I’m firmly in the third school of thought: use a tripod when necessary. To me, necessary means situations when you must have the shutter open a long time.

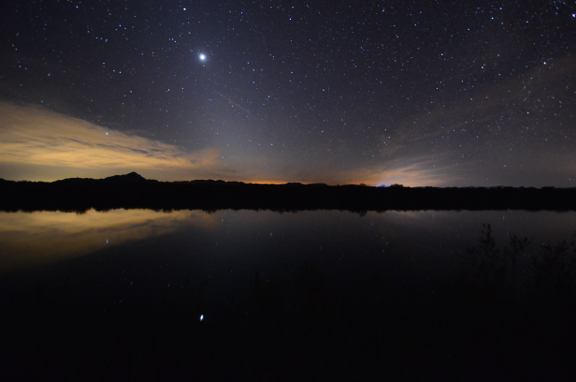
An example is nighttime sky photography. I’m usually working with 30-second exposures with my 10mm lens wide open. Those two parts of the Exposure Triangle are fixed. The only leg of that triangle that I can change is the ISO and I use that to get the exposure I want. It’s usually very high — 3200 or more — too high for daytime photography.

Venus Reflected
This is shot from 2017, when I was camped out along the Colorado River. I don’t have the settings, but I can assure you that this was shot from a tripod.

Another example of when you might want motion blur in your photos. Imagine sitting at a race track and wanting to capture the speed of the cars whizzing by. Put the camera on a tripod, set the shutter speed to 1/10 second or slower, and adjust the other two Exposure Triangle settings to ensure you get a good exposure. Then shoot pictures as the cars roar past. Everything in focus that isn’t moving will stay in focus but those moving cars will be a blur. It isn’t possible to pull this off properly without using a tripod.

And that brings up one more point in favor of using a tripod: it can give you more artistic flexibility. After all, once it’s set up with your subject properly framed, there’s nothing to stop you from experimenting with all of your camera settings to get the perfect picture. I guess that’s what the course instructors meant by slowing down.

In Summary

To use a tripod or not to use a tripod? That’s the question you need to answer based on the situation.

As for me, I’ll only use when when I have to — and I know enough about how my camera works to know when that might be.