Is That Deal Really as Good as They Say?

Amazon misstates retail prices to inflate savings.

It’s a twist on my Safeway whine from last week. Stores — including online stores — purposely misstate the retail or regular price of items to make their own prices look better.

Amazon's PriceHere’s proof. I was distracted by a tweet that took me to Amazon.com and was further distracted by a “Lightning Deal” offer for the Garmin nüvi 500 GPS. Here’s the deal as it appeared on Amazon.

Wow! I thought to myself. A $499.99 GPS for only $169.99! That’s a savings of $329 or 66% off retail price!

I’m shopping for a new GPS — something with a bigger screen that still supports topographic maps — and thought this might be an excellent deal for me. So I went to the Garmin Web site to get the full details about this particular model.

Real Retail Price
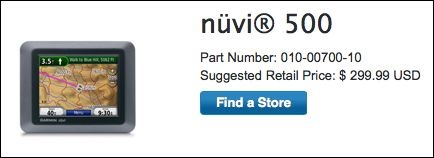
What did I discover on Garmin.com? That the suggested retail price of this GPS is not $499.99, as Amazon advertises. It’s $299.99. That’s $200 less.

Doing some math, I calculated a savings of only $129 or 43% off the real retail price. Admittedly, that’s still pretty good, but it’s a far cry from 66%.

Not Such a DealAnd the deal isn’t so sweet when you look at Amazon’s regular (not “Lightning”) price: $232.38. Now you’re saving only $67 or 22% off retail price, despite the fact that Amazon claims you’re saving $267 or 54%.

My point? Don’t believe retail prices as advertised on reseller Web sites or in stores. Do your homework. Don’t let fantasy savings con you into making a purchase decision before you have all the facts.

You Want Permission to Do WHAT?

When sharing information from Facebook gets out of control.

I’m trying to streamline my photo sharing process. I’d like to be able to upload a photo to Zenfolio, which is where my photo gallery resides, and then, with a few clicks, put it on Facebook and Twitter. It seems to me that since Flickr can upload to Facebook and Twitter, those few clicks might be to put photos on Flickr and have Flickr do the heavy lifting. With that end in mind, I made the first step to connect Flickr to Facebook. Here’s the dialog that appeared after logging in:

Yahoo Permissions for Facebook

I’m displaying this image in almost full size on purpose — so you can read it. That’s what I did — and I’m pretty sure that most people don’t. Read it and you’ll learn that Yahoo! not only wants permission to post Flickr photos to my Facebook account, but it basically wants access to every single piece of information I have on Facebook, as well as information from my friends’ accounts.

Why does it need this information? Answer: It doesn’t.

What will it do with this information? Answer: Who knows? Set up direct marketing to me and my friends? Sell it? Put information about what I like or don’t like anywhere it wants on to Yahoo!? Extract information to store on its servers where I can’t see, modify, or delete it?

Who in their right mind would agree to this?

Likely, some of my Facebook friends. So now I need to go back into my Facebook account and lock down information sharing even more — just so click-happy friends don’t give MY information to Yahoo! Or other companies wanting access to everything.

Facebook should NOT allow this kind of access. There’s no reason for it. They are betraying their user’s trust.

Now I can’t take advantage of Flickr/Facebook linking because I know how to read and don’t want to share my information with another huge conglomerate. Who benefits? No one.

How to Extract GPS Coordinates for a Google Maps Location

It’s a lot easier than you might think.

Like most folks who depend on the Internet as a source of information, I use Google Maps a lot. But rather than use it to track down street addresses and get driving directions, I use it to pinpoint places out in the middle of nowhere that I need to visit by helicopter. There are usually no street addresses, and even if there were, they wouldn’t help much while flying. What I need are GPS coordinates.

You might be in a similar situation. You see a place on a map and, for one reason or another, you need to know its exact GPS coordinates. Fortunately, Google Maps can help. Here’s how to get those coordinates.

  1. Use Google Maps (not Google Earth) to display the location you want GPS coordinates for. In my example, I’ll use satellite view to find a dirt airstrip I know along the Verde River north of Phoenix. You could search for an address if you needed the coordinates for a street address.
  2. Google GPS Step 1Hold down the Control key and click right on the spot you want the coordinates for. A menu pops up. (You may be able to simply right click, but I’ve had limited success with that on my Mac using Firefox; Control-click always works.)
  3. On the menu, choose Center Map Here. The view will probably shift a bit.
  4. Google GPS Step 2Above the map area, in the blue bar, click the Link button. A window appears with two text boxes in it. The contents of the top text box, which are selected, includes a link to the map that you might paste into an e-mail message. It also includes the GPS coordinates, which I’ve indicated with a red box around them. Sometimes the GPS coordinates are not so obvious and you’ll need to scroll through the contents of the box to find them.

Note that the coordinates are in digital format. In this example, they’re 34.160043°N 111.727266°W. (West and South are negative numbers.) Some GPSes use this format; you can usually specify the format you want to use in your GPS’s settings.

If you need coordinates in degrees, minutes, seconds format, you’ll need to do some simple math. Let’s take a look at how it works for the first number: 34.160043.

  1. Take the whole number (34) and set it aside. That’s the degrees.
  2. Take the number after the decimal point and multiply it by 60: .160043 x 60 = 9.60258
  3. Take the whole number from that calculation (9) and set it aside. That’s minutes.
  4. Take the number after the decimal point and multiply it by 60: .60258 x 60 = 36.1548
  5. Take the whole number from that calculation (36) and set it aside. That’s seconds. Keep in mind that if you want a more precise number, you can include the decimal places after it. You might also want to round the number up or down depending on what comes after the decimal point. In this example, the number after the decimal point is 1 so I’d round down and use 36.
  6. Put the numbers you set aside together in degrees° minutesseconds” format. In this example, you’d have 34° 9′ 36″.

My helicopter’s GPS uses a degrees° minutes‘ format, so I’d stop calculating after step 2 and wind up with 34° 9.60258’.

Congratulations! You’ve made it to the end of yet another post here on An Eclectic Mind. If you got this far, you must have gotten something out of what you read. And isn’t it nice to read Web content that isn’t full of annoying ads?

How about doing something to show your appreciation? I’d love it if you’d add a comment at the end of this post to share your feedback with me and others. But I’d really love it if you’d visit my Support page and chip in a few dollars to help cover the cost of hosting this blog and motivate me to keep writing new, interesting content. It’ll only take a moment and I really would appreciate it!


Easy, To Die For Butternut Squash Soup

I can’t get enough of this stuff.

One of my favorite things to eat is butternut squash soup. Trouble is, when I have a flavor in your mind and I find myself eating something that just isn’t quite as good, I get seriously disappointed. You know what they say: If you want something done right, yadda yadda yadda.

Here’s the recipe I like. It’s remarkably easy to make, but in case you have a serious case of lazy bones, I’ve included a few shortcuts to make it even easier.

Ingredients

  • 1 medium onion, chopped. I use sweet onions. Lazy? You can buy them pre-chopped in most supermarket produce departments or the freezer section.
  • 2 tablespoons margarine or butter.
  • 2 cups chicken broth. I use canned. Although one can is 15 ounces (I think), that’s close enough.
  • 1 pound butternut squash, pared, seeded and cut into 1-inch cubes. This is probably the most labor-intensive part of the process. Those squash are a real pain to pare. And where have you ever found one less than 2 pounds in size? I usually do it the hard way, but today I stopped off at Trader Joe’s and picked up a 2-pound bag of butternut squash already prepared. (So, of course, I made a double-batch of soup.) You might be able to use frozen squash if it is unseasoned; I’ll leave that up to the seriously lazy cooks to experiment with.
  • 2 pears, pared and sliced. I use fresh pears whenever possible, but I suspect that you could get away with canned pears, as long as you rinse off the sugary syrup they insist on canning them with.
  • 1 teaspoon fresh thyme leaves. Yeah, like I’ll find fresh thyme in Wickenburg. I use dried but only half as much.
  • 1/4 teaspoon of salt. I usually omit this, especially if the broth does not have reduced salt. You can always add salt later; you can never take it away.
  • 1/4 teaspoon white pepper. I use regular pepper, which I grind as I need it.
  • 1/4 teaspoon ground coriander.
  • 1 cup whipping cream. This is killer stuff and makes the soup very rich. I suspect you could use half and half to make it a little less deadly.

Cooking Instructions

  1. Cook and stir onion in margarine in a medium pot until tender.
  2. Butternut Squash SoupStir in broth, squash, pears, thyme, salt, pepper, and coriander.
  3. Heat to boiling; reduce heat heat and cover.
  4. Simmer until squash is tender, 10 to 15 minutes.
  5. Puree soup in a food processor or blender. You may have to do this in batches. You might also want to wait until the soup has cooled a bit; I cracked my food processor bowl by processing hot soup. I now use my glass blender.
  6. Return pureed soup to pot.
  7. Stir in whipping cream and heat until hot.
  8. Garnish with pear slices and toasted pecans if desired.

Yields 6 1-cup servings.

This is a great soup for Thanksgiving. The squash and pears are in season right now so it’s the perfect time of year to make this. Treat yourself. You won’t be disappointed.

The Golf Ball Drop

Good thing I don’t play golf.

Yesterday at about noon, I did another golf ball drop from my helicopter. It was my second ever. The first didn’t come off all that well.

The event was at a golf course about 3 miles off the approach end of Phoenix Sky Harbor runways 25 L/R. I’d called the tower the day before to tell them what I’d be up to and make sure it wouldn’t be a problem. (The ATC folks at Sky Harbor tower are great.) At the time of the event, planes were taking off on runway 8 (north side of the airport, farthest runway from where I was) and landing on runways 7 L/R. I was cleared to cross the extended centerline and then let the tower controller know when I was landing, doing the drop (low level), and ready to depart again. The whole time I was flying, I was listening to airliners departing from the runway; I was never told to switch to the south tower frequency.

Golf Course Location

Golf Ball Drop

Hovering over the drop zone.

I did much better at this drop than the last one. The conditions were good. The drop zone was on the driving range for a golf course in Tempe. Although there were some serious wires to the north, there were no obstructions near where I had to drop. That means I didn’t have to climb above any obstructions for the drop (which is what messed me up last time). Winds were light out of the east, so there was no pedal dancing — I was able to point the helicopter’s nose right toward the spectators for the entire flight.

Although I’d originally been told to expect 900-1100 golf balls, we only had about 400 on board. They all fit in a box. We cut three of the box’s four flaps off, leaving the drop guy, who was provided by the client, with a handle he could use to hold the box while dropping. (This was the drop guy’s first time in a helicopter. Too bad it was such a short and boring flight.)

This time, we dropped out of the door behind mine. This made it possible for me to see exactly where the balls were falling. (Duh.)

My instructions were to drop between a big red flag and a smaller red flag at the cup. The folks who ran the show expected the balls to roll down the hill from the big flag toward the cup.

Golf Ball Drop

Dropping golf balls over a driving range in Tempe.

I was in about a 150-foot hover over the drop zone. When it looked as if the balls weren’t going to roll, I hovered sideways, right over the cup. The shower of balls came much closer. I didn’t see any balls go in, but a bunch of them gathered around the cup. One sat right on its lip. There would be a winner but no in-the-cup winner.

Afterwards, I landed and exchanged the ball dropper guy for my ground crew helper, a Black Hawk pilot named Jonathan who’d come along for the ride. Jonathan took the in-flight photos you see here.

Next time, I’m sure I’ll make the hole.