How I’ve embraced the Internet of Things.
On May 20, 2014, I began blogging about the construction of my new home in Malaga, WA. You can read all of these posts — and see the time-lapse movies that go with many them — by clicking the
new home construction tag.
One of the best things about designing and building your own home is the ability to include features that are fully customized for your own individual needs. I built my home with home automation in mind, but what I still find surprising as I look back on what I’ve done is how easy it is to retrofit a home with automation features.
I thought it was time for me share some of what I’ve learned while setting up the home automation features of my home. This is not intended to provide readers with everything they need to know to set up their own system. Instead, it’s an overview of what I’ve done and why and what it’s cost me. As you’ll discover, it’s neither difficult nor expensive to get started.
Oh, and one more thing: if you’re looking for a “buyer’s guide” or detailed analysis of what’s available or even step-by-step instructions for setting up a system or devices, you won’t find it here. This is just an overview of what I did and why I did it. Use it to get some ideas for your system or needs.
The System

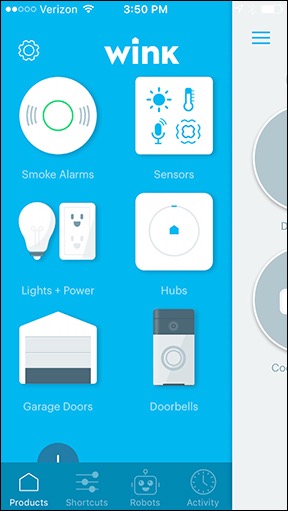
The main screen of the Wink app on my iPhone. Each icon represents a type of device; tap the icon to access the actual devices.
Let me start by explaining what I wanted from my home automation setup.
I was very interested in setting up certain things that could be turned on or off when I wasn’t home. For example, the very first thing I thought about was having floodlights on my deck that shined down onto the concrete driveway where I land my helicopter. Although I very rarely fly after dark, if I was out flying and got delayed until after nightfall, I wanted the ability to turn on the floodlights from my helicopter so I could clearly see where I had to land without relying on my landing lights.
So in this example, I have a few components. On one side are the actual floodlights and the light switch that turns them on and off. On the other side is the Internet and my mobile device (smartphone) that communicates with it. What I needed was something in between the two sides — a device that made it possible for my phone to talk to the light fixtures.
That’s where the home automation system comes into play. It forms a sort of bridge between devices and a smartphone. It connects those devices to the Internet so your phone can talk to them.
When I began looking into this — about two years ago now — there were already quite a few options. There are even more now. I needed a system that met the following requirements:
- Affordable. I’m not rich and I don’t want to pump a bunch of money into a system — especially one that might be out of date in a few short years.
- Well supported. I wanted a system that had been around for a while, seemed to have good customer service, and looked as if it would be around for a while longer. That ruled out any brand new providers or ones that didn’t seem to add many new devices.
- Wide variety of devices. That’s what it’s all about, isn’t it? Being able to connect the most things to the system? Well, I didn’t need a lot of things, but I did need certain types of things.
I also discovered that different systems used different communication protocols. For example, Wink, which is the one I wound up with, supports ZigBee and Z-Wave enabled devices. So any device that supports these two protocols should work with Wink. But a device that doesn’t support them might not be supported by Wink. I really can’t explain it any better than that. (And you can learn the difference between these two protocols here.) My advice: make sure the devices you want to use are supported by the system you select before you install a system. While there’s nothing stopping you from having multiple systems, wouldn’t you rather have just one?

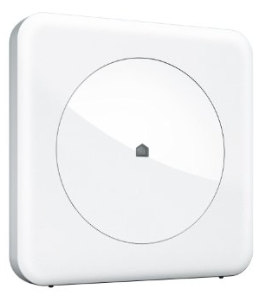
The original Wink Hub connects wirelessly to my network.
I chose Wink because it met all my criteria and was available for sale in Home Depot, which is where I bought almost everything to complete the living space in my home. Wink offered two (now three) main communication devices: the Hub, which is a sort of router with no visible interface, and the Relay, which is a touchscreen device you’d mount on the wall. The Hub was cheaper and I really didn’t see the benefit of a touchscreen, especially when I’d likely use my phone to interact with the system. There are now two different hubs, but I don’t see enough benefit in the new version (Hub 2) to make it worth upgrading. (If it ain’t broke, don’t fix it.)
I should make one thing clear: some devices require the Hub (or Relay) while others don’t. For example, my Quirky + GE Smart Window/Door Sensors require the Hub but my Ring video doorbell does not.
Once the whole thing is set up, you add devices to the Wink app. You can then control them in a variety of ways as I discuss here.
The Floodlights
Remember my example with the floodlights on my deck and driveway? That’s actually the first component I installed.
I wired the light fixtures like any other fixtures: two fixtures each having two bulbs with their wires coming together to one switch. These were standard Home Depot fixtures and floodlight bulbs; nothing special.

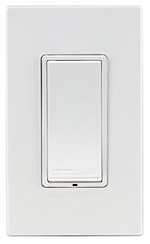
This light switch looks like any other Decora switch, but it does not toggle.
What’s special was the wall switch. I bought a Leviton DZS15-1BZ Decora switch. (All my living space light switches are Decora style.) The back side of the switch is a lot bulkier than a regular light switch, but that’s because it has wifi capabilities built into it. It connects to the wires like any other light switch so I didn’t have any trouble installing it. I should mention here that I can switch it out any time I like — or add other ones just like it. My point: you can retrofit to add this at any time.
Once it was wired up and I’d set up my Wink hub, I followed the instructions in the Wink app on my phone to add the switch as a device. Voila! A light switch I could turn on or off or monitor from anywhere I had an Internet connection. Yes, including my helicopter in flight. I used it not long after installation when I returned from a charter flight after nightfall. It was very cool to see my deck lights turn on as I was flying across the river to my home.
And yes, it works like a wall switch, too, although it doesn’t toggle. Tap to turn it on, tap to turn it off.
Door Sensors
Security, for Peace of MindReading about my the security features of my home automation system, you might get the idea that I’m paranoid. Am I? I’d like to think that I’m not. I’d like to think that I’m just interested in keeping an eye on things, especially when I’m not home.
During my off season, which is seven months out of the year, I travel quite a bit. Even two of the months I’m “working,” I’m based part of that time in California. So although I have a very reliable house-sitter (with a Doberman!) and neighbors who keep an eye on things during my long trips away from home, the house is empty almost as much as it’s occupied. While crime is not an issue where I live, it is somewhat remote. (My city-dwelling friends would argue that I live in the middle of nowhere.) It just seems to make sense to install features to keep an eye on things when I can’t be around to watch them myself.
Another thing I set up very early on were the door sensors. I bought four Quirky + GE Smart Window/Door Sensors, which are now marketed as Quirky Tripper Smart Security Trigger. These are two-piece units that you can place on doors or windows.
I used them on doors. One piece goes on the door itself and the other piece goes on the door frame so it lines up with the other piece when the door is closed. They don’t have to touch. When the door is opened, the sensor triggers. I set this up so it would send me an alert on my phone any time the door opened. I can also check the app from anywhere to see if the door is open or closed. Each door has a name, so I always know which one was opened.
Obviously, I did this for security reasons. I’m the only person who lives here. If a door opens and I didn’t open it, I want to know about it.
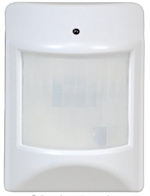
Motion Sensors

I use motion sensors like this to monitor activity around my shop and garage.
My security setup also includes motion sensors. I use the GoControl Z-Wave PIT Motion Detector, which has a built-in temperature sensor.
Like the door sensors, the motion sensor also works with Wink and will alert me when it senses motion. It’s very sensitive — it can pick up my 7-pound dog, Penny, and has, in the past, sensed a mouse.
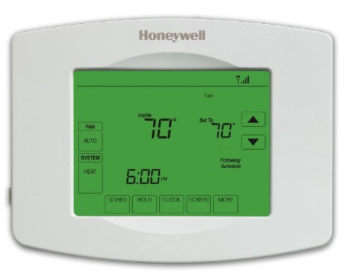
Thermostat

This is the one I have. It was installed about a year and half ago; they have a lot more spiffy looking ones now, but I can’t imagine that they offer more features.
When the HVAC guys got around to finishing up my heat pump system — that gives me what we used to call “central air” as well as heat — I made sure they installed a wifi enabled Honeywell thermostat. This thermostat is programmable with up to four time periods a day and up to seven different programs a week. Since my life is not “scheduled,” I have it set up for the same programming each day and fine-tune it when I’m around or leave.
Like the other items I’ve listed so far, this one works with my Wink app. But it also has its own app that can be used independently of Wink. I’ve played around with both and have decided that I prefer the Honeywell app, so that’s what I use.
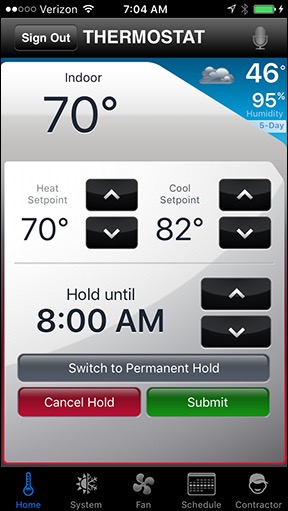
Adjust the thermostat while still lounging in bed? Check.
Because it’s wifi enabled, I can control it from anywhere with an Internet connection. So yes, I can adjust the thermostat while I’m still lying in bed. But I can also adjust it from SeaTac, when I want to bring the heat (or air conditioning) back to a comfortable temperature before I get home from a trip. Likewise, I can set it to a more economical temperature while I’m away, if I forgot to adjust it before leaving. And I can check the temperature at any time to make sure the system is working right. It has alert capabilities, too, as you might imagine, but I don’t use them.
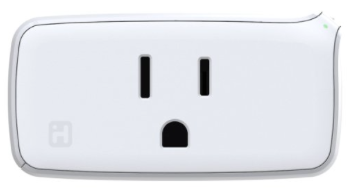
Smart Plugs
Because not all lights or appliances have wall switches, there are smart plugs. A smart plug is a wifi enabled outlet that you can plug into any outlet. You then plug an appliance into it — a lamp, a coffee maker, a neon sign — and turn that item on. When the plug is turned on, it sends power to the appliance and it goes on.

Smart plugs like this one make it easy to automate any device.
I bought iHome Smart Plugs to play with this feature. The first one I set up was to be able to turn on a neon sign I bought in Quartzite last year. I hung the sign on the rail for my loft, far out of reach. With the signed plugged into the smart plug, I can turn it on from my phone. What’s really cool, however, is that these smart plugs also work with Apple’s HomeKit and Siri, so I can turn the light on or off with a voice command. (It’s a real hit when I have friends over for dinner or drinks.)
Frivolous? Guilty.
I also used one of these to help circulate air in my loft. Because two of my HVAC vents are up on my loft, the warm (or cool) air sometimes gets “stuck” up there, especially on very warm or very cold days. I set up a fan and attached it to one of these smart plugs, then set up a schedule for the plug to turn on in the morning and turn off in the evening. This made it possible to get the air circulation I wanted without having to climb the ladder to the loft to turn the fan on or off.
So yes, the plug, when used with my Wink system, can be programmed to turn on or off at any time. And that schedule can be overridden at any time. From any place. Kind of cool, no?
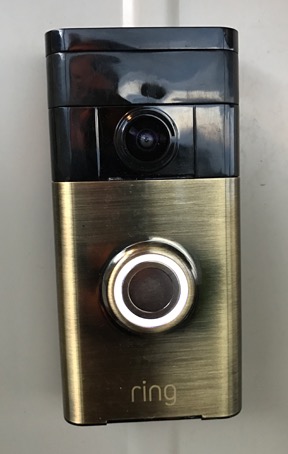
Video Doorbell
One of the toughest things I had to do when wiring my home was to find and install a hardwired doorbell. Why? Because people apparently don’t use hardwired doorbells anymore. They seem to prefer wireless ones that have a push button outside and a door chime somewhere inside. But I wanted a wired one and I finally found the basic one I wanted. And then I had to figure out how to get the silly thing properly installed so I had electrical power on the wall outside my front door. (Hint: when you switch the wires, the doorbell rings continuously.)

It was not easy mounting this on a corrugated metal surface, but I managed and it isn’t going anywhere without my building attached.
Why did I want power there? Because I knew that at some time in the future, I was going to install a video doorbell. It took a while to find the one I wanted, but I eventually wound up with a Ring doorbell. This is a really cool device. It combines the features of a regular doorbell — push the button and the chime I’d already installed chimes — with a video camera, intercom system, and motion sensor. Basically, if someone drives (or walks) up to my home, I get an alert. I can then use the video camera to see who it is and start a conversation with them — even if they don’t ring the bell.
And it really does work! I recently answered the door and chatted with the person standing there — who I could see — while I was driving my truck in town.
Although Ring can connect to Wink, it’s much better when used with its own app, which lets you configure it and interact with it. And this is the only device I pay a subscription for: I signed up for the cloud recording feature so that every time Ring senses motion, a video clip is automatically stored on Ring’s server for future reference. (Needless to say, I have many recordings of me letting Penny the Tiny Dog out to do her business.
The Router
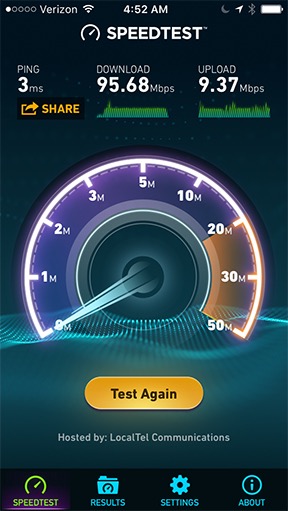
Right around this time, I started having trouble with my Internet connection.
I get all my television service via Internet streaming with Roku. After installing Ring, I noticed that television shows would often get interrupted and need to reconnect to continue streaming. It was very annoying.
Rural fiber rocks.
At first, I didn’t make the connection between the Ring installation and the Roku problem. I did a speed check and saw that I still had the wicked fast Internet service I always had. After restarting the router and anything else I could think of and the problem not going away, I figured that the junky router my ISP had provided had simply gone bad. So I did the lazy web thing and got on Facebook to ask my friends if they could recommend a router. During the conversation that ensued, I got a router education and discovered that several of the devices I was installing — the Wink hub, Ring, the thermostat, the cameras (see below) — were talking directly to my router, along with my desktop computer, laptop, iPads, iPhone, and Roku. The router couldn’t handle the traffic and was partially shutting down when I watched TV.

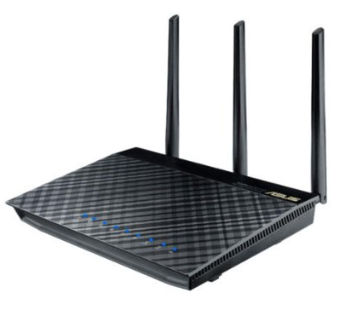
The ASUS router I bought to replace my crappy ISP-provided one. Wow! What a difference!
My friend Tom, who is extremely knowledgeable about these things, recommended a specific model of ASUS router. It was well over $200 — a lot more than I wanted to spend on a router. But I understood that I needed more capacity and I also now understood how much each model could handle. So I settled on an ASUS RT-AC66U Dual Band router. This would give me a 2.4GHz network like I already had plus a 5GHz network and even a guest network. I set it up with the home automation devices on the 2.4GHz network and my other devices, including the Roku, on the 5GHz network. And I plugged my desktop mac directly into one of its four Ethernet ports, thus removing it entirely from the wifi network. (I don’t know why I didn’t do that in when I set up my old router; they’re sitting right next to each other.)
What I like about this router is how easy it is to set up and monitor connected devices. While I assume my old router had some of this capability, this one just seems to make it more obvious. And it handles my current load — about 20 devices — with ease. No more Roku streaming problems!
Garage Doors
My home has four car garages, each with its own door. When I wired the garage, I included outlets over each garage bay for the future installation of garage door openers. But because I didn’t need garage door openers, I didn’t get them installed right away.
I finally got around to it this past June. The installer offered me three options ranging from $325/door to $425/door. (Do the math on four doors: ouch!) All three options were for LiftMaster doors — that’s the professionally installed version of Chamberlain.

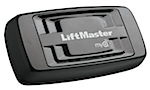
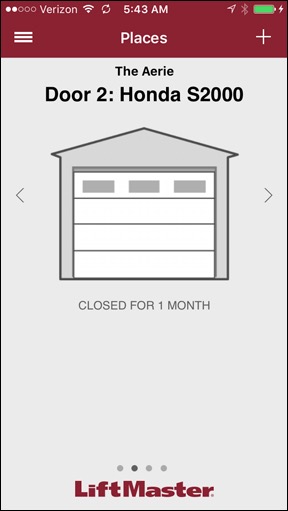
Smaller than a deck of cards, this device plugs right into my router and makes my garage doors accessible from my iPhone.
I did some research and learned that although all three options were wifi enabled, the most expensive one (model 8550W) had a built-in “router” of sorts and was all ready to be connected to the LiftMaster app. But the other two models could be added to the app with the purchase of a single small device called an Internet gateway. The differences between those two models was chain (noisy) vs. belt (quieter) drive. As I told the installer, if my garage door opens and I’m not the one opening it, I want to hear it. So I went with the cheapest of the three models (model 8365) and spent an extra $50 for the Internet gateway, which I installed myself by simply plugging it into a wall socket and my new router.
The LiftMaster app shows a status screen for each garage door, which I can name. Tap the picture of the garage door to open or close it. (Looks like my Honda is being neglected again.)
(And no, I was not about to install the garage door openers myself, even to save a few hundred bucks. There really is a limit to my DIY skills.)
I absolutely love my smart garage doors. I can open or close them from anywhere, check the status (is a specific door open or closed?), get an alert when one opens, and even set up a robot to check the status of the doors at a specific time of day and automatically close them all — in case I forget to close them myself. Of course, they all do have the usual remote controls — one for each vehicle that lives there — and a central control area just inside the door that leads from my entrance vestibule to my garage. And there’s even a keypad outside one of the doors that, when the proper code is entered, will open a specific door or close them all.
The only thing that would make the setup any better is if the garage door openers washed the cars while they were sitting idle in the garage.
Smoke/CO Detectors
When I first started working on the inside of my living space, I was excited to buy a pair of Kidde Wink-compatible smoke detectors. To me, this was the best of all worlds: a system of smoke/carbon monoxide detectors that would “talk” to each other and alert me about hazards no matter where I was.
Trouble was, the smoke detectors were battery operated and they didn’t have a hardwired version. The building code requires hardwired smoke detectors. So I had to buy the old fashioned kind and install those to meet building codes.
Once I got my Certificate of Occupancy, however, I could make changes. I didn’t remove the approved smoke detectors. Why would I? They were already bought, paid for, and installed. Instead, I just added the two smoke detectors to my home: one in the garage (where I honestly think everyone should have one) and one up on my loft. I then connected them to each other wirelessly and tested them. Not only did they both go off, but they gave me the alert I was hoping to get on my phone.
Smart Bulbs

GE Link smart bulbs put wifi into the base of a light bulb.
My most recent automation acquisition was a pair of GE Link light bulbs. These are energy saving LED lightbulbs that are wifi enabled. They can be added to my Wink app like the smart plugs or light switches.
The benefit of using a smart bulb instead of connecting the light fixture to a smart plug is that you can easily control the bulb manually. If you use a smart plug between the wall and the lamp, if the plug is disabled, there’s no power to the lamp. With a smart bulb, there’s always power to the lamp; it’s the switch on the lamp or the bulb itself that controls whether there’s light.
Like the smart switches, smart bulbs can be controlled with the app or on a schedule. They make it very easy to set up light timers on any kind of light.
Interconnectivity
One thing I didn’t mention here is that devices accessible through my Wink system can talk to each other and work together. This is done through the creation of “robots.”
For example, I can have a robot that monitors my Ring doorbell between sunset and sunrise and turns on my deck light if it senses motion. (I already have the deck light monitoring when I come home so it turns on the light when I pull into my driveway.)
While an example like this is great, Wink doesn’t have the ability to set times for an activity to end after a robot started it. So if it did turn on the deck light, it would stay on until either I turned it off or another robot did. I’ve put in a feature request to Wink to add timer-based functionality — for example, turn the light on for 15 minutes.
Cameras
I didn’t talk about my live video cameras, mostly because I don’t consider them part of my home automation system and they don’t work with Wink or any other system. I have three different cameras (not including the one in Ring and my weather cam), one of which was installed before my home was built! I keep trying new ones but don’t seem to find one I really like. At this point, I have enough of them. They provide additional security and a way to keep an eye on my home when I’m not around.
Suppose I’m on a day trip out of town somewhere and I get a motion sensor alert. I can use the cameras to see whether there’s someone around who shouldn’t be. If there is, I can use one of the cameras to talk to that person if I want to.
Tip of the Iceberg
This is the tip of the iceberg as far as capabilities are concerned. There are automatic watering systems, sensors for all kinds of things, even a device that tells you when it’s time to buy eggs.
And I’m sure I’ll be expanding my little system as time goes on — although I can keep track of my egg supply without a computer.
Have you set up any home automation at your place? If so, please do take a few moments to share your experience or advice with readers. My experience is limited to what’s here. You can add value to this post by sharing what you know with others.


 It takes, on average, 5 to 10 hours for a student pilot to learn how to hover. To hover, you need a feel for the controls. You can’t get a feel for the controls without actually manipulating the controls. The more you manipulate the controls, the better you learn how they feel.