Bees: First Honey Extraction

How sweet it is!

I started my beekeeping hobby in June 2013 and have been blogging about it periodically. If you’re interested in reading the other posts in this series, follow the Adventures in Beekeeping tag. Keep in mind that the most recent posts always appear first on this blog.

On Tuesday, I extracted honey from my first beehive for the first time. The yield from this 6-week old hive was amazing — but I’ll get to that in a moment. First, some backstory.

Why I Extracted

The odd part about the whole thing is that I never intended to extract honey from this hive at all. I was told that I’d started late and that the bees would likely need any honey they made to get them through the winter. This was okay with me. I’m not interested in extracting honey and putting it in jars as gifts or to sell. I’m interested in comb honey, which hardly anyone seems interested in producing or selling. I’m also interested in increasing my hive count and producing nucs for sale to other beekeepers. And maybe next year getting serious about raising queens.

Hive #1 in Mid July 2013
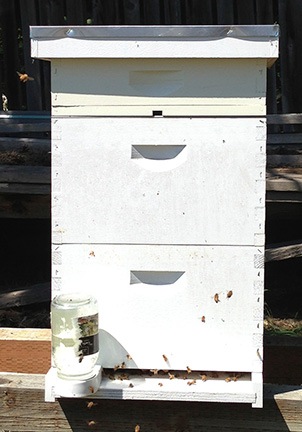
My first hive looked like this right before I extracted honey. The honey was in the middle box; the top box contains Ross Rounds.

But this particular hive had grown very quickly — so quickly, in fact, that I put a second deep hive box on it right after my first hive inspection. Being a new beekeeper, I really didn’t have a handle on the way colonies build. I was under the impression that if I put a deep hive box on a hive, bees would use it for brood and honey. The medium “honey” supers were for honey; I’d add one of those later.

Bees, however, don’t read beekeeping books or take advice from beekeepers. They do whatever they want. And this colony had used virtually all of the top hive box to store honey and pollen. Seven full frames plus two half frames of it. The tenth frame was partially drawn out with comb with some honey deposits. (This was all made in about a month. These were busy bees.)

Do you know how much a deep super weighs with 10 frames of honey in it? Estimates run between 50 and 80 pounds.

It’s for this reason that many beekeepers use only medium hive boxes. They want full boxes to be lighter and easier to handle.

But I want my hives to be compatible with accessories such as drone frames and in-hive feeders. And nucs, which nearly always come with deep frames in them. So I’d like all of my hives to have a deep hive box.

But just one of them. This hive had two.

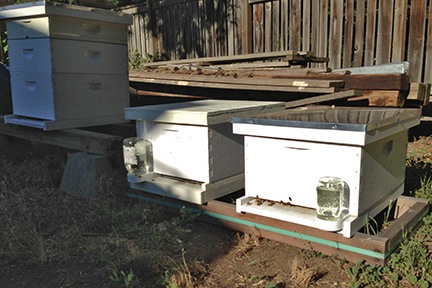
Meanwhile, I’d done a hive split the week before and the bees from the new hive were living in a nuc box until I could get another deep hive box for them. It would cost $62 and I’d have to wait a week for it to arrive. The bees didn’t seem happy and I was eager to get them into more comfortable living quarters. I didn’t want to wait (or pay) if I didn’t have to.

The logical thing to do was to use the second deep hive box on my first hive. But that was full of honey. I needed to get rid of the honey. The only way to do that — without throwing away the frames — was to extract it.

So that’s what I set out to do on Tuesday.

Special Equipment

Honey ExtractorTo extract honey, you need a honey extractor. There are a few types and they range in price due to features and size. Prices start at about $200 and go up to well over $1,000. The expense of buying one of these units is one of the reasons I didn’t want to deal with extracting honey. Who wants to spend $800 on a machine that’s only used a few times a year and needs to be cleaned, maintained, and stored when not in use?

Fortunately, my friend Jim had an extractor and was willing to let me use it. He’d also hang around and walk me through the process. So that’s where I went on Tuesday.

Uncapping ScratcherThe only other special equipment needed was a pail to collect the honey, a stainer to separate out the wax cappings and anything else that wasn’t honey (don’t ask), and an uncapping scratcher, which I already had.
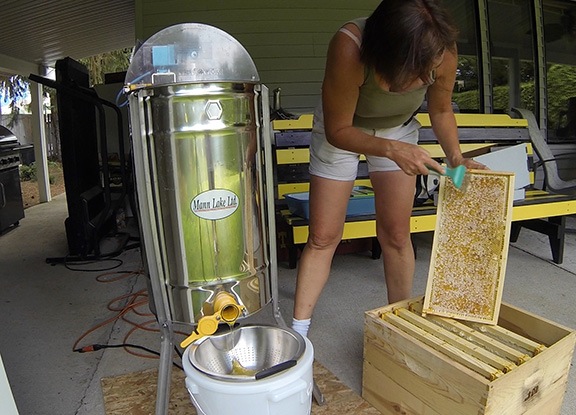
Pulling the Frames

My first hive is at Jim’s house, so it was simply a matter of removing the honey-filled frames from the hive and carrying them to the patio at the back of his house where he usually used the extractor. I suited up, opened the hive, removed the Ross Rounds box and queen excluder on top, and got to work. I’d brought along a clean nuc box to hold the frames five at a time. Bee BrushThe trick was removing the frames, using my bee brush to brush the bees off the frame and back into the hive, and putting the frame sans bees into the nuc box.

I wish I had photos of this process, but with uncertain weather — remember, I’m still on contract for cherry drying — and a general feeling of urgency about getting the job done, I simply forgot to set up my camera.

Jim was extremely helpful. As I prepped each frame, he stood ready with his hands on the nuc box cover. I’d pull out a frame and then run my brush gently over the frame surface. It was amazing how easy it was to simply sweep the bees away. Then I’d turn the frame and do the other side. And then go back to the first side where a few more bees had landed again. Then Jim would pull off the cover, I’d slip the frame in, and he’d cover it back up. We did this until the nuc box was full.

He ran the box back to his house while I pulled the now half-empty deep hive box off the hive and set it aside. I placed the medium hive box with its ten empty medium frames on top of the bottom box. When Jim returned, we continued, but now I brushed the bees into the medium box they’d be using for future honey stores.

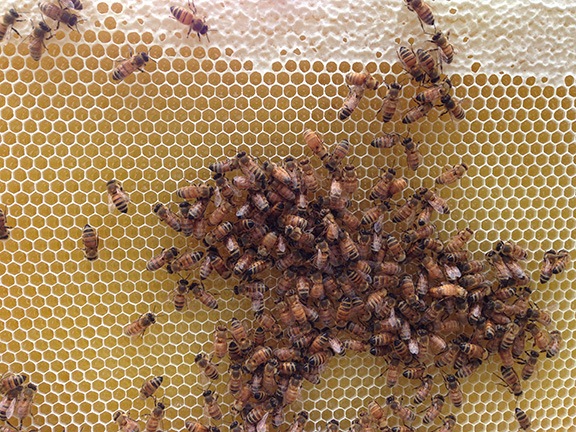
We wound up with a total of seven frames that were ready for extraction. All seven were full and mostly capped.

Capping, by the way, is what the bees do to a full cell of honey. They create wax caps to seal them off. Beeswax, by the way, is completely edible, including the caps. (Bees also cap brood, but I wasn’t interested in any of that.)

Honey Comb
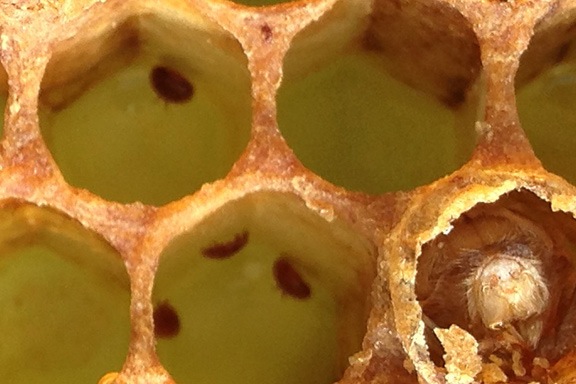
This closeup shot of a honey frame shows capped honey cells on top with uncapped honey cells beneath them. This frame would not be ready for extraction.

While Jim brought the nuc with the last two frames back to the house, I reassembled the hive, placing the queen excluder back on top of the new hive box, a spacer with an exit above that, and the Ross Rounds box above that. Then the inner cover and outer cover.

I left the deep hive box with the remaining three frames set aside. I was hoping that while I was busy extracting the bees would realize that they were no longer in the hive and would leave. Then I went back to my truck and stripped out of my bee suit. I wouldn’t need it to extract and it was a warm day.

Extracting the Honey

The extraction process was pretty straightforward. First, I used the uncapping scratcher to scratch away most of the honey caps. All I really had to do was puncture them, but I dragged the scratcher across the surface to do the job quickly. I then slid the frame into one of the extractor’s three slots with the scratched side facing out. I did this for three frames.

Uncapping Honey-filled Frames
Here I am, uncapping one of the frames.

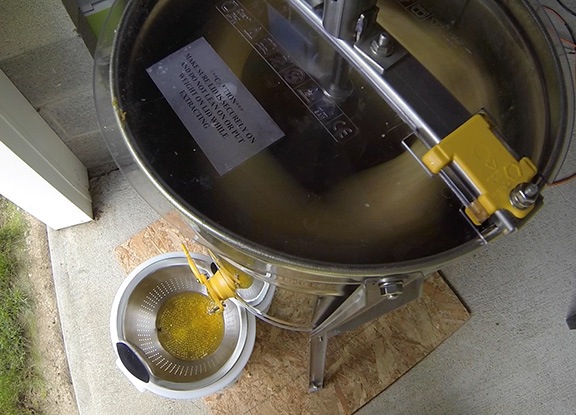
Next, we spun up the extractor. The machine spins the frames, using centrifugal force to get the honey out of the cells. The honey hits the side of the extractor and drips down into the extractor’s well.

Extracting Honey
The extractor spins the honey out of the cells.

Honey Bucket
Once the honey began flowing, it continued for well over an hour.

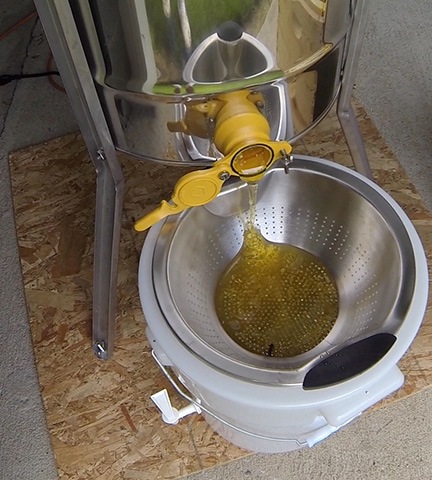
Jim opened up the gate at the bottom and let the honey drip into the strainer over a bucket. We watched as the first thick drip appeared. “Quick!” Jim said. “Get something to grab that first taste!”

The something was my less than clean finger. I captured the first drip and sucked it off my finger. It was heavenly. (Honestly, if you haven’t tasted fresh, raw honey you’re missing quite an experience. Warning: You probably won’t ever eat mass-produced, supermarket honey again.)

Jim complemented me on the color. It was a light yellow. I suspect there was a lot of clover content; there’s a ton of clover in the area near the hive.

When the first side of the frames were about half done, I stopped the extractor. One at a time, I removed the frames, scratched the other side, and replaced them facing the other way. Then I ran the extractor again, this time up to full speed. Jim had advised me to avoid full speed when I was running the first side to prevent the frame foundation from warping. After about five minutes, I flopped the frames again to get the remaining honey out of the first side.

Meanwhile, the honey just globbed out through the gate into the strainer. As I mentioned earlier, it was a warm day so the flow was pretty quick and smooth. By the time I’d finished the second group of three frames, the strainer was full with the honey dripping through it slower than it poured in. The wax cappings were clogging the strainer. We had to shut the tap and wait for the strainer to catch up. By then, it was clear that I had over a gallon of honey.

I still had one fully capped honey frame to extract. Doing so in the spinning extractor could be tricky since it would be out of balance when it spun, even if I put two empty frames in with it.

Besides, it was clouding up and I didn’t want to spend any more time than necessary away from base. I’d already gotten check-in calls from both of the pilots working with me. Rain was in the forecast for that evening and the next day. With a total of more than 230 acres of cherry trees still under contract, I had important responsibilities elsewhere.

Jim and his wife Kriss offered to keep the extractor set up and let the rest of the honey flow into the strainer when the strainer had caught up. I could pick up the bucket and strainer the next day and put the honey in jars at home. In the meantime, I could take the deep hive box and frames home so I could use them in my newest hive.

I commented proudly on Twitter and Facebook that I’d extracted a gallon of honey. Later that evening, Kriss corrected me: two gallons.

Putting the Honey in Jars

Early the next day, the two other pilots and I hovered over about 120 acres of cherry trees in Quincy, East Wenatchee, and Wenatchee Heights after thunderstorms rolled through. By 10 AM, the weather had cleared out. I was hosting a party that evening that included smoked beef ribs and I lacked one ingredient for the rub I was making. I needed to get the ribs on before 1 PM for them to smoke all afternoon.

And, of course, I still had to fetch the honey.

So I set out to run my errands, finishing up at Jim and Kriss’s house. I don’t know if they were home; I didn’t want to knock on their door and bother them if I didn’t have to. I just went out back. The honey bucket was there, covered up to keep it safe from bugs — mainly Jim’s bees.

I looked at the clear, thick yellow liquid in the bucket. Tick marks along the side indicated that it contained over two gallons of honey.

I left a 12-pack of quart sized jars and some money on the patio table, then took the honey out to my truck. As we’d agreed, I also loaded 10 medium hive boxes from the stacks Jim had bought from a retired beekeeper into my truck. They were in new condition, although unpainted and somewhat dirty. At only $7 each, I couldn’t pass up the deal.

Back home, I finished prepping the ribs and got them on the smoker. Then I set about putting all that honey into the quart- and pint-sized jars I’d bought while running my errands.

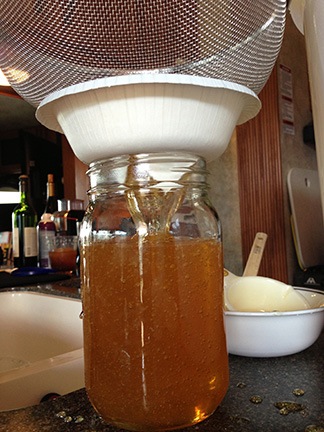
For some reason, I thought I needed to run the honey through a finer strainer to filter out the remaining tiny bits of wax cappings. In hindsight, I realize this wasn’t really necessary. All it added was another messy step to what was already a very messy job.

Filtering Honey
I’m not sure why I filtered the honey again. It really didn’t need it.

Trouble is, the spigot at the bottom of the bucket was too small for the honey to pass through. So all the honey had to be scooped up out of the top of the bucket. I used a half-cup measuring cup. I poured it into a strainer that I’d placed over a paper bowl fashioned as a wide funnel.

I’m not exaggerating when I say it took me about 90 minutes to go through it all. My guests arrived just as I was finishing up.

Everyone had a taste of honey. They all loved it.

Honey Jars
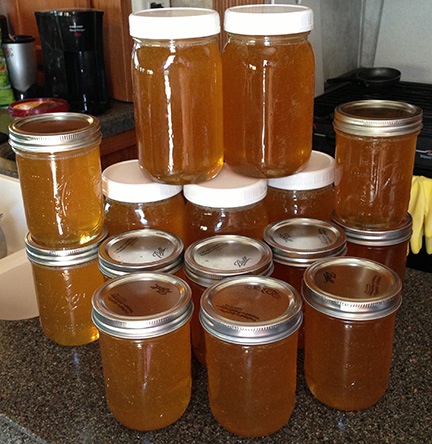
The final product. (I’d already stowed my personal pint.)

My friend Cheryl and I arranged the jars on my countertop for a photo. The final tally was 5 quart sized jars and 11 pint sized jars.

I’ve already given away five pints.

The Aftermath

Clean up wasn’t difficult with lots of hot water to melt the honey. I’ll return Jim’s honey bucket and stainer today, along with a bunch of cherries I picked yesterday morning. I sure do appreciate him letting me use his extractor and walking me though the process. I’d offer him some honey to thank him — but I know he has plenty of his own.

As for what I plan to do with all that honey — well, I’ve been thinking of brewing some mead

Bees: The Risky Hive Split

Let’s see if I regret this.

I started my beekeeping hobby in June 2013 and have been blogging about it periodically. If you’re interested in reading the other posts in this series, follow the Adventures in Beekeeping tag. Keep in mind that the most recent posts always appear first on this blog.

Last week, I blogged about a hive inspection and included a photo of a queen cell. Because of its position in the frame, I thought it was a supersedure cell — the kind of queen cell the bees produce if their queen is ill, dead, or missing. But when I showed it to my beekeeper friends at last week’s bee chat, they universally agreed that it was a swarm cell. That meant my bees were planning to swarm.

I didn’t want that to happen. I wanted to increase the number of bees and especially beehives that I had — not decrease the number of bees.

Queen Cell
The elongated cell is definitely a queen cell, but is it a swarm or supersedure cell? People more knowledgeable than me say swarm.

I thought of everything I knew so far about beekeeping — which is pretty much based on what I’d read and observed for the past few months. (In other words, a lot but not much.) I reasoned that if the brood frames that included the swarm cells were removed from the hive without the queen and they were put in another hive, the bees would raise a new queen and I’d have a new hive.

This is a hive split.

I did this on Friday. I took two brood frames plus one honey frame from my first hive and placed them in a nuc box with two empty frames. All three frames were covered with bees that would become the new hive’s starting population. I’d rely on those bees to complete the rearing of the queens in the queen cells on those brood frames.

I then replaced the brood and honey frames I’d removed from the hive with empty frames, giving the bees plenty of space for new brood and honey in the existing colony.

The only problem: I never saw the queen.

Although I’m pretty sure she was left behind in the original hive, I can’t be sure since I didn’t see her. After all, the hive had to have at least 20,000 bees in it — finding one among all that is not easy.

And that’s where the risk lies.

You see, if I took the queen along with the brood frames containing the swarm cells, not only would I leave the original hive queenless, but I run the risk of losing a viable queen to the new queens that hatch. Or having bees swarm from the nuc anyway. (Admittedly, this second scenario is not likely, given the limited number of bees in the nuc box.) Finally, as my beekeeping friend in Vermont, Tom, pointed out, if a hive suddenly becomes queenless, the workers might start laying eggs. Those will all be worthless drones.

Of course, I did leave behind brood frames that included queen cells just in case. That hive runs the same risks.

Do I know what will happen? No. But time will tell. I’ll check the nuc box later today — it’s right here at my RV parking space — and try to figure out what’s going on. I’ll also check the original hive (which is down in Wenatchee) later in the week to see what those bees are up to.

Worst case scenario: I screw up my original hive and don’t have a viable colony in the nuc box. Best case scenario: my risky hive split works.

Will report back when I know something.

Bees: Installing Drone Frames

Trying natural varroa mite control.

I started my beekeeping hobby in June 2013 and have been blogging about it periodically. If you’re interested in reading the other posts in this series, follow the Adventures in Beekeeping tag. Keep in mind that the most recent posts always appear first on this blog.

Varroa mites are a real problem for beekeepers in the U.S. (and likely abroad). They breed on bee larva, sucking the “blood” out of their hosts and spreading throughout the hive. It’s impossible to prevent them from infesting a hive. The only thing you can do is try to minimize them and their damage.

A drone frame is a special brood frame with larger cells on the foundation. It’s part of a varroa mite control program. Theoretically, when the bees see these large cells they realize that they’re perfect for raising drones. Drones have only one purpose — to fertilize the queen — but they’re really not needed once the queen has been fertilized and is laying eggs. They’re larger bees and need larger cells to develop. They also take longer to develop, which is why varroa mites prefer infesting drone cells. So the idea is to encourage the bees to put only drone cells on one frame which, hopefully, will attract many of the mites in the hive. Then, before the drones hatch but after the mites have infested the drone cells, you pull the frame out of the hive and freeze it. This kills the drones (which, again, you really don’t need) and the mites. You then remove the caps from the drone cells and put the frame back into the hive where, hopefully, the process starts all over again once the bees have cleaned out the cells.

That’s the idea. I figured I’d give it a try, so I ordered two drone frames — so I could always have one in my hive, even when one was in the freezer. After getting the frames, however, I caught a swarm and started a second hive. So I’ve got one frame in each hive and need to get another pair to swap them out.

The photo below shows me inserting a drone frame into the bottom box of my first beehive. I pulled out a frame that was virtually untouched by the bees and moved that into the upper box in place of another untouched frame.

Adding a Drone Frame to a Bee Hive

I just hope I can fit the darn things in my freezer. Right now, I’m still living in my RV; eventually I’ll have my chest freezer out of storage and set up where I’ll have plenty of space.

I should mention here that using drone frames is part of an integrated pest management (IPM) system. I’ll use other control methods — such as a bottom board screen — when I settle my bees into their permanent home later this season.

Bees: A Closer Look

A look inside my first hive.

I started my beekeeping hobby in June 2013 and have been blogging about it periodically. If you’re interested in reading the other posts in this series, follow the Adventures in Beekeeping tag. Keep in mind that the most recent posts always appear first on this blog.

I did my third hive inspection on my first beehive the other day. My primary goals were to check the overall health of the hive, make sure there was fresh brood (unhatched bees), verify that the queen was present and healthy, see how far along the bees had come in filling the 20 frames in the hive, and replace one of the frames in the lower hive box with a drone frame.

I accomplished all of these things except spotting the queen. The hive seems very healthy, though, and the bees seem to be multiplying nicely, so I can assume that the queen is in there somewhere. The presence of several supersedure cells, however, hinted that the queen may be aging or that the bees might not have confidence in her continued viability. I find this odd because the bees came in a nuc I bought locally and the man who sold it to me installed a new queen not long before I bought it. So I’m not sure what’s going on there.

You can see a supersedure cell, along with quite a few drone cells, in the photo below. The supersedure cell is the elongated cell near the center of the image. The drone cells are the cells with the domed caps. Also in the photo are cells of capped and uncapped brood and stored honey. It’s interesting to note that I shot this closeup with my iPhone’s camera; I’m pretty surprised it was able to focus so closely — I did not zoom in, although I did crop the image.

Closeup of Brood Comb

Eight of the upper hive box’s ten frames were full of partially capped honey. One frame was in progress and the other frame was completely untouched. The sheer quantity of stored honey and the speed at which these bees seem to produce convinced me to add the Ross Rounds frames I’d assembled on July 4. I returned the next morning and added it atop a queen excluder and spacer with exit. With luck, they’ll fill and cap those frames before the end of the season.

More on drone frames in another post.

A Full Fourth

Probably the busiest Fourth of July I’ve ever had.

These days, I’ve been challenging myself to keep busy. Downtime between jobs has been damaging in the past, causing depression, frustration, and weight gain. I began fighting back last summer and remain determined not to spend time sitting on my ass when there are better, more interesting things to do. And let’s face it — almost anything is better than sitting around on your ass, letting the days of your life just tick away like a clock with an aging battery that can’t be replaced.

I try to sketch out a rough plan for each day of my life. Sometimes I tweet what I’m tentatively planning. Sometimes I don’t. Having a rough idea of what I plan to do helps keep me focused. Stating it publicly makes me responsible for doing — or trying to do — it. But I always let things take their course when I can. After all, no plan is set in stone. Spontaneity is what makes live truly interesting.

Yesterday, July 4, I set a busy schedule for myself. But I did even more than I planned. (And boy, am I feeling it today!)

Ross Rounds

As the time on that tweet hints, I wake up very early nearly every morning. Although its great to get an early start on the day, there’s a limit to what you can do that early when stores are still closed and friends are still asleep.

So while I sipped my morning coffee, I assembled my Ross Rounds.

Ross Rounds
Completed Ross Rounds. Photo from the Ross Rounds website.

Ross Rounds are a comb honey system that makes it possible for bees to produce packaged honey comb. You set up the special frames with plastic rings and pure beeswax foundation and insert the frames in their custom hive box. You then put the box on top of a honey-producing hive of bees. Eventually, the bees move into the Ross box and begin building and filling honeycomb in the special frames. When the rings are completely full of honeycomb and honey, you remove them, cover them, label them, and either sell them or present them as gifts to friends.

Ross Rounds Frame
Here’s a fully assembled Ross Rounds frame.

Assembling the frames took some doing. I had to split each frame, lay in the ring halves and snap them into place, lay in a sheet of wax foundation, and snap the frame closed. The ring halves only go in a certain way, so much of the time was spent lining them up properly. But once I got the hang of it, the process went quickly. I got all 8 frames, with 4 pairs of rings each, done in about an hour.

I’m not sure when I’ll be able to use the Ross Rounds system. I’ve been told that because I started my bees so late in the season I probably won’t be able to take any honey from them. They’ll need all that they create now for winter. But I’ll do a hive inspection on my first hive — probably today — and see how much of their top hive box is full. If it’s more than 80% full, I’ll add a queen excluder and the Ross Rounds frame and see how far I get by the end of the season.

Motorcycle Ride

Meanwhile, I was texting back and forth with another early riser, my friend Brian, who lives in Wenatchee. He’d seen my plan for the day on Facebook and was wondering if I wanted company for my motorcycle ride. After some texting back and forth and a call to my friend in Chelan — who I woke at 8 AM! — we decided to ride up to Silver Falls together and do a hike before going our separate ways for the day.

Penny on my Motorcycle
Here’s Penny in her dog kennel on the back of my motorcycle. (Yes, she fits fine in there and can move around freely.)

Penny the Tiny Dog and I were at Brian’s apartment at 9 AM. Penny rides with me on the motorcycle. I bungee-netted her hard-sided dog carrier to my motorcycle’s little luggage rack. It’s rock solid there. She rides in the dog carrier behind me. I don’t think she actually likes the ride, but I do know that she likes coming with me wherever I go. So when I lift her up onto the motorcycle’s luggage, she scrambles into her carrier without protest.

What’s weird is when we stop at a traffic light and she barks at other dogs she sees.

Brian rides a cruiser — my Seca II is more of a sport bike — and he led the way, keeping a good pace. We made the turnoff at the Entiat River about 15 minutes after leaving his place. We both thought Silver Falls was about 12 miles up the river, but a sign about a mile up the road said that it was 30 miles. I saw Brian look at his watch as we rode past the sign. He had a BBQ to go to that began in early afternoon; I had other plans, too. But we kept going. We’d make it a short hike.

I really enjoy riding my motorcycle in Washington State. This road, which wound along the banks of a rushing river, reminded me of the riding I’d done in New York State years before: mountains, farmland, trees, and cool, fresh air. I think one of the reasons I stopped riding motorcycles when I moved to Arizona is because it was simply not pleasant. Too much straight and flat and hot and dry. The road up to Silver Falls is full of curves and gentle hills, with orchards and hay fields forests along the way. Every twist in the road brings a new vista in the granite-studded canyon. Every mile brings a different sensation for the senses that are switched off inside a car: the feel of temperature and humidity changes, the smell of fresh-cut hay or horse manure or pine. This is part of what makes motorcycling special.

We arrived at the parking area, which had only one car. It was just after 10 AM. I got Penny out of her box and on her leash. We stripped off our riding gear and started the hike.

Silver Falls

This was my second trip to Silver Falls. My first was back in 2011, not long after I had my motorcycle shipped from Arizona to Washington. I blogged about that trip here. And, if you’re interested, you can read more about Silver Falls on the Washington Trails Association website.

Brian at the Creek
Here’s Brian alongside the creek. Penny refused to pose with him.

Penny and Maria on Bridge
Brian shot this photo of Penny and me on the bridge near the top of the falls.

The three of us — Brian, Penny, and I — headed up the trail together, stopping now and then to take photos. The stream was rushing wildly, with crystal clear water cascading over rocks and logs in the stream bed. We followed the same path I’d followed on my first trip there, taking the trail on the right up to the top of the falls and coming back the other side. The temperature was perfect — a bit cool in the shade but nice and warm on the wide switchbacks in the sun. Brian led at a fast pace and I did okay keeping up. I remembered my first trip there when I was still a fatty and how long the hike up to the top had taken. What a difference 45 pounds makes!

We ran into some other hikers on their way up the other side as we headed down. Because of time constraints, we only spent about an hour and a quarter there. It was 11:15 AM when we geared up and headed out.

Because we were going our separate ways and I was running late to meet my friends in Chelan, Brian let me lead the way with the understanding that I’d go at my own pace. I let it rip and covered the 30 miles in 30 minutes.

Blueberry Hills

It was 11:45 when I reached the junction of Entiat Road and Route 97A. I had a choice: continue with my plan to visit friends in Chelan or head back to Wenatchee Heights and take it easy for a while before heading out to the BBQ that afternoon.

I turned left toward Chelan.

There were a lot of cars on the road, but they kept at a good speed just over the speed limit. I fell into place behind them. It was a lot warmer back on the main road, but not too warm for my denim jacket. The road left the river, passed through a tunnel, and climbed into the mountains. It crested and started down, with beautiful Lake Chelan spread out before me: blue water surrounded by green orchards and vineyards capped by a perfectly clear blue sky.

I pulled over in town to get my friend Jim on the phone. He and his wife Teresa agreed to meet me at Blueberry Hills, a you-pick blueberry place and restaurant in Manson. Penny and I stopped for gas along the way. We wound up behind Jim and Teresa’s car as they pulled into the Blueberry Hills parking lot.

They had their dog, Zeus, a red heeler puppy with them. Penny and Zeus became friends months ago when we were in California on a frost contract with the helicopter. Zeus was much smaller then. He’s getting close to full grown now and is a lot bigger than Penny. They looked genuinely glad to see each other.

We climbed the stairs to the outside patio overlooking the blueberry fields. Jim and I went in to order lunch. I bought the dogs a pair of frozen beef bones, which the restaurant sells for their four-legged customers. Penny and Zeus got right down to business. When our food came, so did we. Blueberry Hills makes excellent food.

We talked about all kinds of things while waiting for our food and then eating. Teresa had just come back from a visit to their daughter’s family in Anchorage. Jim, like me, was just recovering from a hectic week of cherry drying. We had stories to swap and insights to share. It was a pleasant lunch — one I wish I could have lingered over, perhaps with a piece of pie. But it was getting late and I was supposed to be at a friend’s house in Wenatchee at 3:30. So we headed out, stopping to pick up two pounds of blueberries along the way.

I took the road on the east side of the river on the way back to avoid the traffic in Chelan, Entiat, and Wenatchee. It was a quick 50-mile ride to the south bridges between East Wenatchee and Wenatchee. Two more traffic lights and I was winding my way up Squilchuck Canyon, back to my temporary home in Wenatchee Heights.

The Teachers’ BBQ

By the time I got into the Mobile Mansion, it was 3:26 PM. I texted Kriss, who I was supposed to meet in 4 minutes to let her know I’d need at least an hour. That was fine; we weren’t due at the BBQ until 5 PM anyway.

I cleaned up, dressed, and threw the blueberries into a cooler bag. I still needed to get the other ingredients for what I planned to bring to the BBQ: strawberries, whipped cream, and cake. But when I got down to Safeway, there wasn’t a single strawberry in the store. I wound up with a single package — the last one! — of raspberries. And frozen whipped topping. I did get a good deal on a July 4 themed serving plate, which I’d leave behind with my hostess.

At Kriss and Jim’s house, I assembled my fruit and cream and put it in the serving dish. Kriss gave me some red sprinkles to dress it up. I was disappointed at myself for not bringing something better. (I’m really looking forward to having a full kitchen again.)

I met Kriss and Jim’s daughter and husband. I gave Jim the nuc box and frame holder I’d gotten as a little gift for him. (I met them through beekeeping; Jim has four hives and has been going out catching swarms lately. My first bee hive is in their backyard until I close on my Malaga property later this summer.) I watched at their three kittens, two of which are just staying with them temporarily. I unwound from the frantic pace I’d been keeping all morning.

We all headed out to a friend’s home about a mile away. It was an annual July 4 BBQ where Kriss’s fellow teachers — some still teaching, others retired — gathered for burgers, grilled salmon, excellent sides, and dessert. I met a lot of new people and answered a lot of questions about my cherry drying and other flying work.

The BBQ wound up after 7:30 PM. I said my thanks and goodbyes and climbed back into my truck. I was exhausted from my day out and stuffed from a good meal. I wanted to go see the fireworks but had no desire to deal with the traffic. A nice evening back home might be a good end to the day…

The Spoons Party

But I passed right by another friend’s house on my way home. Shawn and his wife were hosting the BBQ that Brian had gone to. I’d been invited but had turned it down to attend the other BBQ with Kriss and Jim. Was the party still going on?

I drove past and discovered that it was. I parked and walked around back to see what was going on. My rafting friends — as I’d begun to think of them — were playing a card came I’d heard about on my last rafting trip with them. It involved collecting four of a kind and grabbing a spoon off the table. There were five players and four spoons. The person who didn’t get a spoon lost.

A silly game, but nonetheless, I pulled up a chair and another spoon was added to the table. I didn’t play very well at first, but got slightly better. The vodka may have helped.

This party had kids — four of them — and later had fireworks out on the street. The whole area, in fact, was full of fireworks. Fireworks are legal in Washington — at least this part of Washington — and were readily available all over the place. Shawn and Brian had bought a bunch. When it got dark enough to enjoy them, they put on a show out in the street. Family fun.

When they broke up and headed back to the backyard, I took my leave. It was about 10 PM and I’d had enough for one day.