R44 Cockpit Mount for GoPro Camera

It’s pretty basic — if you can think upside down.

Cockpit Cam Shot
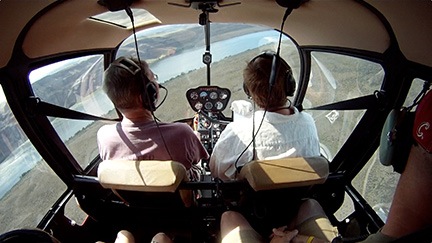
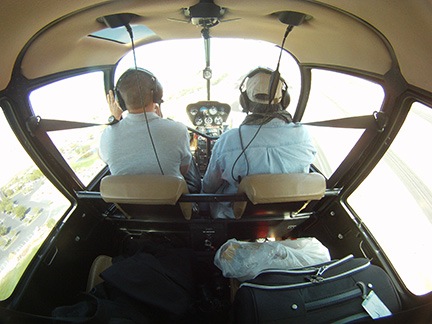
A frame-grab from a “cockpit cam” video. This flight had all seats occupied.

The other day I received yet another request for information about how I mount GoPro cameras on my R44 helicopter. For various reasons, I don’t like to share details about certain mounting techniques. But this one asked about my cockpit mount, which offers a view from the back of the cockpit through the front windows — with limited views out the side windows, too. The pictures throughout this post show some good examples.

This is, by far, my most basic mount. It doesn’t require any special equipment — just one of the flat adhesive mounts that come with a GoPro camera, a white vibration isolator (which I think still comes with a GoPro camera), and the camera’s case.

Stick one of the adhesive mounts on the black headset holder. Then attach the camera and push in one of the white vibration isolators. This picture shows what it should look like:

R44 GoPro Mount

If you’re looking for a way to do this — with this view — without using an adhesive mount, I can’t help you.

A few points about this setup:

  • Cherry Drying Cockpit View
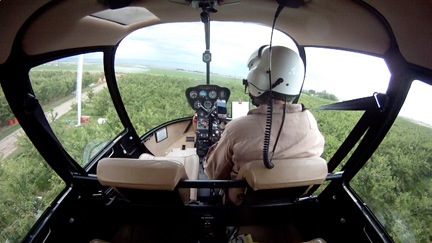
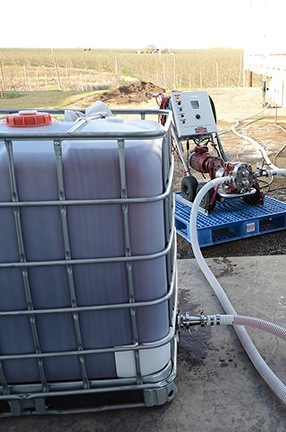
    I get up close and personal with wind machines when I fly cherries.

    The camera is mounted inverted. That means that you probably want to use the camera Setup options to set the camera for Upside Down shooting. Otherwise, you’ll need to invert the video/images on your computer before use.

  • You’ll need to estimate the angle for the camera. For best results, you’ll want to get some of the ceiling as well as some of the back seat area.
  • Don’t forget the white vibration isolator. If you didn’t get one with your kit, buy a few to have on hand.
  • You definitely want to make that thumb screw as tight as possible so the camera doesn’t wobble up and down during flight. I keep a philips screwdriver in my GoPro kit just for that purpose.
  • You won’t be able to open the camera door on the back when the camera is pointed the right direction. You’ll have to unscrew it enough to angle it forward to get the door open and pop the camera out.
  • If you mount it properly, you should still have access to the headset jacks when the camera is in position.
  • Remove the headsets and cords from any seat that isn’t occupied. Headsets on the hooks in back may appear in the image. Hanging cords up front look ugly.
  • Cameras Spoil the View
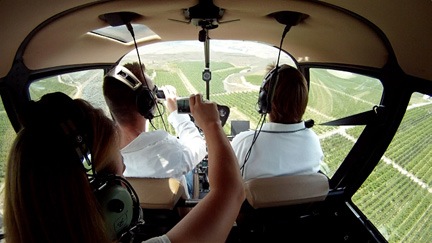
    Some people really like to take pictures during a flight.

    If people are sitting in the back and you want good video out through the cabin, tell them to keep their arms, cameras, etc. out of the view. (The folks on the flight shown here took photos/videos during the entire trip — and I have the video to prove it.)

  • 16:9 resolutions will feature more of what’s going on outside the helicopter; 4:3 resolutions will show more of the ceiling and back seats.
  • Good exposure
    Bad Exposure
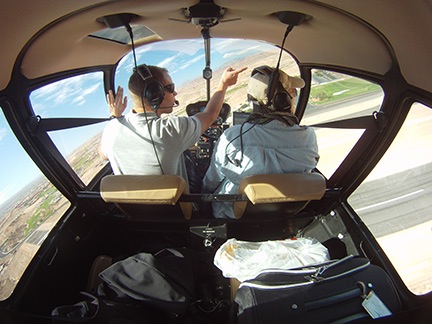
    These two images were snapped less than a minute apart. Because the direction the helicopter is facing is different, the exposures are completely different.

    The best exposures for outside views are when you’re flying away from the sun. Flying toward the sun yields crappy images.

If you have a GoPro Hero 2 and want cockpit sound, you can use a skeleton case and connect an audio cable to an empty headset jack. I’ll let you figure out how to do that on your own. (You can’t expect me to give away all my secrets, can you?)

As far as stability goes, I’m pretty happy with the quality of the video. There will always be some vibration in a helicopter — unless you use a gyro — but the video I got with this setup was completely usable. I just haven’t used it for anything yet. I really do need to put together a movie with all the GoPro video I’ve shot up here in Washington.

Santa and Pilot
Golf Ball Drop
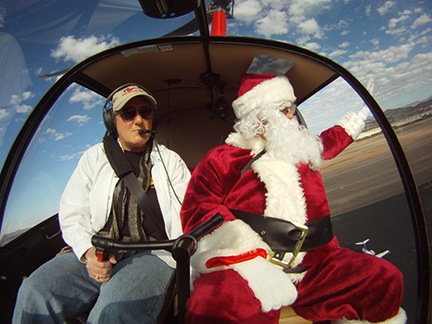
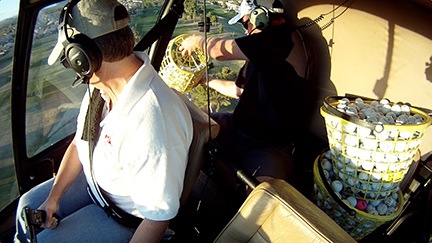
In the Santa shot, the suction cup mount is nearly center on the cockpit bubble, pointing straight back. In the golf ball drop, the suction cup mount is very close to the front passenger door.

There is another solution for cockpit use if you’re more interested in showing the pilot/passengers than the view. I have had some good success with the suction cup mount on the inside of the cockpit bubble (passenger seat only; you don’t want that thing falling down on the pilot’s side and getting caught up in the pedals) and also hanging from that silly window above the front passenger seat. Again, the camera is inverted for both of these methods. For video, to minimize vibration, you want to mount it as close to the airframe as possible. This kind of mount is not as stable as the one illustrated earlier. I use it quite a bit for still photos when I have something interesting to show, like Santa or a golf ball drop.

A few things to remember when mounting a GoPro — or any device — inside the helicopter cockpit.

  • Make sure it’s secure. You don’t want objects coming loose during flight, especially if a door is off.
  • Don’t mount anything where it could interfere with the pilot’s controls. That includes mounting where it could fall into the pilot’s controls.
  • Remove the dual controls if anything is mounted in the front passenger side. You might also want to cover where the pedals go to make sure nothing can fall in there.

That’s about all I can tell you about this. If you have any questions or comments or you want to share a link to a photo or video you shot using this technique, please use the Comments for this post so everyone can see what you have to say or show.

Bottling Wine, Day 2: Bottling

A look inside a mobile wine bottling facility.

I’m one of those people who likes to see and do as many things as I possibly can. Life, to me, is a quest to learn and experience as much as possible. Each day I get to do or see or learn something interesting is another day worth living.

Yesterday was one of those days. I got an opportunity to photograph, video, and help out in a mobile wine bottling facility.

The Truck

Big wineries — like the ones everyone has heard of — have their own wine bottling facilities. These are likely big rooms filled with very expensive, highly specialized equipment. Big wineries can afford to buy and maintain these machines. After all, they’re producing thousands of cases of wine every year and may run the bottling line dozens of times a year.

Smaller wineries can’t afford such luxuries. Not only is the cost of the equipment usually beyond their means, but they also lack the space to house it and the funds to maintain it. Besides, they’re producing much smaller quantities of wine and only need to bottle once or twice a year. It just doesn’t make sense to make such a huge investment when there is another alternative.

That other alternative is a mobile bottling truck. This is a big rig truck with a trailer on the back. The trailer is completely outfitted with all the equipment needed to fill, cork, cap, and label bottles of wine.

The truck is driven and operated by a single technician who travels from one small winery to another. He knows exactly how to operate the equipment — which is both mechanical and computerized — and how to fix it if something goes wrong. He sets it up for the bottles, wine, corks, foil caps, and labels the winemaker provides. He then gets the line running while a handful of laborers the winemaker provides do the few manual tasks required to complete the process.

To say it was amazing is an understatement. Watching this thing in action was awesome.

The Bottling Process

Pumping Wine
Wine is pumped from a vat into the trailer.

Arranging Bottles
This machine sterilizes the bottles and places them on the line in single file.

Filling Bottles
The bottles are filled with wine as they move.

Corking machine
Bottles move into the corking equipment where they are corked.

Adding Foil Caps
Two workers add foil caps to each bottle.

Sealing Foil
This machine presses the foil caps onto the bottle tops.

Applying Labels
The bottles move past the labeler, which applies front and back labels with one pass.

Production Line
This look from the front of the trailer’s inside shows the bottles on the right heading back toward the door.

Boxing Wine
Two people load the bottles into cases. They’re loaded neck down to keep the cork wet during storage.

Case of Wine
Cases of wine slide down a track from the back of the trailer.

It all starts outside the trailer, where wine is pumped from its storage vat into the trailer itself though sterile hoses. From there, it goes into the filling equipment where it waits for the bottles.

Meanwhile, at the back end of the trailer, a forklift brings palettes of empty bottles to the open door. The bottom of each case of 12 bottles is unsealed. A man standing just inside the door takes a case, being careful to hold the bottom of the box closed, places it on a wide conveyor belt, and lifts the box, depositing the bottles, neck end up. He’ll do this four to six times a minute as long as the line is running.

The bottles then move, jiggling and clinking, into a rotating mechanism that sterilizes the bottles and places them on another belt where they enter the equipment in single file.

From there, the bottles are placed on tiny elevators that lift each bottle to a filling machine that moves the bottles along the line. The machine senses when the bottles are filled and stops adding wine.

The bottles then go into a corking machine that puts a cork into each bottle. Then the bottles move past two workers who place foil caps on top of each bottle. At the line’s speed, it would be nearly impossible for just one person to handle this task.

From there, the bottles move into a machine that pressed the foil caps down onto the top of the bottle, providing a secondary seal over the cork. Both the corks and the foil seals are customized with the winery’s logo.

Next, the bottles move past the labeler. The labels come on rolls that alternate front and back labels. The machine uses a vacuum to pull the labels off their backing, exposing the sticky side. As the bottles move past the vacuum pad, the sticky side of the label is pressed onto each bottle. The spacing of the labels is finely tuned for each bottle size.

At this point, the bottles of wine are complete. But they’re at the front of the trailer and need to be in the back. So they make the long trip all the way down the side of the trailer, in single file, to where two people wait. Stationed right beside the man who puts the empty bottles on the line, they have the empty boxes he discards in piles at their feet. The first person places a box on a workspace and fills it with six bottles as they file past. She then moves the box to her companion who places another six bottles in, closes the box, and pushes it through a machine that tapes it shut. Both workers are performing their tasks nonstop to keep up with the flow of incoming bottles.

After being taped shut, the box rolls down a ramp where other workers apply a label to the box and stamp the date on it. The boxes are then stacked on palettes. When all cases of a variety are bottled and stacked, the palette is wrapped with shrink wrap. It’s then transported into a temperature controlled storage area by forklift and an empty palette is prepared for the next variety.

The Results

At full speed, the equipment can process about 60 bottles per minute. The bottling tech told me we were running a little slower, maybe about 55 bottles per minute. That’s still pretty damn fast.

We bottled seven varieties of red wine yesterday, including one rosé. We used three different bottles, each of which required the machinery to be recalibrated for proper movement, corking, and label positioning. We started at about 8 AM and were finished by 2 PM. We took about an hour for a lunch break.

We bottled a total of 818 cases of wine.

Afterward, the six volunteers (including me) got to sample some of the wine that wound up in partially filled cases. Despite its bottle shock, it was pretty darn good. I think the Petit Verdot was the best of the bunch and really look forward to its release. And yes, I grabbed a bottle of that and a bottle of Zinfandel as my reward for a day’s work in the truck. I’ll wait until Pete officially releases them before I open them.

The Photos

I took a lot of photos during this process — the ones you see here are only a sampling that illustrate the main part of the process. The photos include shots taken on Sunday during the filtering, which I cover in a separate blog post.

Bottling Wine, Day 1: Filtering

Before wine can be bottled, it must be filtered. Here’s how it works at one winery.

I’ve been neglecting my blog for a week or so mostly because of preparations for my annual migration to Washington State. First it was the packing. Then it was the driving. Then it was the unpacking. I’m here now, parked in my usual spot at the Colockum Ridge Golf Course’s tiny RV park in Quincy, WA. I arrived a full month earlier than usual just so I could witness and help out at Beaumont Cellars Winery’s red wine bottling on April 17.

The Back Story

Beaumont Orchards is one of my cherry drying clients. I’ve been responsible for drying their cherry crop after a rain since 2009. But Pete, the owner of cherry, apple, and pear orchards in Quincy, began dabbling in winemaking a few years back. He (and others) were very pleased to discover that he was pretty good at it. Last year, in fact, his wines began winning awards.

Each year, Pete has expanded his winery operations just a little bit more, producing more hand-crafted wines and setting up a really nice tasting room. Beaumont Cellars, which is based at his home, has become one of the premier wine-tasting destinations in the newly established Ancient Lakes AVA.

This year, he mentioned that he’d be bottling wines on April 17. I decided that it was something I really wanted to see, something I’d like to do some video about. So I arranged my schedule to arrive earlier than usual in Washington.

Filtering Day

Pumping Out Barrel
The wine is pumped out of the barrel.

Wine Filter
The wine filter consists of multiple vertically mounted filter pads that are discarded after use.

Connecting Hose
Pete and Megan connect a hose to the bottom of a wine vat. Filtered wine enters at the bottom to minimize splashing.

Good to the last drop
Megan catches the last bit of wine as Pete tilts the barrel opening into a pitcher.

Pouring wine into next barrel
Megan pours the last bit of wine from one barrel into the next one being filtered.

Pouring wine into the Vat
Pete pours some filtered wine into the vat.

I arrived in Quincy at around 2:30 on Sunday afternoon. I had just finished hooking up the mobile mansion’s water, electric, and sewer connections when Pete called, asking where I was. He was in the middle of filtering the wines in preparation for bottling on Tuesday.

Tired from my three-day, 1200-mile drive pulling a 34-foot fifth wheel through the valleys, plains, and mountains of Arizona, Nevada, Idaho, Oregon, and Washington, I nevertheless grabbed my camera and hurried over. Pete and Megan, his winemaking apprentice (for lack of a better term) were more than halfway finished. I got to watch and photograph the activity.

The wine began in barrels. Pete and Megan used hoses and a pump to pump the wine out of each barrel, through a filter, and into a large plastic vat. The barrels for each variety were combined into a single vat.

When the pump is no longer able to suck wine from the bottom of a barrel, the barrel is tipped into a pitcher to catch the last little bit. It’s then poured into the next barrel of the same variety as it’s pumped through the filter. Likewise, any filter overflow is captured in a pitcher and manually poured into the vat. This minimizes the loss of wine.

When the job was done, there was a huge vat of wine for each of the varieties to be bottled on Tuesday. Pete and Megan cleaned up by pumping purified water through the pump and hoses, disassembling the filter, and cleaning everything down with a power washer capable of heating water to 180°F. Pete used a forklift to move the wine vats into a temperature-controlled storage area and stack the empty barrels out of the way.

Throughout the process, we’d been sampling the wine — and it was good!

The Photos

I took a lot of photos during this process — the ones you see here are only a sampling that illustrate the main part of the process. I put most of them on the Beaumont Cellars Facebook pagea gallery on the Beaumont Cellars website. In both cases, the photos include shots taken on Tuesday during the bottling, which I cover in a separate blog post.

Snow-Covered Mountains

Late winter storm leaves Weaver Mountains blanketed with snow.

Just thought I’d share a quick photo taken from the upstairs window at my house in Wickenburg. After two days of rain and snow throughout Arizona, the Weaver Mountains about ten miles north of here are completely blanketed with snow. I hope things aren’t too mushy for the folks in Yarnell!

Snow-Covered Mountains

Hovering with the Balloons

Just a quick post after an unusual photo flight.

Hovering with BalloonsI did a “first light” photo flight this morning. The client: me.

I needed a bunch of photographs that could clearly illustrate how a change altitude affects the perspective of an aerial photo scene. So I armed my helicopter with a battery of GoPro cameras, set them up to snap an image every 2 seconds, and went flying at dawn.

For about 90 minutes.

On the way back, I spotted a number of hot air balloons in the sky northeast of Deer Valley Airport. This isn’t anything unusual; the balloons are up every morning for the first hour or two of the day. But what was unusual is my attempt to capture images of the balloons.

Instead of satisfying myself with the usual fly by images, this time, I climbed to about 1,000 feet AGL, pointed the helicopter southwest toward the balloons, and brought it into a hover. And held it there for about a minute.

While I was hovering there, facing the balloons, I got a weird feeling, as if I were a bird trying to join a flock. I could imitate their motion (or apparent lack thereof), but I wasn’t one of them.

Anyway, this is one of the shots I captured, cropped for better presentation. As you can see, there was one balloon at a higher altitude but most of the others were lower. Can you see them all in this shot? I count seven.

I couldn’t do anything about the distance. The GoPro cameras have a wide angle lens, making everything seem farther away than it really is. If I got any closer, the folks in the closest balloon — which was also the one higher than me — may have freaked out. (If you think airplane pilots hate helicopters, you should talk to a balloon pilot one day.)

This isn’t, by far, the best photo shot this morning. But it’s the one I thought of from the moment I lowered the helicopter’s collective to descend back toward Deer Valley until the moment I first viewed it on my computer.

I really do need to spend some time in a balloon soon.