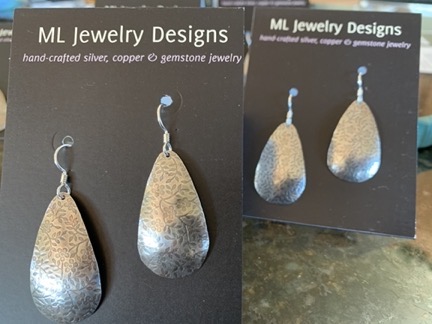
I explain why I charge $39 for a pair of earrings with less than $10 worth of materials.
Yesterday, I went down into my jewelry shop and made 6 pairs of earrings out of roughly $55 worth of sterling silver sheet metal and pre-made ear wires. I’ll sell each pair for $39. Sounds like a great deal for me, right? Well, if you read on, you’ll learn more about the actual cost of these earrings.
You’re looking at six pairs of patterned sterling silver earrings. The goal is to get as many cutouts as possible on this 6×2.5 sheet of silver, which cost me more than $40. I think I’m doing pretty good here. pic.twitter.com/mcjAEbHYae
— MARIA (is vaccinated) LANGER 🚁 😷 🇺🇸 (@mlanger) April 30, 2021
I tweeted my progress while creating these earrings, using a Twitter thread with photos. I skipped tweeting the first step, which was getting the pattern onto the silver — I don’t buy sheet silver with a pattern already on it (although I do sell it that way) — but got most of the other steps. They make up good documentation for this blog post’s purpose, which is to talk about what actually goes into making something from scratch: materials, tools, skills, and time.
Materials
The materials for this project were pretty basic:
- 26 gauge sterling silver sheet. I buy the metal I plan to apply a pattern to in 6″ x 2.5″ pieces because that’s the size of most of my texture plates. I learned (the hard way) that you can ruin a texture plate by using it to texture a smaller piece of metal than the plate. Because of a 75% or so increase in the price of silver last year, this small piece of metal cost just over $42.
- Sterling silver ear wires. I buy these in bulk, but they still cost nearly $1 each. I can save money by making them myself out of 20 gauge half-hard sterling silver wire, but I like the look of the ones I buy and they’re less likely to bend out of shape than the ones I make. I’ve even had one of the galleries I provide inventory to tell me that they prefer manufactured ear wires for the very same reason.
- Rubber ear nuts. These are tiny pieces of rubber that go onto the end of the ear wire, making them less likely to fall out of your ear (or off the jewerly display card I use when selling). I buy them by the gross and they cost a fraction of a cent each. (I don’t understand why all jewelry makers don’t include them with ear wire earrings. Such a tiny, inexpensive little thing can prevent the loss of earrings.)
In addition to these materials. I also have the printed cards I use to display and sell the earrings. These cost just pennies apiece and are part of my marketing/selling expenses, but they shouldn’t be overlooked. Ditto for the specially sized, clear plastic zipper bags I put the earrings and cards into when I sell.
Tools and Equipment
It’s the tools and equipment that really add to the cost of the jewelry I make. As an accountant might tell you, these are fixed costs that need to be considered as part of anything you make with them. The more you use a tool or piece of equipment, the less the per-piece cost of that equipment is. An analogy from my day job as a pilot would be something like insurance: if it costs you $15K/year and you fly 100 hours a year, that’s $150/hour; but if you fly only 10 hours, that’s $1500/hour. Ouch.
Going through the steps to create these earrings, I used the following tools and equipment:
- Rolling mill. This is the device I used to impress the pattern onto the silver. Rolling mills vary in cost. I have a Durston, which is made in the U.K. and isn’t cheap. But mine is small, so it wasn’t too costly. I think I paid around $750 for it.
- Texture plate. This is a piece of brass with a texture on it. The brass is harder than the silver so when the two pieces of metal are run through the rolling mill together, the texture from the brass is imprinted onto the silver. The texture plates range in price from about $5 for a single-use paper version up to $100 or more for steel versions. My brass plate cost about $10 and will give me about 50 impressions before it’s too flat to make more impressions.
- Metal shear. Although I didn’t really need it for this project, I used my metal shear to cut off a 1/4″ by 2 1/2″ piece of the textured metal to use as a ring blank. You see, when the metal goes through the rolling mill, it stretches. So even though I cut 1/4″ off one end, I still had 6″ x 2 1/2″ of textured metal to work with. My metal shear, which I use a lot, cost about $250.
- Shape template. I use shape templates to create earrings and other items in consistent sizes and shapes. The template I used for this project has about 30 shapes/sizes on it and cost $8. It’s made of heavy duty plastic so it’ll last a long time.
- Fine point Sharpie pen. That’s a tool, too. I used it to trace the shapes onto the metal as close as I could without overlapping. What do they cost? About $3 each?

Here’s the cutting job in progress.Joyce Chen kitchen shears. I have a variety of ways to cut metal sheet — my jeweler’s saw, a pair of French shears — but I used these shears for this project. They’ll cut through any reasonably thin soft metal — and 26 gauge silver is pretty thin and relatively soft. The cost? $21.
- Flex shaft. After cutting out all those pieces, I needed to smooth their edges. Being the machine person I am, I used my flex shaft, which is basically a Dremel-style tool with the motor at the end of a long shaft and a foot pedal to control the speed. Mine is a EuroTool and cost about $120. But don’t forget to add the motor hangar for it, which cost another $32.
- Mounted sandpaper cartridge roll. I used a sandpaper roll to do the actual sanding. They cost about $1 each.

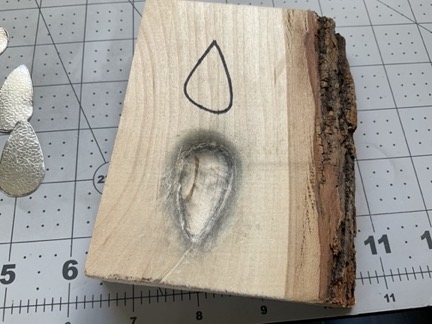
Here’s my custom dapping block. The other drawn-on shape is for one I no longer use and never actually carved into the wood.Custom dapping block. A dapping block makes it possible to put a dome into pieces of metal. But because these earrings aren’t round, they needed a custom dapping block. I made mine from a piece of bass wood that only cost about $2, but I used a variety of Dremel bits to carve it out and I fine-tune it every time I use it. Still, we’ll say $2 for this homemade tool.
- Nylon hammer. Although my photos on Twitter show me using a dapping punch with the block to put a dome on the metal, I actually used a domed nylon hammer that has always worked a little better for me. Cost: $14.
- Hole punch. While I could have drilled holes for the ear wires into each piece before doming it using a center punch, flex shaft, and drill bit, I took the easy way with a 1.25mm metal hole punch. Cost: $14.
- Scrap wire. I used a piece of thin copper wire to attach the earring pieces together for oxidizing them. The cost of this scrap is pennies and not even worth adding into the equation.

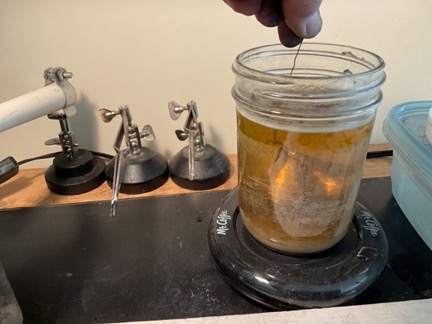
In this shot, I’m dipping all 12 pieces of the earrings, on a copper wire, into the liver of sulfur. You can see the jar and mug warmer, as well as the side of the container next to it that I use for the baking soda rinse.Liver of Sulfur. Liver of sulfur is a chemical that, when dissolved in warm water, can darken copper or silver (but not gold). It’s widely used by jewelers who want an oxidized look on textured metal. The stuff I use costs $18/jar and that’ll last about a year.
- Mason jar. I use a 1-pint wide mouth mason jar to mix, heat, and store the liver of sulfur. Because I do canning, I always have a bunch of spare jars — although once I use them for chemicals, I can’t wash and reuse them for food. Figure about $2 for this jar with the plastic lid.
- Cup warmer. I use a coffee mug warmer to keep the liver of sulfur warm while working. The one I use costs $11, but you can sometimes find them cheaper in thift shops.
- Baking soda. I mix baking soda and water in a glass bowl and use that to neutralize the chemical reaction of the liver of sulfur so the metal stops darkening. It’s the stuff you buy in the supermarket. How much? I don’t know. $3 for a box that’ll last a very long time?
- Container. Of course, I need a container to put that baking soda and water solution in. I use reusable disposable plastic containers with lids. When I’m done, I cover it up so it doesn’t evaporate. Figure $2 for a container with a lid.
- Tumbler. There are all kinds of tumblers you can use for jewelry, but I use a basic Lortone 3A 3-lb capacity rock tumbler. I paid about $110.
- Ceramic tumbling media. This is my secret sauce and I’m not very motivated to provide details, mostly because it saves me a ton of work and provides consistent results every time I use it — which is vital when you need to make multiples that are the same. Let’s just say that it’s ceramic tumbling media that rubs the darkening off the raised part of the pattern. The stuff I use costs $45/bag and that bag will last at least a year. If you want to try it, find one that works for you. (Good luck.)
- Dawn detergent. I add a drop or two of Dawn to the tumbler with the ceramic media and water. I always use dawn because everyone recommends Dawn. I buy small bottles that last a long time. What does that cost? Let’s say $2.
- Extra tumbler barrel. Because it’s best to keep stainless steel shot separate from any other tumbling media, I had to buy an extra barrel. Add $36.
- Stainless steel shot. Steel shot burnishes the finished jewelry. Don’t buy the cheap stuff; it’ll rust. I buy it by the pound for $26; because it doesn’t rust, it should last forever.
- Burnishing compound. A few drops of burnishing compound in the tumbler with water and the steel shot helps achieve a nice polish. It’s $10 for an 8 oz. bottle that lasts at least a year.

I finished the earrings in my home at my breakfast bar while waiting for dinner to cook.Chain nose pliers. I use pliers to open the ear wire loops and close them once the earring piece is attached. My preferred brand: Wubbers. They’re not cheap but they’re heavy duty. $26.
- Paper hole punch. I use a small punch to put holes in the cards that I mount earrings on. Figure about $9.
That’s everything I used directly during the course of this project. It doesn’t include rags or paper towels or the wipes I use to keep my workspace clean after sanding. It doesn’t include any of the furniture in my shop — my homemade jeweler’s bench, the tables where I keep my rolling mill and soldering station (where the liver of sulfur lives), or my adjustable height stool. It doesn’t include lighting and utilities for my shop space. Heck, it doesn’t even include the cost of constructing my shop space, which is an entire 12 x 24 foot room in my garage.
Let’s add these costs up:
| Item | Acquisition Cost |
|---|---|
| Rolling Mill | $750 |
| Texture Plate | $10 |
| Shape Template | $8 |
| Fine Point Sharpie | $3 |
| Joyce Chen Shears | $21 |
| Flex Shaft | $120 |
| Flex Shaft Motor Hangar | $32 |
| Sandpaper Roll | $1 |
| Dapping Block | $2 |
| Nylon Hammer | $14 |
| Hole Punch | $14 |
| Liver of Sulfur | $18 |
| Mason Jar | $2 |
| Cup Warmer | $11 |
| Baking Soda | $3 |
| Container | $2 |
| Tumbler | $110 |
| Ceramic Media | $45 |
| Dawn Detergent | $2 |
| Extra Tumbler Barrel | $36 |
| Stainless Steel Shot | $26 |
| Burnishing Compound | $10 |
| Chain Nose Pliers | $26 |
| Paper Hole Punch | $9 |
| Total | $1,275 |
Add that to the $55 in materials and you come up with $1,330. So if the only thing I ever made was those six pairs of earrings, their cost would be $222/pair.
Yes, that’s absurd. Of course I make more than six pairs of earrings with all this stuff. But how many pairs of earrings do I need to make and sell at $39/pair to cover my investment in tools and equipment?
Think about it.
Skills
And then there are skills, which come with training and experience.
I am not exaggerating when I say that I’ve spent thousands of dollars on jewelry making courses — in-person and online — as well as books and magazines. YouTube videos can only take you so far — what works best is one-on-one time with someone who has actually been doing this for a while.
And practice. How many times did I screw up a piece of metal in my rolling mill? Or cutting it apart? Or oxidizing it? (I’m still smarting from a bad oxidation job on 3 pairs of Keum-boo earrings where I used a new (to me) solution and darkened the gold as well as the silver. Ouch.) Or any of the other steps that went into this project? Practice really does make perfect — or as close to it as a person can get. Practice takes time and burns through materials and supplies. It’s no coincidence that we practice with copper instead of silver or — heaven forbid — gold.
Time
Time is easily quantified for this job since I know when I started and when I finished: 3 hours. That comes out to 30 minutes per pair of earrings. This is why I made stuff like this in batches; it’s a much more efficient use of time.
But how long did it take last time when I didn’t necessarily have everything as well organized? And how long will it take next time, when practice makes me a bit faster?
And shouldn’t I be compensated for my time? Clearly, I wasn’t compensated directly for the time I spent in training or reading up on new techniques or ruining materials because of inexperience or dumb errors. I should, at least, be compensated for the time I spent actually creating salable pieces of jewelry, no?
The Bottom Line

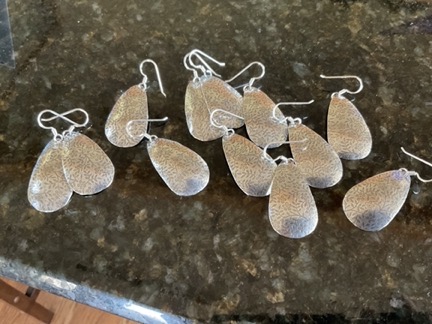
Some of the finished products.
Here’s the bottom line: I took 3 hours of my time and used thousands of dollars worth of training, hundreds of hours worth of practice time, and $1,330 worth of materials, tools, and equipment to make 6 pairs of earrings that I’ll sell for $39/pair.
I think buyers are getting quite a deal, don’t you?
Discover more from An Eclectic Mind
Subscribe to get the latest posts sent to your email.


“But I can watch a YouTube video showing me how to make one..”
To be fair, I’ve learned a lot in YouTube videos. But without the tools, equipment, and practice, it’s a lot harder than it looks.