
I get new life out of an old fuel transfer tank.
Way back in 2008, when I first starting doing cherry drying work in Washington State, the guy who got me started, Erik, told me that I needed to get a fuel transfer tank. He gave me the make and model of a tank and pump that he used: an 82-gallon Transfer Flow. This tank was DOT-approved in all states and made of steel. It was costly, but very good quality.
It didn’t come without problems. First of all, when they heard I wanted it for aviation fuel, they refused to sell it to me. I had to have my wasband call back and order it under his name. Second, the folks who put it together for me didn’t put the proper gasket in the pump so when I filled it the first time, it leaked like a sieve at the pump fitting. A $2 gasket fixed the problem.
A Mobile Tank
I originally had it installed in my first pickup, a miserable 1994 Ford F150. I’d bought the truck to leave on some property I owned in northern Arizona but it quickly became Flying M Air’s utility truck. Of course, it wasn’t up to the task of towing the 22-foot Starcraft RV I had in those days, so the following year it was mounted on my wasband’s 2001 3/4 ton Chevy Silverado, which I took north for a few months every summer. The tank’s DC pump was hardwired to the battery so I didn’t need to deal with cables. Somewhere along the line, I painted it white, mostly so it would stay cooler in the sun — who wants a black fuel tank? — but also so it would look better in my wasband’s white truck. When the divorce started happening in 2012 and my wasband’s mommy decided that he wasn’t going to let me keep the truck in the divorce after all, I had it moved out of his truck and eventually put into my new(er) truck, a 2003 Ford F350. When I killed that truck in December 2015, I had it moved into my much newer 2012 Ford F350.
So the tank has lived in four different pickup trucks in less than nine years.
I did use the tank every summer in Quincy, WA, during cherry drying season. I also occasionally used it for work in Arizona — I remember hiring my friend Janet one day as a fuel truck driver to bring it up to Seligman where I refueled twice during a wildlife survey job. (I honestly can’t remember which truck it was in back then.) By 2014, however, I was moved into my new home in Malaga, WA, and didn’t need a fuel source at the helicopter in Quincy. Instead, I fueled at the local airport when I went out on or came back from a flight. I didn’t really fly much in Quincy anymore — I hired guys to help me with my contracts and two of them were based there with their own fuel sources. So I didn’t need the tank and it was pretty much empty on the back of my truck.
When I decided to replace my fifth wheel “Mobile Mansion” with a truck camper, “the Turtleback,” I needed to get the tank off my truck. At the same time, I knew that if I just put it in my garage or beside my building, I’d likely never move or use it again. A better solution would be to put it on a trailer so I could continue to move it around and possibly use it again.
The Trailer
This spring, a Harbor Freight opened in Wenatchee, which is the “big city” near where I live. Harbor Freight sells tools and other related items. Most of what it sells is cheap junk made in China. (That’s okay, as long as you know what you’re getting and don’t set your expectations too high.) Harbor Freight also has a pretty large selection of you-bulld-it utility trailer kits. One was a 40-1/2 x 48 utility trailer with a 1090 pound capacity. At 6 pounds per gallon, the fuel would never weigh more than 500 pounds. Add maybe 100 pounds for the tank for a total of 600 pounds. Plenty of leftover capacity; better safe than sorry.
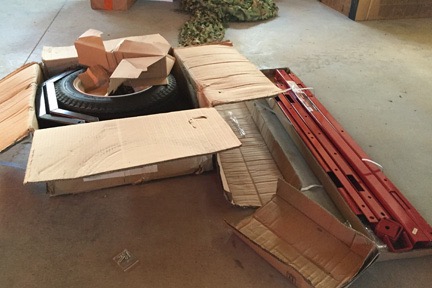
The trailer kit came in two boxes. Here are the pieces.
The trailer came in a kit. One day in April 2016, I set about putting it together in my garage. It wasn’t difficult, but it was time-consuming. The wheels had to be mounted on the axles, but they also had to have their bearings packed with grease. I’d never done that before but learned pretty quickly. And the wiring for the taillights was particularly tedious. But I did that, too, and apparently got it right because they work.
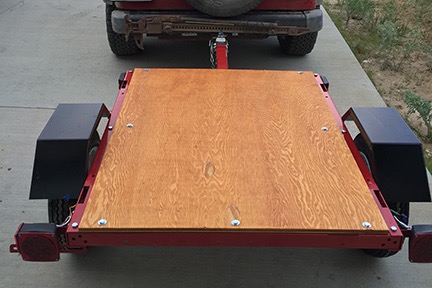
The newly completed trailer after dragging it out of my garage on the back of my Jeep.
Of course, the kit didn’t come with a deck. So I went to Home Depot with the measurements and had them cut a piece of heavy duty plywood the size I needed for the deck surface. I took it home, gave it two coats of waterproof stain, and used lag bolts to attach it at six points to the frame. When I was done, I was rather proud of my work.
The next thing I needed to do was get that very heavy fuel tank — which still had a bit of fuel in it — off my truck and onto the trailer. When it had been moved from my dead truck to my new used truck, the folks at the car dealer had used a forklift and I’d just strapped it in with tie-downs, knowing I’d eventually move it. I had no idea how much fuel was in it but I knew it wasn’t empty and I knew it would be heavy.
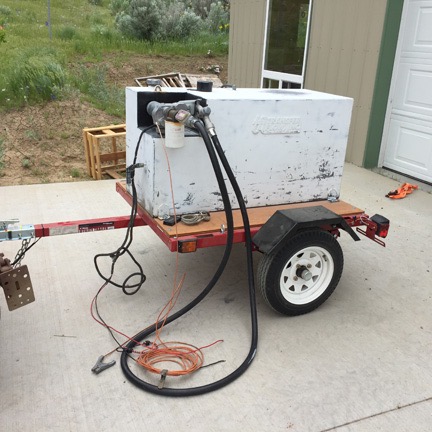
The tank just fit on the trailer.
Fortunately, my winemaker neighbor has a forklift. I drove the truck over there one day while he was working with wine barrels and he pulled the tank off my truck. Then I drove home, hopped in the Jeep, and drove it over with the trailer in tow. My neighbor placed the tank on the trailer bed. It just fit — honestly, I should have gone with the larger but less capacity trailer.
There were a few things I needed to do to finish up:
- Bolt the tank down to the trailer. There were four bolt holes and I used lag bolts to do the job. But since I didn’t trust the bolts in the wood, I also put a pair of ratchet tie-downs across the top.
- Paint the tank. I still had a can of white paint I’d bought years ago to touch up the tank while it was on my wasband’s truck. As the picture shows, it looks pretty shabby and I’d wanted it to look nicer on the truck. But I never got around to painting it. Now was the time. I gave it two coats.
- Secure the hose and grounding wire. I was going to have custom metal hose rack made but the guy I was going to hire to do the job talked me into whipping something up out of wood. I later wound up tucking the hose into the tie-down straps and using a bungee cord to hold it in place in transit. That worked better than I expected.
- Add alligator clips to the pump wires so it could be connected to a battery for power. The pump had always been hardwired to the trucks it lived on (with the exception of the last one). When I had it moved off the dead truck, they’d simply cut the wires at the battery. Clips would make it easier to use with any battery. I bought clips capable of handling the 18 amps the pump would draw and put them on.
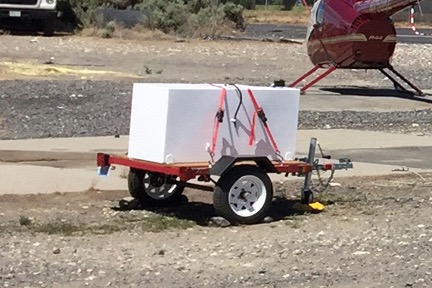
This is the only photo I have of the tank sitting at the Quincy landing zone. In this photo, the helicopter it had been fueling had been moved. The hose and pump is on the other side.
I got all this done pretty quickly — and that was a good thing. I’d hired two guys to help me out in Quincy for cherry drying and only one of them had a fuel tank. I figured I’d let the other one borrow mine. So I towed it to the bulk fuel place, filled it up, and then moved it to his Quincy landing zone. He’d power the pump with the battery on his rental car.
Final Improvements
The tank sat in Quincy for over a month. The pilot towed it to the bulk fuel place and topped it off. Later, another pilot came and took his place, topped off another helicopter, and then refilled the tank again. Along the way, one of them allowed the pump fitting to get loose and 100LL — which is dyed blue — leaked all over the front of the tank and that nice wooden trailer deck, staining it all. It took me 3 minutes with a pair of pipe wrenches to fix the problem — apparently, that’s too much to ask some people to do.
I towed the tank — still full — home. Now I had 80 gallons of 100LL to offload. I had no desire to use the tank at home and no interest in storing it full over the winter. I topped off my motorcycle and my ATV, filled a 5 gallon fuel can, and managed to put some of it in the helicopter. It was a pain in the neck because I had to move my Jeep over to have something to hook the pump up to.
So I bought a battery to power it. We have a battery place in town that sells all kinds of batteries. I chose a small maintenance free model. I charged it up and it worked fine.

This very small panel should keep the battery charged; we have plenty of sun here.
And I got to thinking that it would be nice if the battery just had a solar powered battery tender on it so it would stay charged. I did some homework and bought a small, 5 watt Battery Tender Solar Panel.
And then I thought that it would be nice if the battery was enclosed in a box with the solar panel mounted on it. So I built a box out of scrap lumber, painted it with some outdoor “Oops” paint I’d bought cheap to paint my beehives, put the battery inside, and mounted the solar panel on the side. (And yes, I did put a vent in the box; I even put some screen over it to prevent mice from getting in.) I screwed the whole thing down onto the deck of the trailer over one of the wheels. But before I did that, I repainted the tank, using up the rest of the white paint I had to hide the dye stains and make it look cleaner.
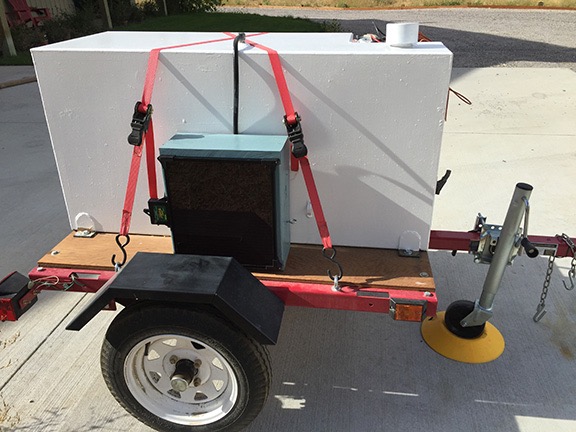
The end result was very polished looking and very functional.
The only thing I still have to do is connect the wires for the pump to the battery. The tank is empty enough to store it for the winter so I probably won’t bother until spring.
I figure I have about $2K invested in this setup — the tank was the most expensive part of it. It’s DOT-approved and road legal. It’ll likely be used annually in Quincy by one of my pilots and may get some use at events that aren’t close to an airport. But I have no interest in fueling at home. All of my flights either start or end at the airport so it’s a lot easier to just get fuel there.
Discover more from An Eclectic Mind
Subscribe to get the latest posts sent to your email.
Looks like a neat setup. The main thing I’d add would be a spare tire on a rack, either on the tongue or perhaps on the back as a sort of bumper/protector for the rear of the tank. Check http://www.sixrobblees.com/, they’re a pretty good mail order source for trailer accessories if you can’t find one locally. The other thing you might want to bolt on (and I speak from experience here) is a weather/dust-proof box where you can keep a batch of extra fuel filters ready to swap out. One of the larger size steel ammo boxes from a surplus store would probably be about right, and they generally have good dust/water tight seals that hold up to the elements.
If you or one of your contract pilots ever get a bad batch of bulk fuel, especially one that’s full of fungus (more likely with jet fuel, but not impossible with avgas) you might find yourself going through lots of filters till it either gets cleaned out or you end up disposing of the bad batch. It might not be a bad idea to bungee down an empty fuel jug just for waste fuel since not all locations permit dumping it out on the ground, especially in quantity. I’ve pulled fuel samples that looked just like a huge glob of slimy snot and others that looked like coffee full of grounds, both of which required repeated draining and sampling to clear.
On one occasion it was so extensive that I grounded the aircraft and helped a mechanic drain and purge the fuel system. With a full schedule of tourists already booked it wasn’t what my boss wanted to hear, but I wasn’t willing to fly with that gunk still in the tanks. He wasn’t really convinced until I plopped a 1-quart mason jar full of bad fuel sample on his desk; it was full of slime about the same color and consistency as a moon jelly. It actually wiggled when you shook it, instead of sloshing like a liquid. Watching it slowly squeeze through the small-diameter fuel drain port on the bottom of the aircraft was like seeing a jellyfish give birth, horrible but fascinating at the same time.
Having been a tourist in several jet fuelled helicopters, I found the “jellyfish giving birth” from the fuel filter description rather scary.
When taking ‘first flight of the day’ fuel samples from AVGAS-powered Cessnas I have seen lots of water, some small insects, a tiny nematode and silts and rusts of various colours, but never a thick (engine stopping) jelly. Yikes.
I like the spare tire idea a lot; I’ve already had a flat once on my bee trailer and it was a royal pain in the butt. So glad there were no bees on board.
But there really isn’t any room for cargo on board. The fuel filter was replaced this year and seldom has more than 200-300 gallons going through it in a season. All fuel is bought at either a bulk fuel facility or airport, both of which have filters. So I’m not too worried about that. Besides, don’t we sump our tanks?
Check out that link to the 6Robblees site and run a search for ” spare tire rack”. My last boat trailer had one that that bolted to the trailer tongue, which is typically unused space anyway. There’s a couple of types, one uses U-bolts and carries the tire flat, the other has a bracket that bolts on and carries the tire vertically. Either way it’s cheap insurance.
I’ll likely wait until the spring for the fuel trailer, but I also need a spare holder for my boat trailer, which I might be taking south with me for the winter. Never thought of simply searching for “spare tire rack.” Duh.
Believe me, I was far from happy about seeing that stuff squishing out of the aircraft fuel tank sump. I was even less happy seeing larger quantities of it show up in the fuel truck sample. The culprit is a fungus that thrives at the fuel/water interface, living in the water and feeding on the fuel. Jet fuel intended for long-term storage normally has biocides mixed in with it to prevent this kind of infection, the most common being a product called Prist (which is actually an anti-icing additive). The stuff is expensive, so the company I was flying for at the time opted to use straight jet fuel. That worked fine at their main base, since they had an extensive filtering system and they went through a huge quantity of fuel, it didn’t have time to sit in the tanks and accumulate water. The problem was that they loaded that same fuel into a smaller truck and drove it out to a remote location at the far west end of the canyon. It sat in the truck for days or weeks there with no biocide, which gave the fungus time to grow. Even a “full” fuel tank has airspace above the fuel, you need it to prevent spills when it gets hot and expands. The normal day/night temperature cycle in an above-ground tank leads to condensation on the inside, which then drips down into the fuel and collects on the bottom, which is where the fungus starts to grow. After being presented with the “jellyfish” they drove a different fuel truck out, loaded with fuel that had the additive in already. We ended up grounding both aircraft at that location for half a day while the fuel tanks were emptied and flushed and the fuel filters changed. A lot of hassle for something that could have been avoided with a few dollars worth of additive, but a good lesson for us all.
Thanks for the explanation.
You made the right call and had the authority to make the company act. But something tells me that there are other companies taking chances that this jelly ‘will push through’ and be burnt off, or will flush out with a new load of Prist-treated fuel.
New staff to such companies might suspect there is a fuel thickening problem but auto-censor their concerns for fear of being thought ‘awkward’, if their judgment involves cancelling flights and dumping fuel.
As a student I was often asked to fly solo in old aircraft which had one or more minor technical problems (broken manifold pressure gauge, loose throttle friction nut, non-functioning squawk etc.). I had waited all week to get this opportunity, the weather was CAVOK, I would have flown with a wheel missing…
Your trailer is Perfection.
I know that feeling (referencing your garage shelving post) of predrilling, dropping in the lag bolts, getting a deal and being able to cut it to size, having the right tools for the job, waterproofing the ply…
The feeling of a job Very well done, Maria.
On time & under budget.
Thanks. I love projects like this.