Keeping my things neatly organized is a major goal in my new home.
I spent much of the other day working on organization solutions for my home. I want to be able to put things away neatly, organized so they’re easy to find. I want to open a drawer or closet and see things arranged where they belong.
Coat Closet
The very first thing I did was to hang a shelf and rod in my hall closet. This would be my coat closet. All of my coats, on hangars, were in a wardrobe moving box that was basically falling apart under their weight. It was March after the drywall was done and the kitchen cabinets were being installed — the same time I was using a variety of coats. Clearly, I needed a coat closet done.

The shelf and rod in my coat closet was my first home organization project.
I used a pair of 1×6 boards, cut to the depth of a shelf I wanted on top and mounted rod holders on them. Then I cut a piece of dowel I had — former curtain rods from my Arizona home — and fit in in place. I painted the boards and shelf. Voila! My coat closet, which I’d also use to store my vacuum, was done.
The Pantry
I had decided early on that I didn’t want food in my kitchen cabinets and I didn’t want appliances on my kitchen counters. That meant putting in a pantry.
I call my pantry “the amazing shrinking pantry” because it originally appeared on my plans as a walk-in closet with shelves on three walls. During the framing process, as the skeletons of my future walls were set, it became obvious that if the pantry was that big, it would extend far into the great room and hide the top of the stairway from view of the kitchen island. So we cut it to about half the original size. That made it a deep closet. Later, when I realized that I needed a place to put the ladder for the loft, creating a cubbyhole in the wall where the pantry was could be a good solution. I hired a framer to modify the future walls, cutting space from the back of the pantry. The space that was left measured only 33×32 inches when the drywall went up. The pantry had gone from a small room on paper to the smallest closet in my home.

Melamine board is durable and has a washable surface.
Undaunted, I put in shelves a few weeks ago. I bought a 4×8 sheet of melamine board. That’s basically particle board with a melamine resin coating. I had the Home Depot saw man cut it to size on the big saw, not only saving me the trouble of doing it myself but making the board movable. A full sheet is simply too heavy for me to handle on my own. I also bought some white 1×3 trim pieces. At home, I cut the trim pieces to the depth of the shelves and used wood screws to attach them to the closet walls at the studs. (First time I used my stud finder.) Then I laid the shelves atop the trim strips. I spaced the shelves with enough room at the bottom to fit my wine cooler and wine bottle rack (trimmed to size). The first shelf was tall enough to accommodate my countertop appliances: mixer, food processor, coffee maker, bread machine. The next few shelves would hold my food. The very top shelf, which required a stepladder to reach, would hold seldom-used entertainment items, such as a steamer, pitchers, and platters, as well as liquor bottles.
Finishing this first organization project was a real morale booster. I was able to move my food up from my RV, where I’d been living for nearly two years, and unpack my kitchen appliances. It was the first step to really making my kitchen usable.

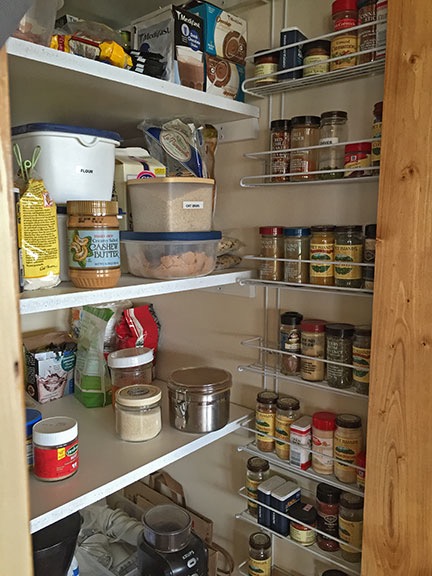
My nearly finished pantry includes shelves for food, small appliances, and spices.
Of course, I wasn’t quite done. After painting the board edges and screw heads with glossy white paint (to match the melamine), I started thinking about adding shelves along the wall in the very narrow space between the edge of the shelves and the doorway. I was mostly concerned with storing spice bottles — with a real kitchen at my disposal again, I had begun doing a lot of cooking and was accumulating small jars of herbs and spices at an amazing rate. I’d been storing them in a basket in the pantry, but every time I needed something, I’d have to dig through the basket to find it. I tracked down white wire spice racks on Amazon.com and ordered four of them. Although my original idea was to put two on each side of the doorway, I wound up putting three on one side. The spices fit nicely — and yes, I did put them in alphabetical order — on those shelves. That was the first project I finished last week.
The Bedroom Closet
My old house had a large walk-in closet in the master bedroom. While it was nice to have all that space, there were two reasons why I didn’t like that closet:
- The upstairs heater/AC unit was in there. The house had two-zone heat and, because it didn’t have a basement, it had two separate HVAC systems, each of which had the air handler in a closet. This ugly, fully exposed thing stood in the back corner of the closet, taking up about 20% of its space.
- There were ugly wire shelves for linens in there. The house didn’t have a linen closet. (Who builds a house without a place to put linens?) Our solution was to add shelves in the master bedroom closet. But instead of putting in nice, neat shelves, my wasband went with white, plastic coated wire shelves. The kind of shelves you might have in your garage. They were shoved into place right inside the doorway, like the afterthought that they were. Functional, but ugly.
(Looking back at it now, I realize that it’s just another example of the half-assed solutions I lived with for 29 years. Why do something right when you can do it cheap?)
I didn’t want to be unhappy with my new home’s closet. I wanted to do it right.
The closet is 100 inches wide and 35 inches deep with a 72 inch wrapped doorway. Eventually, I’ll hang a pair of sliding doors on it, but for now, it’s wide open.
I explored a lot of possible solutions, including a DIY shelf setup. Although my pantry shelf project wasn’t bad, I knew I lacked the building skills to create a satisfactory solution from scratch inside the closet. That meant either a kit or hiring a contractor.
I contacted California Closets. That’s a company that build (supposedly) custom closet solutions. I asked for a “free consultation.” I thought that meant someone would come to my home and talk to me about what I wanted. But instead, it meant that a woman would call me from her home or office in Spokane, talk to me about the size of the closet, and email me some sketches. She had no desire to come see me until she knew she had a sale. And with a materials-only quote of about $1500 for a closet design that wasn’t anything like what I wanted, she certainly wasn’t going to get the sale.
That meant a kit. I looked at the John Louis Home Deep Deluxe closet organizer kit several times before finally buying it. I found a coupon code online for 10% off and shipping was free. It arrived a week later in a big box that was too heavy for me to lift. My friend Tom helped me drag it up the stairs, where it sat in the hallway until the movers came. The movers moved it into the bedroom at my request where it sat until last week.
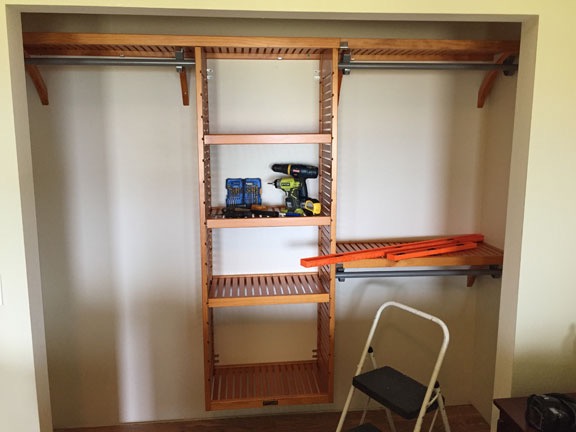
Assembling the John Louis system was not like assembling Ikea furniture. It required precise measuring, driving multiple heavy screws into the wall, and cutting shelves and garment rods. I started it late one afternoon, worked on it for about three hours, and then made the mistake of taking a break for a glass of wine while I watched the sun set. I picked up the task the next day. Although the instructions were clear and in plain english with plenty of illustrations, the installation video, which I watched on my iPad as I worked on each step, was invaluable. The system is extremely flexible and comes with enough shelving to do almost anything you like. I customized my closet with basically equal single and double bars on either side of the standard 24-inch shelves. The resulting organizer exactly filled the entire 100-inch width of the space, which lots of shelf space. It was affixed firmly to the wall, attached to studs wherever possible. And it looked awesome.

Here’s the finished closet organizer with the tools I needed to build it. (My chop saw, which I used to cut the shelves, is down in my shop.)
Laundry Room Shelf
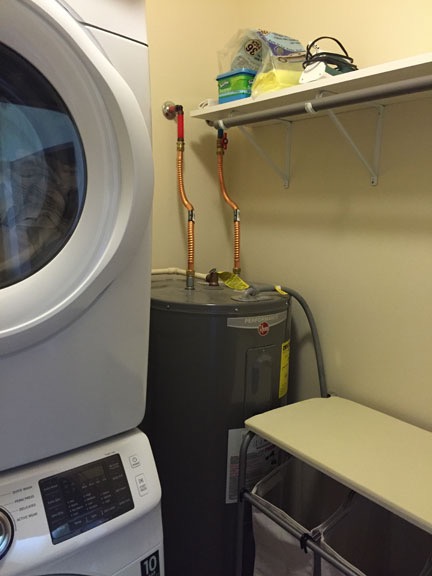
While I was on a roll, I figured I’d use my new shelf-installation skills to put up a shelf in my laundry room. My laundry room is remarkably tiny, only 5×6 feet, and houses a full-sized washer and dryer (stacked), water heater, and 3-bin hamper. I’d been putting laundry soap, clean rags, and other items on top of the hamper and the place was a disorganized mess. A shelf was the solution but because the plumbers had roughed in for a taller water heater, I had some weird water pipes running down the wall. The shelf couldn’t go from wall to wall.
The solution was to mount shelf supports on three studs of the wall and place a melamine shelf atop it. I’d already bought everything I needed. The shelf supports had cups at the end to support a clothes rod — I thought that might be a nice touch to hand dry shirts and other items. My bedroom closet had spare rod.

It isn’t easy to get a picture inside such a tiny room. The other end of the shelf is where I put my laundry detergent. The top of the laundry bin doubles as an ironing board; I got it on Amazon.com.
I spent about an hour cutting the shelf, mounting the supports, hanging the shelf, and fastening the rod. While the result wouldn’t win any design competitions, it was functional and not nearly as ugly as the water heater below it.
Bathroom Storage
My bathroom needed storage, too. I had not designed it to have a medicine cabinet set into the wall. That was mostly due to my complete inexperience as a general contractor and the simple fact that I didn’t think of it. Wall mounted medicine cabinets were big and bulky — I didn’t find a single one I liked that wouldn’t cast a shadow with the over-sink light fixture above it. That meant any medicine cabinet items would have to go elsewhere.
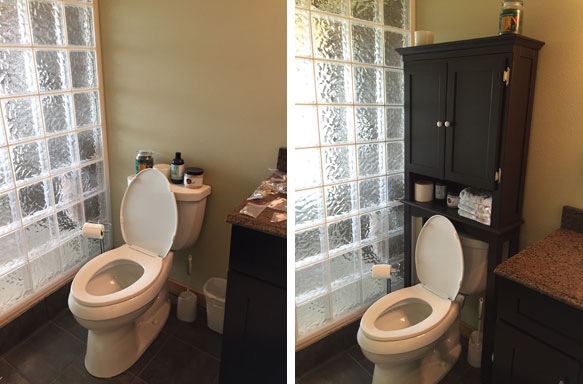
I saw an over-toilet cabinet that matched my bathroom vanity in Bed Bath and Beyond and picked it up on one of my trips into town. While I was still on a roll, I assembled it. Although it looks pretty good and it’s attached to the wall for safety — don’t want that falling down on you while you’re doing your business in the seat — I’m not 100% happy with it. It’ll either grow on me or I’ll find another solution. Perhaps a wall-mounted medicine cabinet over the toilet? With this in place for now, I have plenty of time to think about it.

I think these before and after shots do a good job of showing how much better the toilet area looks with the shelf unit in place. And its practical storage, too.
Remaining Projects
I have two big storage projects left to do:
- Linen closet shelves. When I bought the melamine board for my pantry, I also bought board and had it cut for the linen closet. I just haven’t gotten around to putting in the shelves. I’ll use the same technique I used for the pantry.
- Shop shelves. Although I bought and assembled some shelve units from Ikea for shop storage and was ready to buy and assemble more, Ikea no longer sells those kinds of shelves. My friend Bob showed me the shelves he assembled in his garage. They’re simple and sturdy. I already have 12 2×8 sheets of plywood that I’d been using on my deck until I got the decking down. Those will be repurposed for shop shelves. I bought the 2×4 lengths of lumber I’d need for the job. These shelves will go into the far back corner of my shop area, where my furniture was stored until it was moved upstairs. I’ll use them to store shop supplies, camping gear, and other equipment I need but don’t use regularly. I’m a huge fan of clear plastic bins for organizing related items; those shelves will be sized to fit the bins.
I have the materials I need to do these jobs. Now all I need is the time.
Guess I’d better get to it.
Discover more from An Eclectic Mind
Subscribe to get the latest posts sent to your email.

Fantastic organizing solutions, Maria!!! There are seemingly endless details with designing and building a home, that’s for sure … but all the little details can make such a HUGE difference, that’s for sure!
I never realized what went into building a house until I started this project. Every time I turn around, there’s something else to do! But the best part about it all: I get to do it MY WAY. No decisions by builders who don’t really care, no debates with a cheapskate partner who cares more about saving money than doing something right. It’s a lot of work, but worth it!
I think the bedroom closet looks great – really sturdy and nice quality. Not so for the over toilet cabinet. I think the fact that it is standing on stilts over the toilet cistern suggests an unplanned design. I think a nice cabinet on the wall with more space between the bottom of it and the top of the cistern would look much better. It’s an example of less is more.
The toilet cabinet is actually a pretty common design here in the U.S. But I agree; a better cabinet design would likely look better. I have time to find one.
I wonder if you could use that cabinet and revise it to hang on the wall (cut off the legs, etc.) It’s a nice-looking cabinet.
I have DEFINITELY thought about that. I don’t like the legs. I think it’s wobbly. It’s secured to the wall so it won’t fall, but I’m still not happy. Will explore it when I have time.
We have a cabinet over the toilet, but it’s screwed to the wall, not as big as yours but it works.
I put all of the wife’s spices in alphabetical order once, never again. Boy was she mad. She wants the ones she uses all the time front and center.
Your home is looking so goof, I’m impressed with what you have accomplished. Thumbs Up.
In my previous home, we had a cabinet over the toilet that was also screwed to the wall. Worked well and added some helpful storage.
Regarding the spices, mine are also in alphabetical order. My mom’s were that way when I was growing up, and it worked well, and I followed her lead when I first moved out on my own and have continued all these years.
All that matters, though, is what works the best for each of us. I’m not one who wants to have to hunt for something, so having some kind of organization / workable order is important to me.
As I’ve said many times, I’ve so enjoyed following along with your home building adventure. You’ve certainly come a long, long way. I know it hasn’t always been easy along the way, but I also know it’s been well worth all the effort for you. :-)
Thanks, Dan.
I never had my spices in alphabetical order, but it makes so much sense!