How I add GPS coordinates to my photos.
A while back, I decided I wanted to include the GPS coordinates in the EXIF data for my photos. Because my cameras (a Nikon D80 and a Nikon CoolPix something-or-other) don’t have built-in GPS features or communicate via bluetooth (or any other method) with a GPS, I have to manually attach the GPS coordinates to the photos.
I say manually, but I do this with software that automates the process. (I’m not a complete idiot.) Still, there’s a slightly convoluted workflow to get this all together. I thought I’d outline it here for two reasons:
- Some blog readers might be genuinely interested. I’m not the only photo-snapping geek around.
- By documenting this, I can look back, years from now, and see yet another example of how technology changes to make things easier and how I solved a “problem.”
So here’s the workflow rundown. I skipped the nitty gritty details to keep it short. (I read somewhere that people don’t like to read long blog posts.)
Step 1: Acquire the Photos
 Bluetooth GPS w/ ChargersWhen I go out to do photography, I take minimal equipment. I don’t like to carry a bunch of stuff. But one of the things I do take with me (other than my camera) is a GPS data logger. I bought a GlobalSat BT-335 Bluetooth GPS Data Logger. I made my choice after lots of research, including this excellent review on bioneural.net. Three things sold me:
- Price. It’s $69.95 on Amazon.com.
- Size. It’s small and lightweight.
- Connectivity. It’s Bluetooth, so I don’t have to deal with cables. (I hate cables.)
As an added bonus, when paired with my MacBook Pro, it puts live GPS data on my computer. Which is kind of cool, even though I currently have no use for this capability.
I’m not saying you should go out and buy this. I’m just saying that I did and I’m very satisfied. And while I certainly welcome comments that suggest other models, my choice has been made, so please don’t try to sell me on your solution.
A GPS data logger like the BT-335 does one thing, and it does it well. It keeps track of where you’ve been by recording GPS coordinates and corresponding times. It stores all this data inside itself with virtually no user interface. I attach it with a wrist strap I bought at a camera store to my camera’s shoulder strap. Before I start shooting photos, I turn it on and it does its thing. I basically forget all about it.
So when I go out to do photography, I turn on my GPS data logger and use my camera to take pictures. Pretty simply stuff, no?
It’s important to note here that the time on my camera must be right — at least within 10-20 seconds (if I’m on the move) or 1 to 2 minutes (if I’m moving more slowly). I check it against my computer’s clock (which is set by atomic clock) and adjust it a few times a year. The GPS data logger gets its date/time information from the GPS satellites.
Step 2: Get the Data and Photos on the Computer
The next step is to get all of the GPS data and the photos onto my computer.
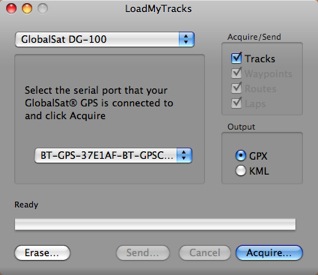
 Although GlobalSat has a perfectly fine utility for getting the data off its unit and onto a Mac, I use the freeware application, Load My Tracks. I tell it I’m using a GlobalSat DG-100 and because the unit is paired to my computer, it finds it. I can then download tracks into either GPX (which I need) or KML format. I download both — heck, why not? — into the folder where I’ll soon be downloading the photos. I then erase the data logger so I don’t have extra track points in it the next time I use it.
Next, I use a card reader with Image Capture, which comes with Mac OS X, to download all photos from my camera into the folder where I saved the track logs. They don’t have to be in the same folder, but I like it that way. Nice and neat. And it makes it easy to back up the logs with the photos.
Now I’ve got the GPS data and photos on my computer.
Step 3: Match GPS Coordinates to Photos
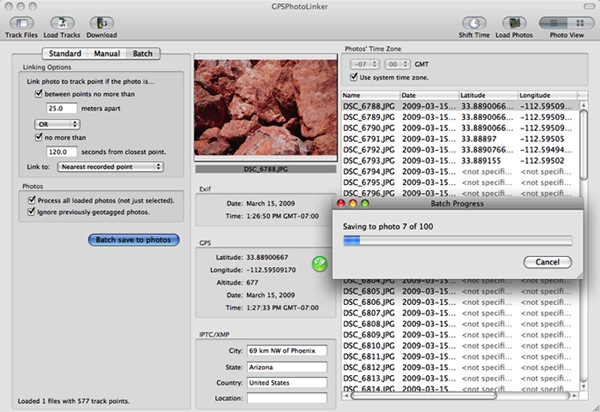
Next, I launch GPSPhotoLinker, another freeware application. I use the Load Tracks button to load up the GPX data file for the photo shoot. Then I use the Load Photos button to load all the photos I took during the shoot. I go into batch mode, which has my settings saved from the last session, and click Batch Save to Photos.
GPSPhotoLinker uses my settings and the data to write the GPS coordinates, including altitude, to each photo. It displays a progress bar as it works. When it’s done, the Latitude and Longitude for each photo appears in the appropriate columns in the list of photos. Here’s what it looks like while it’s working. (Yes, I took pictures of very big, red rocks.)

As for the big, red rocks, you can find them here. (But it seems to be off by a 10-20 feet; maybe it’s time to adjust the camera time again.)
Step 4: Backup
After losing a hard disk for the third time two years ago, I have become fanatical about backing up my data. After importing photos and linking the GPS data to them, I burn them onto a CD or DVD (depending on the capacity needed). When the burn is done, I check the CD or DVD to make sure it functions properly. Then I apply a label with the date and some descriptive information and file the CD or DVD in a box with a bunch of others.
I format the memory card for my camera in my camera to clear it out completely.
I then feel good about deleting photos off my hard disk, adding them to iPhoto, or modifying them in Photoshop or some other image editing too.
Sounds Like a Lot of Work?
It really isn’t a lot of work. It’s a whole workflow thing. Do it enough times and you can do it quickly. Steps 2 through 4 take about 15 minutes from start to finish.
That’s my flow for geotagging. What’s yours? Got a camera with a GPS or GPS connectivity built in? Please do brag about it by adding a comment here. I’d love to learn more.
Discover more from An Eclectic Mind
Subscribe to get the latest posts sent to your email.

My geotagging workflow is almost the same as yours. I’m also a Mac user, import photos with Image Capture and geotag photos with GPSPhotoLinker.
The difference is the GPS data logger. I use my iPhone as a GPS data logger. It’s a device I always carry with me, so I don’t consider it as extra photography equipment. I’m really pleased with the GeoLogTag app. Accuracy is *very* good, the GPX file is exported over WiFi (so also no cables involved) and as a surplus it also geotags my Flickr photos.
http://www.galarina.eu/GeoLogTag/How_To
This sounds like a great solution. I’m due to get a new cell phone sometime this year…I’ll look for one with gps logging capabilities. It would be nice not to have to carry my logger with me — although it really is no bother because of its small size.
As for Flickr, once the EXIF info is embedded in the image, it should automatically be carried forward to any service that can read EXIF info. So any geotagging setup should work with Flickr, too.
Thanks for the comment and the link.
Hi Maria, thanks for sharing about the backup. I wonder if I keep an external drive and keep copies there too, would this work? am considering to get an external drive.
Janet Ching´s last blog post: kinpira gobo, japanese braised burdock root (牛蒡)
Thanks for such an excellent article. Does your software write to RAW files, or JPG only? I prefer shooting in RAW. Thanks again!
I don’t work with RAW files, but I assume that if they have EXIF data, the software will write to it. Maybe someone else reading this can advise you better?
After I posted the above, I went to the software’s web page, and it DOES seem to support writing to RAW. (Shutterbug magazine just did an article about geotaggers, and many of them would not write to RAW files.) Shoulda checked before I commented. Ah well. Happy Easter & thanks again!
Just to be clear (in case I wasn’t). It isn’t the GPS logger that does the tagging. That just creates the tracklog that’s used by the software. The software actually matches up the logger’s track points, once they’ve been imported to my computer, to the photographs, using the date/time info in the track log and in the photograph’s EXIF data.
But I think you knew that.
Hey Herm, that GeoLogTag seems pretty great! Especially for only $5 and for a gadget I’m already carrying around?! Thanks for the tip!
Maria, just tried GPSPhotoLinker with a bunch of photos I took today, and it seems to work well! Thanks for the 3rd or 4th time. :)
Charity´s last blog post: Peeple who need peeple
Glad you got something useful out of this mess!
Linked here from Miraz’s blog … as a geocacher i have a handheld GPSr – i’ve just been experimenting with using the tracks from the Garmin married to my cell fone pix – fantastic … will use these more often – only sorry i didn’t know the last time i was in the USA
Geotagalog is a well thought out photo tagger with live previews (on a map that does not require internet!) and prettier workflow. It’s not free, but the demo is free…
http://calftrail.com/geotagalog
@Maria & Charity
The latest version of GeoLogTag directly geotags photos located on a Mac (shared folder). WiFi is a requirement and it works like a charm. This makes the separate geotagging app on your Mac obsolete (if you shoot in JPEG).
http://www.galarina.eu/GeoLogTag/Home.html