Winter Helicopter Flight to McMinnville Pt 1

Another video from the FlyingMAir YouTube channel.

Guess who flew back down to McMinnville in March?

Join me for the first part of this flight, where I leave Wenatchee Pangborn Memorial Airport (KEAT) and head south over winter terrain. This flight has both nosecam and instrument cam views, as well as cockpit narration and radio chatter. I’ll release additional parts of this flight throughout the summer.

Note: This is the 1080 HD version of this video. A 4K UHD version without the animated subscribe button and Member Wall is available to members at the Sponsor level or higher.

Handmade Items: It’s NOT Just Materials Cost

I explain why I charge $39 for a pair of earrings with less than $10 worth of materials.

Yesterday, I went down into my jewelry shop and made 6 pairs of earrings out of roughly $55 worth of sterling silver sheet metal and pre-made ear wires. I’ll sell each pair for $39. Sounds like a great deal for me, right? Well, if you read on, you’ll learn more about the actual cost of these earrings.

I tweeted my progress while creating these earrings, using a Twitter thread with photos. I skipped tweeting the first step, which was getting the pattern onto the silver — I don’t buy sheet silver with a pattern already on it (although I do sell it that way) — but got most of the other steps. They make up good documentation for this blog post’s purpose, which is to talk about what actually goes into making something from scratch: materials, tools, skills, and time.

Materials

The materials for this project were pretty basic:

  • 26 gauge sterling silver sheet. I buy the metal I plan to apply a pattern to in 6″ x 2.5″ pieces because that’s the size of most of my texture plates. I learned (the hard way) that you can ruin a texture plate by using it to texture a smaller piece of metal than the plate. Because of a 75% or so increase in the price of silver last year, this small piece of metal cost just over $42.
  • Sterling silver ear wires. I buy these in bulk, but they still cost nearly $1 each. I can save money by making them myself out of 20 gauge half-hard sterling silver wire, but I like the look of the ones I buy and they’re less likely to bend out of shape than the ones I make. I’ve even had one of the galleries I provide inventory to tell me that they prefer manufactured ear wires for the very same reason.
  • Rubber ear nuts. These are tiny pieces of rubber that go onto the end of the ear wire, making them less likely to fall out of your ear (or off the jewerly display card I use when selling). I buy them by the gross and they cost a fraction of a cent each. (I don’t understand why all jewelry makers don’t include them with ear wire earrings. Such a tiny, inexpensive little thing can prevent the loss of earrings.)

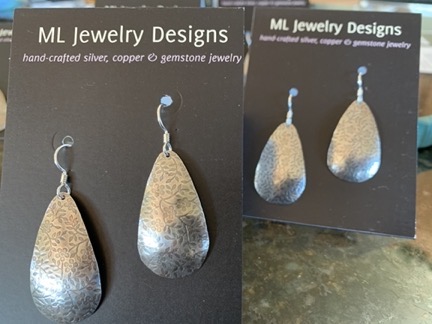
In addition to these materials. I also have the printed cards I use to display and sell the earrings. These cost just pennies apiece and are part of my marketing/selling expenses, but they shouldn’t be overlooked. Ditto for the specially sized, clear plastic zipper bags I put the earrings and cards into when I sell.

Tools and Equipment

It’s the tools and equipment that really add to the cost of the jewelry I make. As an accountant might tell you, these are fixed costs that need to be considered as part of anything you make with them. The more you use a tool or piece of equipment, the less the per-piece cost of that equipment is. An analogy from my day job as a pilot would be something like insurance: if it costs you $15K/year and you fly 100 hours a year, that’s $150/hour; but if you fly only 10 hours, that’s $1500/hour. Ouch.

Going through the steps to create these earrings, I used the following tools and equipment:

  • Rolling mill. This is the device I used to impress the pattern onto the silver. Rolling mills vary in cost. I have a Durston, which is made in the U.K. and isn’t cheap. But mine is small, so it wasn’t too costly. I think I paid around $750 for it.
  • Texture plate. This is a piece of brass with a texture on it. The brass is harder than the silver so when the two pieces of metal are run through the rolling mill together, the texture from the brass is imprinted onto the silver. The texture plates range in price from about $5 for a single-use paper version up to $100 or more for steel versions. My brass plate cost about $10 and will give me about 50 impressions before it’s too flat to make more impressions.
  • Metal shear. Although I didn’t really need it for this project, I used my metal shear to cut off a 1/4″ by 2 1/2″ piece of the textured metal to use as a ring blank. You see, when the metal goes through the rolling mill, it stretches. So even though I cut 1/4″ off one end, I still had 6″ x 2 1/2″ of textured metal to work with. My metal shear, which I use a lot, cost about $250.
  • Shape template. I use shape templates to create earrings and other items in consistent sizes and shapes. The template I used for this project has about 30 shapes/sizes on it and cost $8. It’s made of heavy duty plastic so it’ll last a long time.
  • Fine point Sharpie pen. That’s a tool, too. I used it to trace the shapes onto the metal as close as I could without overlapping. What do they cost? About $3 each?
  • IMG 0028
    Here’s the cutting job in progress.

    Joyce Chen kitchen shears. I have a variety of ways to cut metal sheet — my jeweler’s saw, a pair of French shears — but I used these shears for this project. They’ll cut through any reasonably thin soft metal — and 26 gauge silver is pretty thin and relatively soft. The cost? $21.

  • Flex shaft. After cutting out all those pieces, I needed to smooth their edges. Being the machine person I am, I used my flex shaft, which is basically a Dremel-style tool with the motor at the end of a long shaft and a foot pedal to control the speed. Mine is a EuroTool and cost about $120. But don’t forget to add the motor hangar for it, which cost another $32.
  • Mounted sandpaper cartridge roll. I used a sandpaper roll to do the actual sanding. They cost about $1 each.
  • IMG 0032
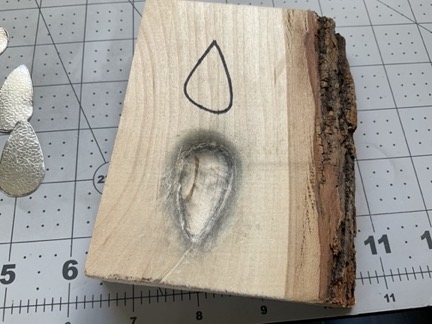
    Here’s my custom dapping block. The other drawn-on shape is for one I no longer use and never actually carved into the wood.

    Custom dapping block. A dapping block makes it possible to put a dome into pieces of metal. But because these earrings aren’t round, they needed a custom dapping block. I made mine from a piece of bass wood that only cost about $2, but I used a variety of Dremel bits to carve it out and I fine-tune it every time I use it. Still, we’ll say $2 for this homemade tool.

  • Nylon hammer. Although my photos on Twitter show me using a dapping punch with the block to put a dome on the metal, I actually used a domed nylon hammer that has always worked a little better for me. Cost: $14.
  • Hole punch. While I could have drilled holes for the ear wires into each piece before doming it using a center punch, flex shaft, and drill bit, I took the easy way with a 1.25mm metal hole punch. Cost: $14.
  • Scrap wire. I used a piece of thin copper wire to attach the earring pieces together for oxidizing them. The cost of this scrap is pennies and not even worth adding into the equation.
  • Using Liver of Sulfur
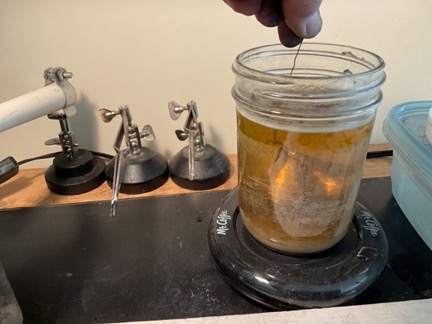
    In this shot, I’m dipping all 12 pieces of the earrings, on a copper wire, into the liver of sulfur. You can see the jar and mug warmer, as well as the side of the container next to it that I use for the baking soda rinse.

    Liver of Sulfur. Liver of sulfur is a chemical that, when dissolved in warm water, can darken copper or silver (but not gold). It’s widely used by jewelers who want an oxidized look on textured metal. The stuff I use costs $18/jar and that’ll last about a year.

  • Mason jar. I use a 1-pint wide mouth mason jar to mix, heat, and store the liver of sulfur. Because I do canning, I always have a bunch of spare jars — although once I use them for chemicals, I can’t wash and reuse them for food. Figure about $2 for this jar with the plastic lid.
  • Cup warmer. I use a coffee mug warmer to keep the liver of sulfur warm while working. The one I use costs $11, but you can sometimes find them cheaper in thift shops.
  • Baking soda. I mix baking soda and water in a glass bowl and use that to neutralize the chemical reaction of the liver of sulfur so the metal stops darkening. It’s the stuff you buy in the supermarket. How much? I don’t know. $3 for a box that’ll last a very long time?
  • Container. Of course, I need a container to put that baking soda and water solution in. I use reusable disposable plastic containers with lids. When I’m done, I cover it up so it doesn’t evaporate. Figure $2 for a container with a lid.
  • Tumbler. There are all kinds of tumblers you can use for jewelry, but I use a basic Lortone 3A 3-lb capacity rock tumbler. I paid about $110.
  • Ceramic tumbling media. This is my secret sauce and I’m not very motivated to provide details, mostly because it saves me a ton of work and provides consistent results every time I use it — which is vital when you need to make multiples that are the same. Let’s just say that it’s ceramic tumbling media that rubs the darkening off the raised part of the pattern. The stuff I use costs $45/bag and that bag will last at least a year. If you want to try it, find one that works for you. (Good luck.)
  • Dawn detergent. I add a drop or two of Dawn to the tumbler with the ceramic media and water. I always use dawn because everyone recommends Dawn. I buy small bottles that last a long time. What does that cost? Let’s say $2.
  • Extra tumbler barrel. Because it’s best to keep stainless steel shot separate from any other tumbling media, I had to buy an extra barrel. Add $36.
  • Stainless steel shot. Steel shot burnishes the finished jewelry. Don’t buy the cheap stuff; it’ll rust. I buy it by the pound for $26; because it doesn’t rust, it should last forever.
  • Burnishing compound. A few drops of burnishing compound in the tumbler with water and the steel shot helps achieve a nice polish. It’s $10 for an 8 oz. bottle that lasts at least a year.
  • Earrings
    I finished the earrings in my home at my breakfast bar while waiting for dinner to cook.

    Chain nose pliers. I use pliers to open the ear wire loops and close them once the earring piece is attached. My preferred brand: Wubbers. They’re not cheap but they’re heavy duty. $26.

  • Paper hole punch. I use a small punch to put holes in the cards that I mount earrings on. Figure about $9.

That’s everything I used directly during the course of this project. It doesn’t include rags or paper towels or the wipes I use to keep my workspace clean after sanding. It doesn’t include any of the furniture in my shop — my homemade jeweler’s bench, the tables where I keep my rolling mill and soldering station (where the liver of sulfur lives), or my adjustable height stool. It doesn’t include lighting and utilities for my shop space. Heck, it doesn’t even include the cost of constructing my shop space, which is an entire 12 x 24 foot room in my garage.

Let’s add these costs up:

ItemAcquisition Cost
Rolling Mill$750
Texture Plate$10
Shape Template$8
Fine Point Sharpie$3
Joyce Chen Shears$21
Flex Shaft$120
Flex Shaft Motor Hangar$32
Sandpaper Roll$1
Dapping Block$2
Nylon Hammer$14
Hole Punch$14
Liver of Sulfur$18
Mason Jar$2
Cup Warmer$11
Baking Soda$3
Container$2
Tumbler$110
Ceramic Media$45
Dawn Detergent$2
Extra Tumbler Barrel$36
Stainless Steel Shot$26
Burnishing Compound$10
Chain Nose Pliers$26
Paper Hole Punch$9
Total$1,275

Add that to the $55 in materials and you come up with $1,330. So if the only thing I ever made was those six pairs of earrings, their cost would be $222/pair.

Yes, that’s absurd. Of course I make more than six pairs of earrings with all this stuff. But how many pairs of earrings do I need to make and sell at $39/pair to cover my investment in tools and equipment?

Think about it.

Skills

And then there are skills, which come with training and experience.

I am not exaggerating when I say that I’ve spent thousands of dollars on jewelry making courses — in-person and online — as well as books and magazines. YouTube videos can only take you so far — what works best is one-on-one time with someone who has actually been doing this for a while.

And practice. How many times did I screw up a piece of metal in my rolling mill? Or cutting it apart? Or oxidizing it? (I’m still smarting from a bad oxidation job on 3 pairs of Keum-boo earrings where I used a new (to me) solution and darkened the gold as well as the silver. Ouch.) Or any of the other steps that went into this project? Practice really does make perfect — or as close to it as a person can get. Practice takes time and burns through materials and supplies. It’s no coincidence that we practice with copper instead of silver or — heaven forbid — gold.

Time

Time is easily quantified for this job since I know when I started and when I finished: 3 hours. That comes out to 30 minutes per pair of earrings. This is why I made stuff like this in batches; it’s a much more efficient use of time.

But how long did it take last time when I didn’t necessarily have everything as well organized? And how long will it take next time, when practice makes me a bit faster?

And shouldn’t I be compensated for my time? Clearly, I wasn’t compensated directly for the time I spent in training or reading up on new techniques or ruining materials because of inexperience or dumb errors. I should, at least, be compensated for the time I spent actually creating salable pieces of jewelry, no?

The Bottom Line

Finished Earrings
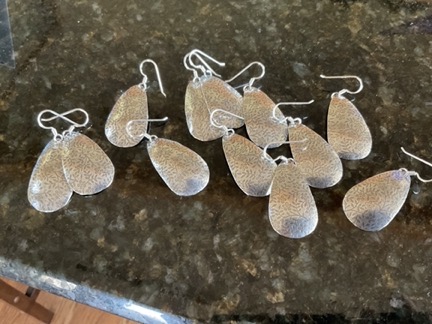
Some of the finished products.

Here’s the bottom line: I took 3 hours of my time and used thousands of dollars worth of training, hundreds of hours worth of practice time, and $1,330 worth of materials, tools, and equipment to make 6 pairs of earrings that I’ll sell for $39/pair.

I think buyers are getting quite a deal, don’t you?

Helicopter Cockpit POV 360° Interactive Video

A very cool cockpit POV 360° Video from the Flying M Air YouTube channel.

THIS IS COOL. I used a GoPro Fusion mounted upside down on the inside of my helicopter, positioning the camera right where a passenger’s head might be. I then flew from the side yard at my house, out near the Three Lakes area of Malaga, and then back to my landing zone at an orchard in Malaga.

READ THESE INSTRUCTIONS BEFORE VIEWING!!!

If you’re watching on a mobile device, be sure to load it into the YouTube app — not your mobile browser — and turn and tilt to change the view. If you’re viewing it on desktop or laptop computer, use your mouse to drag the image in various directions to look all around. On a smart TV, use the arrow buttons to change the view. This is the revised version of the video, which does not change the view by itself.

Don’t forget to check out my pups in the back seat.

HAVE FUN!

Cherry Drying Season Begins. Again.

Can you believe this is my thirteenth season?

Cherry drying season began yesterday for me. It was the earliest start I’ve ever had. At this point, I expect to be on contract until the beginning of August.

Cherry Drying
Here’s a shot of me over the cherry trees a few years ago in my first R44.

I started doing this in 2008, the same summer I turned down a job offer to be a tour pilot in Alaska. That job would have had me landing on glaciers, touring fjords, and sling-loading food to dog sled camps. But it also had very long work days, only mediocre pay, and a long season away from home. I was married at the time — hey, everyone makes mistakes — and my wasband didn’t want me to be away from home so long. So when a chance to spend just about a month flying in Washington state came along, I took that instead. Any opportunity to get out of Arizona’s oppressive summer heat.

Want to learn more about cherry drying, including why we do it? Start with this very old blog post: “Drying Cherries with the Big Fan.” Then read more by following the cherry drying tag.

At the time, although I hoped it would become an annual gig, I never in my wildest dreams expected it to become my primary source of income. Back in 2008, I was still writing computer books for a living, just starting a slide down from a career high in 2004/05. I’d had a helicopter since 2001 but couldn’t make money flying it. The first R44 came in 2005, but it wasn’t until 2007 when I got some lucrative wildlife survey work that the business started turning a profit. Cherry drying carried on that trend. By 2013, when I shed my wasband and moved to Washington full time, I was making more as a pilot than as a writer. (Let’s face it: no one is buying computer books these days.)

Business boomed over the years. For a while, I kept building my client base — and the team of pilots who worked with me to serve them. Things leveled off a year or two ago and I generally have the same clients and contracts every year. My team now consists of 5 pilots (including me), most of which come on about 2 weeks after my season has started and leave 2 to 3 weeks before my season ends.

Mr Bleu
My R44 Raven II helicopter, “Mr Bleu,” parked out at his summer cherry drying base. I put on his blade cozies to protect the blades from forecasted hail in thunderstorms this weekend. Beyond him is a Hiller belonging to another pilot who isn’t working with me; all my guys fly R44s.

My formula is simple: work as a team to serve all the clients equally. Keep all pilots flying as much as possible, no matter which client calls. If only one big orchard needs drying, put multiple pilots on it to get it done fast. Don’t contract for more acreage than we can cover within a reasonable time. Oh, and make sure all of the orchards are in a tight little area so pilots don’t waste time deadheading from one orchard to another.

With few exceptions, my team is different every year. While I’d love to work with the same group of guys every year — 2016’s team really stands out for how well we worked together on the rainiest year I’ve ever seen here — few guys seem interested in doing this every year. They don’t see it the way I did: as a paid vacation with some time off for paying work in a place with lots of recreational opportunities. (Hell, I bought a boat here — before I moved here — so I could get out on the river during my cherry season.) The ones who do see that — Gary comes to mind — come again and again. Most others drift away, so I wind up building new teams every year.

Things will get busy for me in mid-June, when my guys start showing up. I’ll show them the orchards — probably from the air — give them Google Maps references with orchard locations, and probably fly with them so they know what they need to do. Then I’ll leave them alone until rain looks likely. When the calls start coming, I’ll start dispatching — by phone and on the radio. We’ll all keep flying until the work gets done or it gets dark, whichever comes first.

Of course, I’ll have my GoPros hooked up for most of my flights, collecting new footage for my YouTube channel. Folks really seem to love cherry drying videos — which is something I can’t quite understand. There’s really nothing exciting about the work.


This video from 2016 is my most popular cherry drying video so far, with over 735K views. As I write this, it’s averaging 2,000 views a day.

While the season is on, I’ll find an orchard where I can get permission for us to pick our own cherries. Last year, it was a block full of Rainiers that didn’t get picked because they just didn’t get red enough. (Can you imagine?) On really nice days with no chance of rain, I’ll lend my kayaks or maybe my bicycle out to the pilots. Or maybe I’ll take one or two of them out on my boat. Because we’re all on call during daylight hours 7 days a week and the days are so long, there’s no opportunity to party. We always have to be ready to fly at first light.

Did I mention that none of us can leave the area during the entire time we’re under contract? It’s almost like being under house arrest for me. For them — well, if they play it right, it’s that paid vacation I mentioned above.

Near the end of the season, I’ll have one of my end-of-season BBQs. I’ll smoke up a few racks of ribs and roast a chicken or two. I’ll invite my guys and maybe a few other pilots I’ve met during the season. Then, as the cherries are picked out and the contracts end, the guys will leave, one by one. By the end of July, I’ll be the only one left to cover the few orchard blocks that are yet to be picked. When they’re done, I’m done.

And that’s it for me for the year.

Well, not really. I still do charter flights and tours. And the occasional photo flight. And yes, I still go flying just for fun.

But once my last contract has ended, I usually spend some time trying to get my life back to normal, taking trips out of town and trying hard not to check the weather every half hour. I usually go on vacation, too. In 2017, I finished just in time to go to Oregon to watch the total eclipse of the sun. Other years, I’ve taken my camper into the North Cascades, Canada, and the Olympic Peninsula. Last year, I took a photo cruise among the San Juan Islands. This year, I’m going to Alaska for 10 days. (If I play my cards right, I might go out and land on a glacier with the folks I almost went to work for all those years ago.)

And that’s my cherry drying season routine. Did I know back in 2008 that it would become such a vital part of my financial well-being? Hell no.

But in all honesty, I never expect anything to work out the way it actually does. I’ve just learned to go with it. And I’ve got no complaints about this.

Helicopter Thank You Flight

Another cockpit POV Video on the FlyingMAir YouTube channel.

Join me for a quick flight from one orchard to another while I thank channel members and identify points of interest in flight.

I want to give a big shout-out to channel members. These are the folks who chip in to help me cover the costs of flying and maintaining the helicopter. As I mention in this video, I was pleasantly surprised to see that so many members had stuck with me throughout the winter, despite my failure to produce new content. Their loyalty gives me extra motivation to keep installing the cameras and editing the video from every flight I can. If you can’t or don’t want to become a channel member or patron, please join me in thanking them for helping me out.

You can learn more about becoming a channel member here: https://youtu.be/sHSqlQqeP1A It’s a short video full of bloopers that explains what channel membership is all about and why it’s vital to me.

If you don’t want to give money to YouTube/Google, I get it. I opened a Patreon account for folks just like you. Find it here: https://www.patreon.com/FlyingMAir Be aware that Patreon might add sales tax to your contribution — for reasons I still don’t understand.

You can also support the channel through the purchase of a hat, t-shirt, sticker, or magnet on my etsy store: https://www.etsy.com/shop/FlyingMAir

And if none of these things appeal to you (for any reason), you can also support me by subscribing to the channel, sharing my videos, and commenting when you see something you like.

Thanks for all your support!

About Me and the Helicopter

  • I have been flying for about 20 years. My nearly 4,000 hours of flight time is in Robinson R44, Robinson R22, and Bell 206L (Long Ranger) helicopters.
  • The helicopter is a 2005 Robinson R44 Raven II — the same one that appears in the photo at the beginning of the video. You can learn more about them here: https://robinsonheli.com/r44-specifications/ I own this helicopter. It is the third helicopter I’ve owned since 2000.
  • My helicopter has ADS-B Out and is picked up by radar facilities. You can see my track for recent flights on Flightradar24: https://www.flightradar24.com/data/aircraft/n7534D This is a great site for tracking any almost any flight, including the airlines.

About the Video

I try to drop cockpit POV videos on Sunday mornings and “extras” with more info about owning and operating a helicopter midweek. (Some channel members get early access to some of these videos.) I also host occasional livestreams with Q&A chats. Subscribe and turn on the notification bell so you don’t miss anything new! And tell your friends. I’m trying hard to deliver good videos and grow my subscriber base.

Some links on my channel are affiliate links, including all links to Amazon (https://amzn.to/32PLHTD) and MyPilotPro (https://mypilotpro.com/shop/?wpam_id=13). If you click one of them and buy something, I get a small referral reward. It doesn’t cost you anything so I hope you’ll shop with one of those links. Thanks.

Want to support the FlyingMAir channel? Here are four suggestions: